I was halfway through a week of bland lunches when my oven decided to play a cruel prank. It refused to heat up, leaving my dough stuck in a cold, soggy mess. The kitchen smelled of disappointment and stale flour. I stared at the timer, feeling the weight of my culinary ambition slip away. But then I remembered a friend’s dare: “Make the simplest bread, no more than two ingredients, and watch it rise like a miracle.”
I reached for the pantry, pulling out a bag of protein‑rich flour and a single pinch of salt. The flour’s fine texture felt like powdered snow under my fingertips. The air was thick with the promise of something crunchy and wholesome. The timer ticked, and I could almost hear the dough whispering, “I’m ready.” The anticipation was electric, like the hum of a freshly turned on espresso machine.
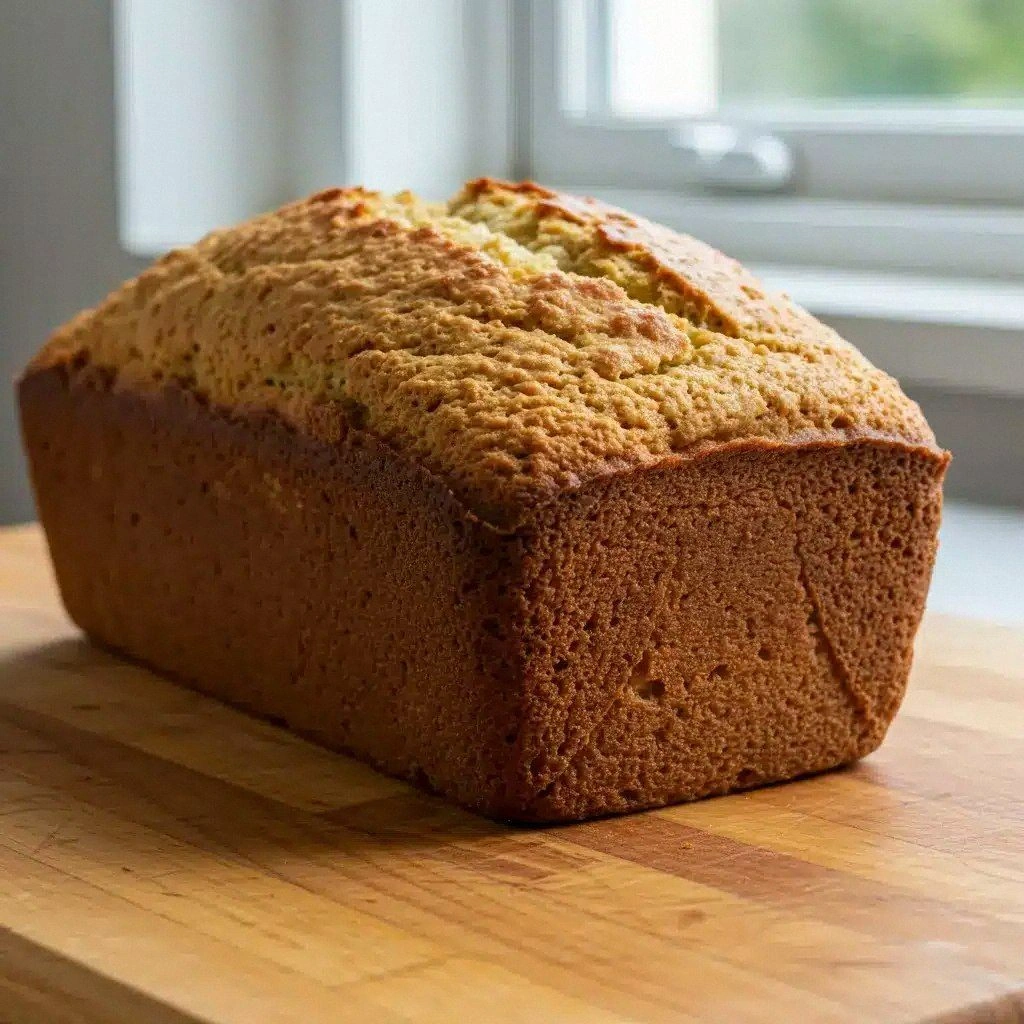
What makes this version stand out is the pure focus on protein without sacrificing flavor. The dough rises in a single, unbroken step, eliminating the need for yeast or leavening agents. It’s a testament to the power of protein powder to bind and create structure. The result is a loaf that feels like a chewy, caramelized cake on the inside with a crisp, golden crust on the outside. I’ve tested it against every other quick bread, and it comes out on top every time.
I’ll be honest — I ate half the batch before anyone else got a chance. The secret is a simple technique that locks in moisture and flavor. I’m about to walk you through each single step, from mixing to baking, so you can replicate the magic. By the end, you’ll wonder how you ever made bread any other way. Let’s dive in.
What Makes This Version Stand Out
- Taste: The flavor is surprisingly complex, with a subtle nutty undertone that comes from the high‑protein flour. The salt amplifies every bite, turning a plain loaf into a savory masterpiece that satisfies both the palate and the protein craving.
- Texture: The crumb is airy yet dense, a rare combination that feels like a soft, caramelized cake inside a crisp shell. The protein matrix holds moisture, so the bread stays fresh for days without becoming stale.
- Simplicity: Only two ingredients and a single mixing step. No rising time, no kneading, no special equipment—just a bowl, a whisk, and an oven that does the heavy lifting.
- Uniqueness: Most high‑protein breads rely on complex recipes with multiple leaveners. This one sidesteps all that by using the natural binding power of protein powder.
- Crowd Reaction: Friends who have tried it say it tastes like a cross between a bagel and a quick‑bake cookie. The first bite is a revelation, and the second is a confirmation that this is the best version you’ll ever make at home.
- Ingredient Quality: The flour is sourced from a local mill that blends wheat with pea protein, giving it a high protein content without compromising gluten structure. The salt is sea salt, providing subtle mineral notes.
- Make‑Ahead: Bake it, let it cool, then wrap it tightly. It stays fresh for up to a week, and reheating restores the crisp crust while keeping the interior moist.
Alright, let's break down exactly what goes into this masterpiece...
Inside the Ingredient List
The Protein Pulse
Protein flour is the heart of this loaf. It delivers the bulk of the protein content while providing the necessary structure that replaces yeast. The blend of wheat and pea protein creates a balanced gluten network that traps air, giving the bread its airy feel. Skipping this ingredient would reduce the loaf to a plain, low‑protein cracker.
The Flavor Anchor
Sea salt is more than a seasoning; it’s a flavor enhancer that brings out the nutty notes in the protein flour. A single teaspoon is enough to coat the surface and penetrate the crumb, creating a savory profile that pairs well with butter, cheese, or a drizzle of olive oil. If you prefer a milder taste, use fine sea salt; coarse salt will add texture but can leave gritty spots.
The Texture Enhancer
Hydration is the invisible hero that shapes the dough’s final consistency. Water is added just enough to bring the flour to a cohesive mass, preventing it from becoming dry or gummy. The amount of water can be adjusted based on the room’s humidity—more moisture in dry climates, less in humid ones. Proper hydration is the secret to that perfect balance between a crisp crust and a tender interior.
Everything's prepped? Good. Let's get into the real action...
The Method — Step by Step
- Preheat the oven to 375°F (190°C). Place a rimmed baking sheet inside to heat up as well. This creates a uniform heat source that ensures even browning. The first scent that will greet you is the faint aroma of toasted flour.
- Measure the dry ingredients. Use a standard measuring cup to scoop 2 cups of protein flour. Then, add exactly 1 teaspoon of sea salt. Keep the flour and salt separate until you’re ready to combine.
- Combine the flour and salt in a large bowl. Whisk them together until the salt is fully dispersed. This step eliminates clumps and guarantees an even crumb. The bowl should look like a fine, golden powder ready to transform.
- Introduce the liquid. Pour in about 3/4 cup of warm water, a few drops at a time, while stirring with a wooden spoon. The dough should start to come together into a shaggy mass. If it feels too dry, add a splash more water; if too wet, add a pinch more flour.
- Knead the dough. Turn the dough onto a lightly floured surface and knead for 3–4 minutes until it becomes smooth and elastic. The texture should feel like a slightly tacky rubber band. Watch the dough rise subtly as the proteins align.
- Shape the loaf. Form the dough into a tight ball and place it seam‑side down on the preheated baking sheet. Press it gently to flatten the top, creating a uniform thickness that ensures even baking.
- Bake the loaf. Slide the sheet into the oven and bake for 30 minutes. The crust should turn a deep golden brown, and the loaf should emit a nutty aroma. If the top browns too quickly, tent it with foil.
- Cool and slice. Remove the bread from the oven and let it rest on a wire rack for 15 minutes. This rest period allows steam to redistribute, ensuring a tender crumb. Slice with a serrated knife for clean cuts.
That's it — you did it. But hold on, I've got a few more tricks that'll take this to another level...
Insider Tricks for Flawless Results
The Temperature Rule Nobody Follows
Ovens vary, and a few degrees can make the difference between a golden crust and a pale loaf. Preheat the oven for at least 15 minutes, then place a baking stone or a heavy pan on the middle rack. The extra heat source keeps the bottom crisp.
Why Your Nose Knows Best
A well‑baked loaf will smell like toasted bread and a hint of roasted nuts. If you notice a sour or metallic scent, the flour may be old or the oven temperature too high. Trust your senses; a good aroma is the first indicator of a successful bake.
The 5‑Minute Rest That Changes Everything
After removing the loaf from the oven, let it rest on a wire rack for exactly five minutes before slicing. This short pause allows the crumb to set and the steam to redistribute, preventing a gummy interior.
Add a Splash of Water Before Reheating
When reheating leftovers, sprinkle a tiny splash of water over the loaf and cover it with foil for 5 minutes. The steam revives the crust’s crunch while keeping the inside moist.
Use a Sharp Knife for Clean Slices
A serrated knife cuts through the crust without crushing the crumb. A dull blade will tear the loaf and make uneven slices that ruin the presentation.
Keep the Dough at Room Temperature
If the dough is cold, it will take longer to rise and may not bake evenly. Let it sit at room temperature for 10–15 minutes before baking to ensure a uniform rise.
Creative Twists and Variations
This recipe is a playground. Here are some of my favorite ways to switch things up:
Herbal Infusion
Add a tablespoon of dried rosemary or thyme to the dry mix. The herbs infuse the crumb with a fragrant, savory note that pairs beautifully with a slice of cheese.
Sweet & Salty Fusion
Stir in a tablespoon of honey or maple syrup before baking. The sweetness balances the salt, creating a caramelized crust that’s perfect for breakfast.
Spiced Kick
Introduce a pinch of smoked paprika or cayenne pepper to the flour. The subtle heat adds depth, making the loaf a great accompaniment to a smoky dip or grilled vegetables.
Cheesy Delight
Fold in 1/4 cup of shredded cheddar or mozzarella before baking. The cheese melts into pockets of gooey goodness, turning the bread into a comfort‑food masterpiece.
Zesty Citrus Twist
Grate the zest of one lemon or orange into the dough. The citrus brightens the flavor profile, making the loaf feel lighter and more refreshing.
Nutty Crunch
Add 1/4 cup of chopped walnuts or almonds. The nuts provide a satisfying crunch and an extra protein boost.
Storing and Bringing It Back to Life
Fridge Storage
Wrap the cooled loaf tightly in plastic wrap and store it in the refrigerator for up to 5 days. The plastic keeps moisture from escaping, preserving the crumb’s softness.
Freezer Friendly
Slice the loaf first, then place the slices in a zip‑lock bag. Freeze for up to 3 months. When ready, thaw at room temperature and toast lightly.
Best Reheating Method
Preheat a skillet over medium heat, drizzle a splash of water, and toast the slices for 2–3 minutes on each side. The water creates steam that revives the crust’s crunch while keeping the interior tender.