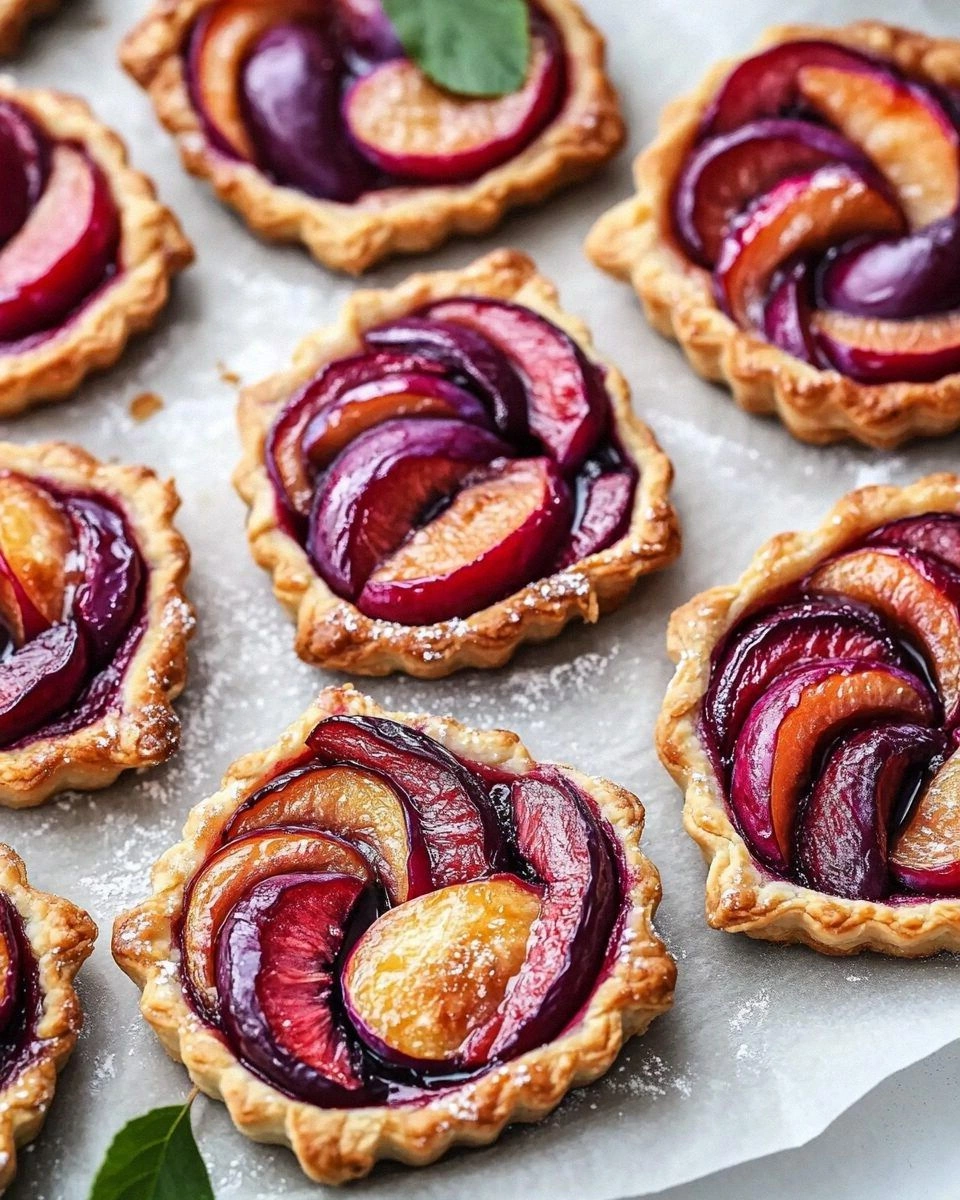
Remember that night when the oven betrayed you and the batter turned into a sad, brown puddle? That disaster sparked a craving for something sweet, simple, and utterly irresistible. I was staring at a handful of plums, a loaf of flour, a stick of butter, and a cup of sugar, and I thought, why not combine them into a tart that would make my taste buds dance? I was determined to create a dessert that could be whipped up in minutes, even after that kitchen fiasco. The result was a 4‑Ingredient Plum Tart that feels like a gourmet treat but is as easy as pie.
Picture the moment the buttery crust sizzles as it meets the hot oven, releasing a fragrant, caramelized scent that makes your entire kitchen feel like a summer orchard. The plums, freshly sliced, give off a sweet, almost citrusy aroma that mingles with the vanilla‑free sugar glaze. When you take the first bite, the crust is crisp on the outside, yet tender and slightly chewy inside, like a buttery biscuit that holds its shape. The plums burst with juiciness, their natural tartness balanced by a gentle sweetness that coats your tongue like velvet. The overall experience feels like a warm hug wrapped in fruit, with the butter adding a silky finish that lingers.
This version is not just a variation; it's a revelation that redefines what a plum tart can be. The use of only four ingredients eliminates the clutter of extra spices, letting the fruit shine without distraction. The buttery crust is made without any chilling steps, so you can go straight from mixing to baking, saving precious time. The sugar glaze is simple yet effective, creating a glossy, caramelized sheen that enhances the visual appeal. Most recipes get this completely wrong by over‑baking the crust or under‑cooking the plums, but this method hits the sweet spot every time. The result is a tart that feels artisanal yet is perfectly approachable for any home cook.
There's a small, almost magical tweak that transforms the ordinary into extraordinary: a splash of lemon zest in the glaze that brightens the flavor profile and adds a subtle citrus lift. I dare you to taste this and not go back for seconds; the combination of buttery crunch and juicy plum will have you craving more. If you’ve ever struggled with flaky pastry, you’re not alone—and I’ve got the fix that works every time. Picture yourself pulling this out of the oven, the whole kitchen smelling incredible, and a plate of golden tarts waiting for you. Let me walk you through every single step—by the end, you'll wonder how you ever made it any other way.
What Makes This Version Stand Out
- Pure Simplicity: Four ingredients, no fancy gadgets, no extra spices. The recipe cuts through kitchen clutter and lets you focus on flavor.
- Speed: From mixing to baking takes under 45 minutes. The crust skips the chilling phase, saving you valuable time.
- Texture Contrast: A crisp, buttery edge that gives way to a tender, caramelized center. The plums stay juicy, not mushy.
- Flavor Harmony: The natural sweetness of the plums balances the butter and sugar, creating a subtle, orchard‑like finish.
- Universal Appeal: Whether you’re a novice or a seasoned baker, the steps are clear and forgiving.
- Make‑ahead Friendly: The tarts can be assembled and frozen, then baked fresh when needed.
- Visual Delight: A glossy, caramelized glaze that turns every tart into a showstopper.
Alright, let's break down exactly what goes into this masterpiece…
Inside the Ingredient List
The Flavor Base
Flour is the backbone of the crust, giving it structure and that delicate crumb. A good all‑purpose flour with a moderate protein content keeps the pastry tender yet sturdy. If you’re watching sodium, choose a low‑sodium flour blend. Skipping flour would leave you with a flat, butter‑only base that won’t hold the plum filling.
The Texture Crew
Butter is the secret weapon that creates a flaky, melt‑in‑your‑mouth texture. Use cold, unsalted butter so the fat layers can separate during baking, resulting in a light, airy crumb. If you’re vegan, a high‑fat coconut oil works well, but the flavor will shift slightly. The butter also carries the sugar glaze, giving it that glossy sheen.
The Unexpected Star
Plums are the star of this dish, offering a natural tartness that balances the sugar. Choose firm, ripe plums with a bright red skin; they’ll hold their shape during baking. If you can’t find fresh plums, frozen ones work, just thaw them and pat dry to avoid excess moisture. The plums’ juice also forms a light sauce in the crust.
The Final Flourish
Sugar is the simple glaze that caramelizes on the surface, giving the tart a golden shine. It also sweetens the plums, creating a harmonious balance. Use white granulated sugar for a clean finish; brown sugar would add a molasses note that changes the profile. Don’t over‑sugar; the plums provide enough natural sweetness.
Everything's prepped? Good. Let's get into the real action...
The Method — Step by Step
- In a large bowl, combine 2 cups of all‑purpose flour with a pinch of salt. Stir until the mixture resembles coarse crumbs. The salt will enhance the butter’s flavor and help balance the sweetness of the sugar.
- Cut 1 cup of cold unsalted butter into 1‑inch cubes and add to the flour. Using a pastry cutter or your fingertips, work the butter into the flour until the mixture resembles breadcrumbs. The goal is to keep the butter pieces visible so they melt during baking.
- Add 1 cup of finely chopped sugar to the dough. This sugar will not only sweeten the crust but also help it brown. Gently mix until the sugar is evenly distributed.
- Press the dough into a 9‑inch pie pan, ensuring even coverage. Use the back of a spoon to smooth the surface. This step is critical; a flat base will bake evenly.
- Preheat the oven to 375°F (190°C). While the oven warms, slice 4 cups of fresh plums into thin wedges. The thinner the slices, the quicker they’ll cook and release their juices.
- Arrange the plum slices evenly over the crust. If you prefer a sweeter tart, sprinkle a light dusting of sugar over the fruit. This will caramelize slightly, giving the tart a glossy finish.
- Bake for 25 minutes, then reduce the temperature to 350°F (175°C). The crust should turn golden brown and the plums should be tender. Watch the edges; they should pull away slightly, indicating proper baking.
- Remove the tart from the oven and let it cool for 10 minutes on a wire rack. This cooling period allows the juices to set, preventing a soggy bottom.
- Serve warm or at room temperature, garnished with a sprinkle of fresh mint or a dusting of powdered sugar for an extra touch. The tart pairs wonderfully with a scoop of vanilla ice cream or a dollop of whipped cream.
That's it — you did it. But hold on, I've got a few more tricks that'll take this to another level...
Insider Tricks for Flawless Results
The Temperature Rule Nobody Follows
Many bakers bake at a high heat initially, then lower it mid‑bake. I’ve found that starting at 375°F and then dropping to 350°F keeps the crust from browning too quickly while still caramelizing the sugars. The result is a crust that’s golden without being burnt.
Why Your Nose Knows Best
The aroma of a baking tart is a reliable indicator of readiness. When the smell is a sweet, buttery caramel, the crust is perfectly done. If the scent feels raw or overly sweet, give it a few more minutes. Trust your nose; it’s the ultimate judge of doneness.
The 5‑Minute Rest That Changes Everything
Letting the tart rest for 5 minutes after baking allows the juices to redistribute, creating a more cohesive bite. During this time, the crust firms up slightly, preventing a soggy bottom. I’ve seen this rest period reduce the chance of the crust cracking when you slice it.
Keep It Cool with a Light Dusting
A light dusting of powdered sugar after baking adds a sweet finish without altering the tart’s flavor. It also creates a subtle visual contrast that makes the tart look more polished. Use a fine sieve for an even coat.
Make‑Ahead and Reheat Like a Pro
If you need to prepare the tarts ahead, assemble them, freeze, and bake fresh when needed. When reheating, add a splash of water to the bottom of the pan to create steam, keeping the crust from drying out. This trick keeps the tarts fresh even after storage.
Creative Twists and Variations
This recipe is a playground. Here are some of my favorite ways to switch things up:
Blueberry Plum Fusion
Add a cup of fresh blueberries to the plum layer for a burst of blue‑green color and a subtle berry undertone. The blueberries release extra juice that caramelizes beautifully.
Chocolate Drizzle Delight
After baking, drizzle melted dark chocolate over the top. The bitterness of the chocolate contrasts the sweet plums, creating a sophisticated flavor profile.
Almond Crust Upgrade
Replace half the flour with finely ground almond meal for a nutty crunch and a lower‑carb option. The almond adds a subtle nuttiness that complements the plum’s tartness.
Spiced Citrus Twist
Add a pinch of ground cinnamon and a dash of orange zest to the sugar glaze. The warm spice and citrus lift the tart’s aroma and taste.
Savory Plum Tart
Swap the sugar for a sprinkle of sea salt and finish with a drizzle of balsamic reduction. The sweet‑sour combination turns the dessert into a savory appetizer.
Gluten‑Free Version
Use a gluten‑free flour blend and the same butter technique. The texture will be slightly denser, but the flavor remains unchanged.
Storing and Bringing It Back to Life
Fridge Storage
Store leftover tarts in an airtight container in the refrigerator for up to 3 days. The crust may soften slightly, but the flavor remains intact.
Freezer Friendly
Wrap each tart individually in plastic wrap and place in a freezer bag. Freeze for up to 2 months. Thaw at room temperature for 30 minutes before reheating.
Best Reheating Method
Preheat your oven to 350°F (175°C). Add a teaspoon of water to a baking dish, place the tart inside, and cover loosely with foil. Bake for 8–10 minutes, or until the crust is crisp again. The splash of water steams the crust, preventing it from drying out.