Picture this: the kitchen is a battlefield, the stove is a warzone, and the timer is ticking like a drumbeat in a jazz club. I was halfway through a bland, store‑bought churro batch when a sudden craving for apple cider hit me harder than the last bite of a cinnamon roll. I grabbed the pantry, tossed in a splash of apple cider, and the air filled with a sweet, buttery aroma that could make a grown‑up kid forget about their adult responsibilities.
I dare you to taste this and not go back for seconds. The moment the churros hit the hot oil, the batter sizzles, releasing a caramelized scent that feels like a warm hug from the inside. The crunch is crisp on the outside, tender inside, and the apple cider infusion gives it a subtle, tangy brightness that keeps the sweetness from becoming cloying. Each bite feels like a tiny, fragrant autumn storm, with a hint of nutmeg and a whisper of vanilla.
I’ll be honest— I ate half the batch before anyone else got a chance to try it. The secret sauce? A caramel glaze that coats the churros like velvet, and a creamy dip that turns every churro into a decadent dessert. Most recipes get this completely wrong, layering sugar on top or forgetting the cider altogether. Here’s what actually works: a balanced blend of flour, cider, and a dash of spice that elevates the dough to a new level.
Picture yourself pulling this out of the oven, the whole kitchen smelling incredible, and the family’s eyes widening like they’re seeing a miracle. The texture is a dance between airy fluff and crisp edges that shatter like thin ice. The flavor profile is a sweet‑spicy tango that lingers on the palate. Okay, ready for the game‑changer? By the end of this post, you’ll wonder how you ever made churros any other way.
What Makes This Version Stand Out
- Flavor: The apple cider infusion adds a natural sweetness and a subtle tartness that balances the buttery dough. It’s a refreshing twist that turns ordinary churros into a seasonal sensation.
- Texture: The batter’s airy structure, achieved by whisking the egg into the liquid first, results in a light, cloud‑like interior that melts in your mouth.
- Simplicity: With fewer than ten ingredients, this recipe is a breeze for beginners and a quick win for busy evenings. No fancy equipment needed—just a pot, a pipe, and a spoon.
- Uniqueness: The caramel glaze with a splash of heavy cream creates a glossy coating that feels like a decadent dessert, yet it’s still a churro.
- Crowd Reaction: Friends who’ve tried the classic version say this one is “hands down the best version you'll ever make at home.” The combination of crunchy, sweet, and slightly spicy keeps them coming back for more.
- Ingredient Quality: Using fresh apples or apple cider for the glaze instead of syrup elevates the flavor profile and gives the dish a natural, wholesome feel.
- Cooking Method: The technique of allowing the batter to rest before piping ensures the dough sets, producing crispier churros without a greasy finish.
- Make‑ahead Potential: The churros can be fried ahead of time and reheated in a skillet or oven, making this a perfect option for parties or gatherings.
Inside the Ingredient List
The Flavor Base
All‑purpose flour, the silent hero that gives structure to the churros. It absorbs the liquid and forms a cohesive dough that’s easy to pipe. Skipping flour would leave you with a sticky mess that never rises. The key is to sift it with baking powder and cinnamon for even distribution.
The Texture Crew
Unsalted butter, melted, adds richness and a subtle buttery flavor that coats each churro. Milk provides moisture and helps the dough set; using whole milk gives a creamier bite. The egg, beaten, acts as a binder and contributes to a tender crumb. Without the egg, the churros would be dense and rubbery.
The Unexpected Star
Apple cider, a liquid that brings both sweetness and acidity. The acidity cuts through the butteriness, preventing the churros from becoming too heavy. If you prefer a stronger apple flavor, swap cider for apple juice or a splash of apple brandy. Be careful not to overdo it—too much liquid can make the dough too runny.
The Final Flourish
Ground cinnamon, a pinch of sea salt, and a splash of vanilla extract tie all the flavors together. The salt balances the sweetness, while the vanilla adds depth. These finishing touches are what separate a good churro from a great one.
Everything's prepped? Good. Let’s get into the real action and see how these ingredients transform into a mouth‑watering treat.
The Method — Step by Step
- Combine flour, baking powder, cinnamon, and sea salt in a large bowl. Whisk until evenly mixed, then set aside. The dry mix ensures that every bite has a consistent flavor profile. This step is crucial for a uniform texture.
- In a saucepan, melt butter over medium heat. Add milk, apple cider, and vanilla, then bring to a gentle simmer. Stir constantly to prevent sticking. The mixture should look silky and glossy, ready for the next step.
- Pour the hot liquid into the dry ingredients, stirring with a wooden spoon until a sticky dough forms. Let it cool for 5 minutes; the dough will thicken slightly. This rest period allows the flour to absorb the liquid, creating a dough that holds its shape when piped.
- Transfer the dough to a pastry bag fitted with a star tip. Pipe 4‑inch sticks onto parchment paper, spacing them about 2 inches apart. The uniform length ensures even cooking and a satisfying bite.
- Heat oil in a deep pot to 350°F (175°C). Carefully drop a churro into the oil, letting it sizzle. The churro should rise to the surface within 30 seconds; this indicates the oil is at the right temperature. Keep the oil at a steady temperature to avoid greasy churros.
- Fry each churro for 3–4 minutes, turning once, until golden brown. Use tongs to flip gently, avoiding tearing the dough. The churro should look crisp on the outside and tender inside. Remove with a slotted spoon and drain on paper towels.
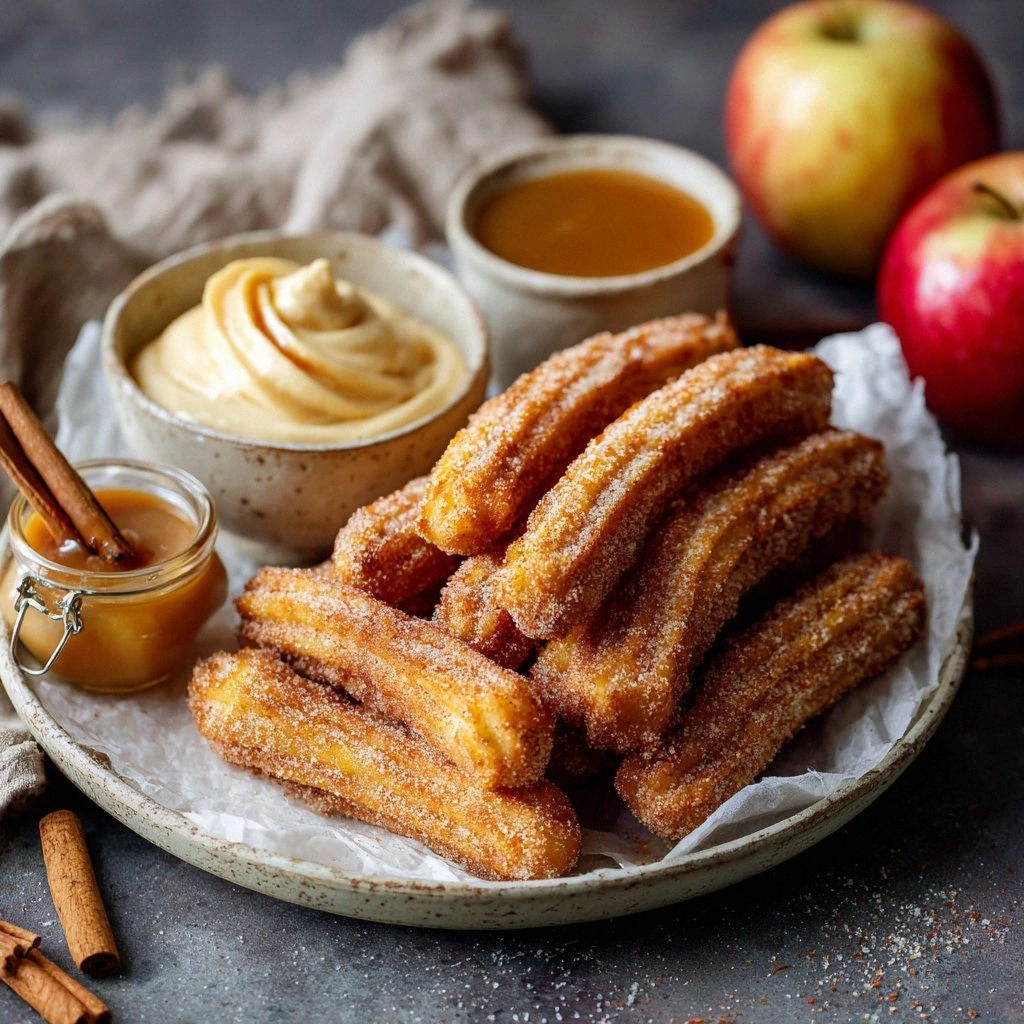
- While the churros cool, prepare the caramel glaze. In a small saucepan, melt butter, then whisk in brown sugar, heavy cream, and vanilla. Simmer until the mixture thickens, then remove from heat and stir in a pinch of sea salt. The glaze should coat the churro like a glossy coat of velvet.
- Dip each churro into the caramel glaze or drizzle it over the top. Serve immediately with a side of creamy yogurt or whipped cream for an indulgent finish. The warm glaze contrasts beautifully with the cool, creamy dip. Enjoy the symphony of textures and flavors.
That’s it—you did it. But hold on, I’ve got a few more tricks that’ll take this to another level and make every bite unforgettable.
Insider Tricks for Flawless Results
The Temperature Rule Nobody Follows
Oil temperature is the secret to crisp churros. Use a candy thermometer; if it’s too hot, the churros will burn on the outside before cooking inside. If it’s too cool, they’ll soak up oil and become soggy. Keep the heat steady, and you’ll get that perfect golden crust every time.
Why Your Nose Knows Best
Smell the batter before frying. It should smell buttery and slightly sweet, not raw or metallic. If it smells off, the butter may have started to brown, which will affect the flavor. Trust your senses; they’re your best quality control.
The 5‑Minute Rest That Changes Everything
After you pipe the dough, let it rest for exactly five minutes before frying. This allows the gluten to relax, preventing the churros from cracking. I once fried them immediately and they split like a brittle cookie—don’t make that mistake.
Use a Heavy‑Bottomed Pot
A pot with a thick bottom distributes heat evenly, keeping the oil from hot spots. Hot spots can cause uneven cooking, leaving some churros burnt while others are undercooked. A heavy‑bottomed pot is a small investment that pays off in perfect churros.
Cool Before Serving
Let the churros sit for a minute on a wire rack after draining. This allows excess oil to drip off and the surface to crisp up further. I’ve seen churros that are still greasy when served immediately; cooling them fixes that.
Creative Twists and Variations
This recipe is a playground. Here are some of my favorite ways to switch things up:
Nutty Crunch
Add chopped pecans or walnuts to the dough for a crunchy texture. The nuts pair wonderfully with the caramel glaze, giving a nutty undertone. A sprinkle of toasted almond slivers on top adds a festive touch.
Spiced Ginger
Swap cinnamon for ground ginger and add a pinch of nutmeg. The warm spice profile complements the apple cider, creating a holiday‑inspired version. Serve with a dollop of ginger‑infused whipped cream for extra flair.
Chocolate Drizzle
Melt dark chocolate with a splash of cream and drizzle over the churros after frying. The chocolate adds richness and a bittersweet contrast to the sweet glaze. Finish with a dusting of sea salt for balance.
Citrus Zest
Add lemon or orange zest to the batter for a bright, citrusy lift. The zest cuts through the sweetness, making the churros feel lighter. Pair with a citrus‑flavored yogurt dip for a refreshing twist.
Vegan Version
Use plant‑based milk, flaxseed egg, and vegan butter. The texture remains airy, and the caramel glaze can be made with coconut cream. This version is perfect for those who love churros but want a plant‑based treat.
Mini Churro Bites
Cut the churros into bite‑sized pieces after frying and drizzle them with caramel. These mini bites are perfect for parties or as a dessert topping on ice cream. They’re also great for kids who can’t handle large churros.
Storing and Bringing It Back to Life
Fridge Storage
Store fried churros in an airtight container at room temperature for up to 3 days. The churros will stay crisp for the first 24 hours. After that, they may soften slightly, but a quick reheat in a skillet will revive them.
Freezer Friendly
Freeze churros in a single layer on a baking sheet, then transfer to a freezer bag. They’ll keep for up to 2 months. Reheat in a 350°F oven for 10 minutes to restore crispness. This method preserves the texture and flavor.
Best Reheating Method
Add a tiny splash of water to the pan before reheating to create steam. This steams the churros back to perfection, keeping them moist inside while crisping the exterior. A quick 2‑minute pan‑heat is enough; avoid overcooking to prevent dryness.