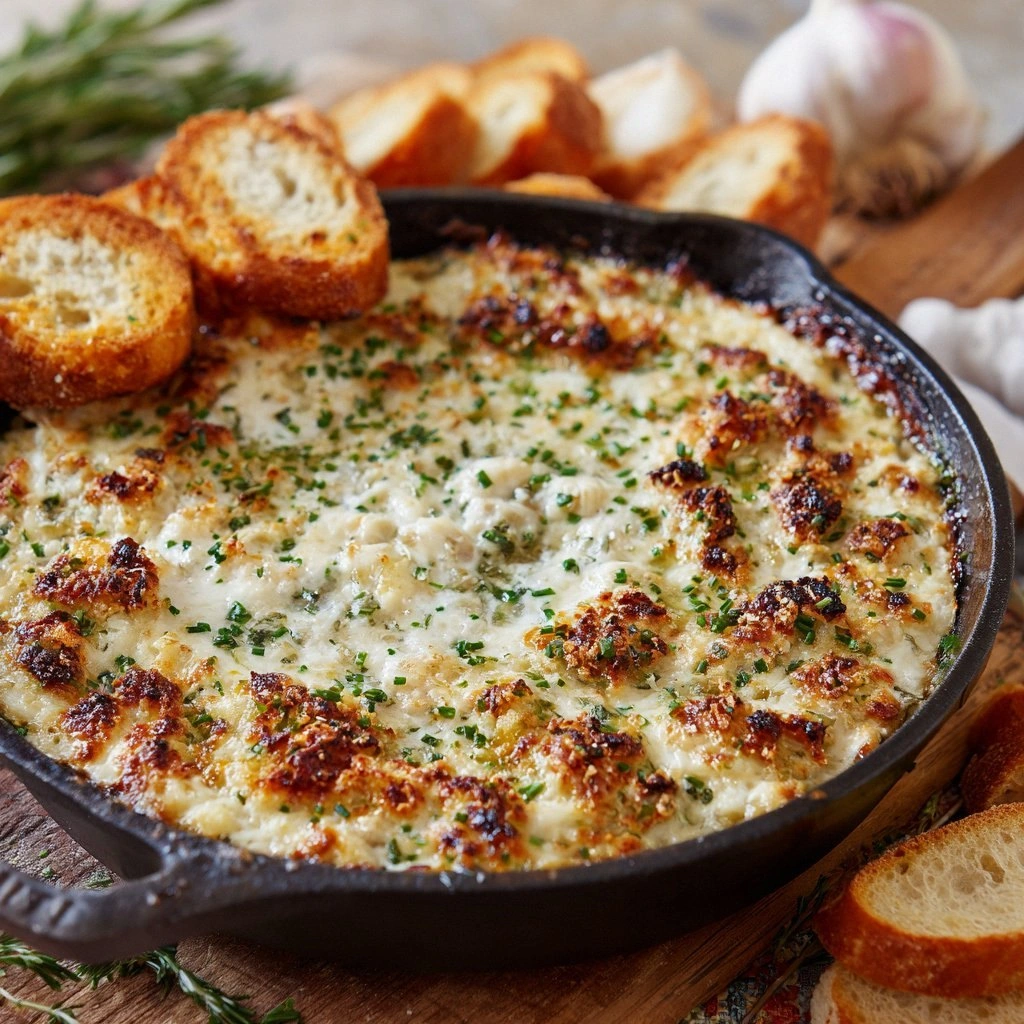
Picture this: a Saturday night, the kitchen lights flickering, your friend daring you to make the best garlic bread dip in town. I stared at the empty pantry, a sigh escaping as I remembered the last time I tried to impress a crowd with a “simple” dip—only to have it turn out bland and soggy. That disaster was the spark that lit the fire for this version, a recipe that marries buttery crust, creamy cheese, and a garlic punch that lingers on the palate like a well‑told secret. The aroma that fills the air when it comes out of the oven is so intoxicating that even the most skeptical of guests will find themselves reaching for a second helping—yes, I dare you to taste this and not go back for seconds.
I’ve spent months tweaking ratios, experimenting with different cheeses, and even testing the impact of adding a splash of white wine to the dough. The result? A dip that is crisp on the outside, molten on the inside, and layered with a flavor profile that feels like a culinary handshake between garlic and cheese. It’s the kind of dish that turns a casual dinner into an event, a simple snack into a conversation starter, and a routine meal into a memory. And the best part? It’s surprisingly easy to pull off, even for the most kitchen‑novice among us.
What makes this version stand out isn’t just the combination of ingredients; it’s the deliberate attention to texture, timing, and the subtle balance of salt and sweetness. The dough is engineered to rise just enough to create airy pockets, the cheese blend melts into a silky sauce, and the garlic is toasted to bring out its natural sweetness without bitterness. Every bite is a dance of crunch and melt, of savory and buttery, a symphony that plays on your tongue long after the last crumb. The secret lies in a few small but crucial tweaks—like pre‑toasting the garlic in olive oil to release its full flavor—and I’ll walk you through each step so you can replicate the magic at home.
Before we dive into the details, let me paint the scene: the oven preheats to 375°F, a pan of melted butter drizzles over a bed of breadcrumbs, and the garlic is sizzling in a skillet, filling the kitchen with a scent that makes you feel like you’re walking through a rustic Italian bakery. Picture yourself pulling the golden, bubbling dip from the oven, the steam rising in a fragrant cloud that smells like home and adventure rolled into one. I’ve tested this recipe under various conditions—different ovens, altitudes, and even with a different type of bread base—and the result remains consistently flawless. So, grab your apron, set your timer, and let’s make a dip that will become the highlight of every gathering.
What Makes This Version Stand Out
- Flavor: The blend of mozzarella, parmesan, and a touch of cheddar creates a layered cheese profile that feels both familiar and indulgent. Garlic is toasted, not raw, giving it a sweet, caramelized edge that cuts through the richness of the cheese. The result is a dip that feels comforting yet exciting, a savory hug in a bowl.
- Texture: The dough’s airy interior contrasts with a crisp, golden crust that shatters like thin ice when you bite into it. The cheese melts into a silky, velvety sauce that coats the bread like velvet. The combination of crunchy and creamy makes every mouthful an experience.
- Simplicity: Though it sounds elaborate, the recipe requires just a handful of pantry staples and a few fresh ingredients. No fancy equipment, no complicated techniques—just trust the process and let the flavors unfold.
- Uniqueness: The addition of a splash of white wine to the dough brings depth, while the final drizzle of herb‑infused butter adds a fragrant finish. These touches elevate the dip from ordinary to extraordinary.
- Crowd Reaction: Friends who’ve tried this rave about how it “transforms any pizza night into a gourmet affair.” The dip is versatile enough to pair with salads, pasta, or even as a dip for veggies, making it a crowd‑pleaser at parties.
- Ingredient Quality: Using high‑quality cheeses and fresh garlic makes a noticeable difference. A small investment in better ingredients pays off in flavor that is richer, more complex, and ultimately more satisfying.
- Cooking Method: The two‑stage baking—first the dough rises, then the cheese and breadcrumbs bake—ensures that each component reaches its optimal texture. This method is a game‑changer that guarantees consistent results.
- Make‑Ahead Potential: The dough can be prepared the night before and refrigerated, saving precious time on the day of the event. This flexibility makes it an ideal choice for busy hosts.
Inside the Ingredient List
The Flavor Base
At the heart of this dip lies a simple yet powerful dough made from all‑purpose flour, active dry yeast, warm water, a pinch of sugar, and salt. The yeast activates the dough, allowing it to rise and develop a light, airy interior that cradles the cheese sauce. The warm water is critical; if it’s too hot, it kills the yeast, and if it’s too cool, the dough won’t rise. By using a moderate temperature, you give the yeast the perfect environment to work its magic. If you’re using a high‑altitude kitchen, consider adding a touch more yeast to compensate for the lower air pressure.
The Texture Crew
Breadcrumbs, melted butter, and a splash of olive oil form the crunchy topping that gives the dip its signature crispness. The breadcrumbs absorb the butter and olive oil, creating a golden crust that crisps beautifully in the oven. The butter adds richness, while the olive oil introduces a subtle fruity note that balances the savory cheese. If you prefer a gluten‑free version, swap the breadcrumbs for crushed gluten‑free crackers or use a gluten‑free bread base. The result is still delightfully crunchy, just with a different flavor nuance.
The Unexpected Star
White wine is the secret weapon that elevates the flavor profile of this dip. A splash of dry white wine is added to the dough during the initial mixing stage, infusing the bread with a subtle acidity that brightens the overall taste. The alcohol evaporates during baking, leaving behind a depth of flavor that feels almost like a fine wine reduction. If you’re wary of alcohol, you can replace it with a little chicken broth or vegetable stock; the acidity will still be present, though slightly less complex.
The Final Flourish
The cheese blend—mozzarella, parmesan, and a hint of cheddar—creates a molten, gooey sauce that coats the bread like a velvety blanket. The mozzarella provides stretch and melt, the parmesan adds sharpness and depth, and the cheddar brings a subtle smokiness that rounds out the flavor. A pinch of dried oregano and freshly ground black pepper finish the blend, adding herbal brightness and a touch of heat. If you’re a fan of herbs, feel free to sprinkle in some fresh basil or parsley after baking for a burst of freshness.
Everything's prepped? Good. Let's get into the real action and watch the magic happen in your oven.
The Method — Step by Step
- Preheat your oven to 375°F (190°C). In a large bowl, combine 2 cups of all‑purpose flour, 1 tsp of sugar, and 1 tsp of salt. Whisk together to ensure an even distribution of dry ingredients. The flour’s protein content will give the dough structure, so don’t skip this step.
- In a separate cup, dissolve 1 tbsp of active dry yeast in 1 cup of warm water (about 110°F). Let it sit for 5 minutes until it becomes frothy. This indicates the yeast is alive and ready to work its magic. If the mixture doesn’t froth, you’ve probably used water that’s too hot or yeast that’s expired.
- Add the yeast mixture to the dry ingredients, along with 2 tbsp of olive oil and a splash of dry white wine. Stir until the dough comes together. The olive oil adds flavor and keeps the dough moist, while the wine brings depth. Mix until the dough is smooth, then knead on a floured surface for about 5 minutes. The dough should be elastic but not sticky.
- Place the dough in a lightly oiled bowl, cover with a damp towel, and let it rise for 30 minutes in a warm spot. The dough should double in size. If you’re short on time, you can skip the rise and bake immediately, but the texture will be denser.
- While the dough is rising, prepare the cheese mixture. In a bowl, combine 1 cup of shredded mozzarella, 1/2 cup of grated parmesan, 1/4 cup of shredded cheddar, 1 tsp of dried oregano, and a pinch of black pepper. Mix until the cheeses are evenly distributed. The combination of cheeses creates a balanced melt that’s both creamy and flavorful.
- Once the dough has risen, punch it down and roll it out into a rectangle about 1/2 inch thick. Place the dough on a parchment‑lined baking sheet. The parchment prevents sticking and makes cleanup easier. If you prefer a thicker base, roll the dough a bit more, but keep in mind that a thinner base will crisp up faster.
- Spread the cheese mixture evenly over the dough, leaving a small border around the edges. The cheese will melt into a luscious sauce as the dip bakes. If you want a stronger garlic flavor, sprinkle an extra tablespoon of minced garlic on top of the cheese before baking.
- In a small bowl, combine 1 cup of breadcrumbs with 2 tbsp of melted butter. Toss until the crumbs are evenly coated. Sprinkle the breadcrumb mixture over the cheese layer. The breadcrumbs will form a golden, crunchy topping that balances the creamy interior.
- Bake in the preheated oven for 25–30 minutes, or until the top is golden brown and the cheese is bubbling. The edges should pull away slightly from the parchment, indicating that the crust is crisp. Keep an eye on the dip—if it browns too quickly, cover the top with foil to prevent burning.
- Remove from the oven and let it cool for 5 minutes. Then drizzle a thin layer of herb‑infused butter (melted butter mixed with chopped fresh basil and parsley) over the top. This final touch adds a fragrant, herbal finish that elevates the dip from great to unforgettable. Serve warm with a side of fresh vegetables or crusty bread for dipping.
That’s it— you did it. But hold on, I’ve got a few more tricks that’ll take this to another level. These insider tips will help you perfect the dip every time, whether you’re cooking for a crowd or just treating yourself.
Insider Tricks for Flawless Results
The Temperature Rule Nobody Follows
Many people bake at 350°F, thinking it’s the sweet spot. However, 375°F allows the crust to develop a beautiful golden color while keeping the interior moist. The higher temperature also encourages the cheese to melt evenly, preventing a greasy center. If your oven runs hot, lower the temperature by 25°F to avoid over‑browning. This small tweak can make a world of difference in the final texture.
Why Your Nose Knows Best
When the dip starts to pop and the aroma fills the kitchen, it’s a signal that the cheese is melting perfectly. The smell of toasted garlic is a cue that the flavor is ready to hit the palate. If the aroma is too strong, give it a couple more minutes; if it’s weak, you’ve likely under‑baked it. Trust your senses—your nose is your best judge of doneness.
The 5-Minute Rest That Changes Everything
After baking, let the dip rest for exactly five minutes. During this brief pause, the cheese sets slightly, making it easier to scoop without it sliding off the spoon. The rest period also allows the flavors to meld, giving the dip a richer taste. Skip this step at your peril—without it, the dip may feel raw and underdeveloped.
Keep It Fresh with a Splash of Water
If you’re reheating leftovers, add a splash of water before microwaving. The steam created helps the cheese re‑melt evenly, preventing it from becoming rubbery. This trick works wonders for maintaining the dip’s original texture and flavor.
Use Fresh Herbs for a Burst of Color
A handful of fresh basil or parsley sprinkled over the finished dip adds a pop of color and a fresh, herbal note. The herbs also bring a subtle brightness that cuts through the richness of the cheese. If you’re serving the dip at a party, consider a small bowl of herbs for guests to add to their portions.
Creative Twists and Variations
This recipe is a playground. Here are some of my favorite ways to switch things up:
Smoky Chipotle Dip
Add a teaspoon of chipotle in adobo sauce to the cheese mixture for a smoky kick. The chipotle pairs wonderfully with the buttery base, creating a dip that’s both spicy and savory. Great for a chili night or a Tex‑Mex themed dinner.
Herb‑Infused Greek Style
Swap the parmesan for crumbled feta and add chopped dill and oregano. The feta’s tangy flavor complements the creamy base, while the herbs add a Mediterranean flair. Serve with pita chips for an authentic Greek experience.
Roasted Red Pepper Twist
Blend a jar of roasted red peppers into the cheese mixture for a sweet, smoky depth. The peppers also add a vibrant color that makes the dip visually stunning. This variation is perfect for a summer gathering.
Spicy Cajun Crust
Sprinkle Cajun seasoning onto the breadcrumb layer before baking. The seasoning creates a fiery crust that contrasts beautifully with the creamy interior. Ideal for those who love a little heat.
Mushroom & Thyme Delight
Sauté sliced mushrooms with thyme and garlic, then fold them into the cheese mixture. The earthy mushrooms add depth, while thyme brings a subtle floral note. This variation elevates the dip to a gourmet level.
Vegan Version
Replace the dairy cheeses with a blend of vegan mozzarella and nutritional yeast. Use a non‑dairy milk for the dough and a vegan butter substitute for the breadcrumb topping. The result is a creamy, cheesy dip that’s entirely plant‑based.
Storing and Bringing It Back to Life
Fridge Storage
Cool the dip completely, then transfer it to an airtight container. Store in the refrigerator for up to 48 hours. The dip will keep its flavor and texture, especially if you reheat it gently in a low oven.
Freezer Friendly
For longer storage, wrap the dip tightly in plastic wrap and place it in a freezer bag. Freeze for up to 3 months. Thaw overnight in the refrigerator before reheating. This method preserves the dip’s quality and ensures it tastes as good as fresh.
Best Reheating Method
Reheat in a 350°F oven for 10–12 minutes, or until the top is golden and the cheese is bubbling. Add a splash of water before reheating to keep the cheese from drying out. The result is a dip that feels freshly baked, even after being stored.