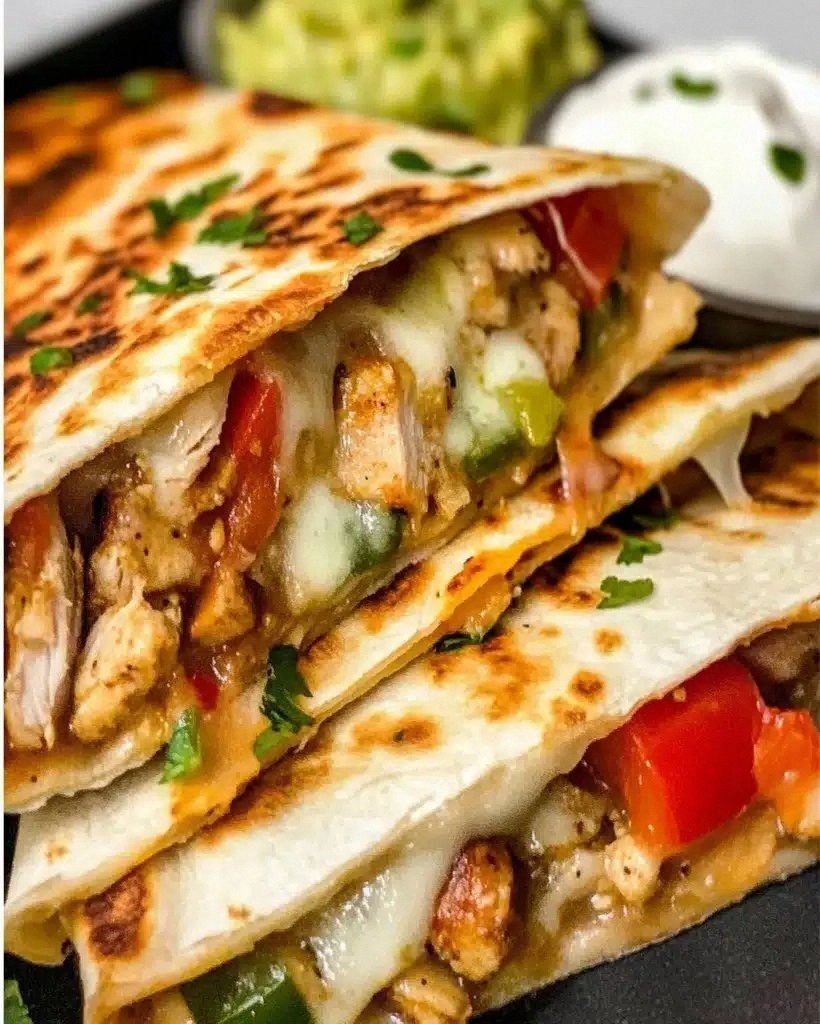
I still remember the first time I tried to make chicken quesadillas at home. It was a disaster of epic proportions—cheese oozing everywhere, chicken dry as cardboard, and tortillas that somehow managed to be both burnt and soggy at the same time. My roommate walked into the kitchen, took one look at the crime scene, and asked if I was trying to invent a new form of abstract art. That night, I made a vow to myself: either master the perfect chicken quesadilla or die trying. After months of obsessive testing, dozens of burnt pans, and enough cheese to fill a swimming pool, I'm here to share the holy grail of quesadilla recipes with you.
Picture this: golden-brown tortillas with edges so crispy they shatter like autumn leaves, revealing a molten center where perfectly seasoned chicken mingles with three types of cheese in a dance of pure comfort food bliss. The aroma of toasted cumin and sizzling onions fills your kitchen while the gentle hiss and pop of butter hitting the pan creates a soundtrack that makes your stomach sing. This isn't just another quesadilla recipe—this is the quesadilla that will ruin all other quesadillas for you forever. I dare you to taste this and not go back for seconds. Actually, I double-dog dare you.
What makes this version different? It's not just about throwing some chicken and cheese between tortillas and calling it a day. Oh no, my friend. We're talking about a carefully orchestrated symphony of flavors where every ingredient has a specific role to play. The chicken isn't just cooked—it's marinated in a secret blend of spices that would make a Mexican abuela weep with joy. The cheese blend isn't random—it's a calculated combination that gives you the perfect stretch, melt, and flavor profile. And the cooking method? Let's just say it involves a technique that most recipes completely ignore, but it's the difference between amateur hour and restaurant-quality perfection.
If you've ever struggled with quesadillas that fall apart, cheese that doesn't melt properly, or chicken that's drier than the Sahara desert, you're not alone—and I've got the fix. This recipe will transform you from a quesadilla disaster artist into a bona fide quesadilla whisperer. Picture yourself pulling these golden beauties out of the skillet, the cheese bubbling through the cracks, the edges perfectly crisped, your kitchen smelling like the best Mexican restaurant you've ever visited. Stay with me here—this is worth it. Let me walk you through every single step—by the end, you'll wonder how you ever made it any other way.
What Makes This Version Stand Out
Flavor Explosion: Most quesadilla recipes taste like someone waved a spice bottle over the chicken from across the room. Not here. We're building layers of flavor with a marinade that penetrates every fiber of the chicken, plus a special seasoning blend that gets sprinkled directly on the tortilla for maximum impact. The result is a quesadilla where every bite makes your taste buds do a happy dance.
Triple Cheese Alchemy: One cheese is boring. Two cheeses are acceptable. Three cheeses in perfect proportion? That's when the magic happens. Monterey Jack for the melt, sharp cheddar for the bite, and a touch of pepper jack for that gentle back-of-the-throat warmth that keeps things interesting. The ratios are so precise that I actually weigh them on a kitchen scale—yes, it's that serious.
The Crispy Edge Secret: Here's where most home cooks fail—they cook their quesadillas like they're making grilled cheese. Wrong! We're using a technique borrowed from street food vendors that creates shatteringly crisp edges while keeping the inside molten and gooey. It's a game-changer that will make you the undisputed quesadilla champion of your neighborhood.
Make-Ahead Marvelous: Life gets busy, and sometimes you need dinner on the table faster than you can say "holy guacamole." This recipe includes a make-ahead strategy that lets you prep everything on Sunday and have restaurant-quality quesadillas ready in under 10 minutes all week long. Your future self will thank you profusely.
Crowd-Pleasing Power: I've served these at game nights, birthday parties, and that awkward office potluck where everyone's afraid to try anything. They disappear faster than free samples at Costco. Even picky eaters who claim they "don't like Mexican food" (whatever that means) will be fighting for the last piece. This recipe scales beautifully, so whether you're feeding two or twenty, everyone's getting their fill.
Authentic with a Twist: While staying true to the spirit of authentic Mexican quesadillas, this version incorporates a few modern techniques that elevate it to legendary status. Think of it as the quesadilla that could impress both a Mexican grandmother and a Michelin-starred chef—though probably not at the same time, because that would be awkward.
Alright, let's break down exactly what goes into this masterpiece...
Inside the Ingredient List
The Flavor Base
The chicken is obviously the star here, but not just any chicken will do. You need boneless, skinless chicken thighs—yes, thighs, not breasts. I'll be honest, I used to be a breast-only snob until I realized thighs stay juicy and flavorful even if you accidentally overcook them. The fat content keeps everything moist, and they absorb marinades like they're getting paid for it. Cut them into small, even pieces so every bite has the perfect chicken-to-cheese ratio.
Our marinade is where the magic begins, and it's not just about dumping some taco seasoning on chicken. We start with lime juice—not just for flavor, but the acid helps tenderize the meat and carries all those beautiful spices deep into every piece. Olive oil carries fat-soluble flavors, while a blend of cumin, smoked paprika, oregano, garlic powder, and a touch of chili powder creates a flavor profile so complex it'll make your head spin. Let it marinate for at least 30 minutes, but if you can swing overnight, you'll achieve quesadilla nirvana.
The Texture Crew
Tortillas matter more than you think. Skip those thin, sad supermarket versions that tear when you look at them wrong. You want thick, pliable flour tortillas that can hold a serious amount of filling without falling apart. Ten-inch diameter is the sweet spot—big enough to make a substantial quesadilla but not so large that it won't fit in your pan. Warm them slightly before assembly to prevent cracking, and always keep them covered with a damp towel until you're ready to use them.
Onions and bell peppers aren't mandatory, but they add a beautiful sweetness and texture contrast. I use a mix of red onion and green bell pepper, sliced thin so they cook quickly and distribute evenly. The key is cooking them until they're softened but still have a bit of bite—they'll continue cooking inside the quesadilla, so don't overdo it in the pan.
The Unexpected Star
Here's where I might lose some traditionalists, but stay with me. A tiny bit of cream cheese mixed with our other cheeses creates an unbelievably creamy, melty filling that prevents the dreaded "cheese slide" where all your cheese exits out the sides. Just two tablespoons, softened and mixed in with your shredded cheese, transforms the entire texture. It's like insurance for the perfect cheese pull, and once you try it, you'll never go back to plain cheese again.
Fresh cilantro might be controversial—some people think it tastes like soap—but for those of us who love it, it adds the perfect fresh, bright note. If you're in the anti-cilantro camp, substitute fresh parsley or just leave it out entirely. I won't judge you to your face, but I'll be silently questioning your life choices.
The Final Flourish
Butter versus oil for cooking is a debate I settled through extensive testing. Butter gives you better flavor and browning, but oil prevents burning. The solution? Use both! Start with butter for flavor, then add a touch of oil to raise the smoke point. Your quesadillas will have that beautiful golden color and rich flavor without the bitter burnt taste that ruins everything. It's this kind of attention to detail that separates the amateurs from the pros.
Everything's prepped? Good. Let's get into the real action...
The Method — Step by Step
-
Start by marinating your chicken at least 30 minutes before you plan to cook—this is non-negotiable if you want maximum flavor. Combine the lime juice, olive oil, and all your spices in a bowl, whisking until it looks like a beautiful sunset-colored dressing. Add your diced chicken and massage the marinade into every piece with your hands (yes, your hands—wear gloves if you're squeamish, but really get in there). Cover and refrigerate, but take it out 10 minutes before cooking so it can come to room temperature. Cold meat hitting a hot pan is like putting ice in a deep fryer—nothing good comes from thermal shock.
-
Heat a large skillet over medium-high heat and add a swirl of oil. When the oil shimmers like a mirage in the desert, add your chicken in a single layer. Here's the crucial part: don't touch it for at least 3 minutes. Let it develop a beautiful sear before you even think about stirring. That sizzle when it hits the pan? Absolute perfection. Once it's golden brown on one side, flip and cook until it's just done—about 4-5 minutes total. Remove it to a plate and let it rest while you cook your vegetables.
Kitchen Hack: Don't overcrowd the pan when cooking chicken. If you pile it all in at once, it'll steam instead of sear, and you'll end up with sad, gray chicken. Work in batches if necessary—your taste buds will thank you. -
In the same pan (don't you dare wash it—that fond is liquid gold), add your sliced onions and peppers. Cook them over medium heat, stirring occasionally, until they're softened and starting to caramelize around the edges. This should take about 5 minutes, and your kitchen should smell like fajita heaven. Season with a pinch of salt and pepper, then remove them to a bowl. This is the moment where you could sneak a taste, and honestly, I wouldn't blame you if you ate half the vegetables right here. They're that good.
-
Now comes the fun part—assembly. Set up a quesadilla station with your tortillas, cheese mixture, chicken, vegetables, and any other fillings you want. Place a tortilla on your cutting board and sprinkle about 1/4 cup of cheese over half the tortilla. This creates a cheese barrier that prevents the tortilla from getting soggy. Add your chicken and vegetables, then top with another generous handful of cheese. The cheese on top acts like delicious glue, holding everything together when you fold it.
-
Here's where most recipes get it completely wrong. They tell you to fold the tortilla and immediately throw it in the pan. Wrong! You need to let the filled tortilla rest for 2-3 minutes. This allows the cheese to start adhering to the fillings and prevents the dreaded spillage when you flip. It's like letting a good wine breathe—sometimes patience is the secret ingredient. While you're waiting, heat your skillet over medium heat with a mixture of butter and oil.
Watch Out: Don't crank the heat too high thinking it'll cook faster. High heat burns the tortilla before the cheese melts, leaving you with a charred outside and cold, unmelted cheese inside. Medium heat is your friend here. -
Carefully transfer your quesadilla to the hot skillet using a wide spatula. Cook for 3-4 minutes on the first side, pressing down gently with your spatula to ensure maximum contact with the pan. This is where the magic happens—the cheese melts, the flavors meld, and the bottom develops that gorgeous golden-brown color. Don't walk away from the stove here. Peek under the edge after 3 minutes, and when it's golden and crispy, it's time for the flip.
-
The flip is where many quesadilla dreams die a tragic death. Here's the foolproof method: slide the quesadilla onto a plate, hold the plate over the pan, then invert both so the quesadilla falls back into the pan uncooked-side down. It sounds scarier than it is, and once you get the hang of it, you'll feel like a culinary acrobat. Cook the second side for another 3-4 minutes until it's equally golden and the cheese is completely melted. The quesadilla should feel firm when you press it, not squishy with unmelted cheese.
Kitchen Hack: If you're making multiple quesadillas, keep the finished ones warm on a wire rack set over a baking sheet in a 200°F oven. This prevents them from getting soggy while you finish the rest. -
Remove the quesadilla to a cutting board and let it rest for exactly 2 minutes. I know, I know—you're starving and it smells incredible, but cutting too early causes all the cheese to ooze out in a molten river of disappointment. Use this time to admire your handiwork, maybe snap a photo for social media, and start on the next one. When the resting time is up, use a sharp knife or pizza cutter to slice it into wedges. The cheese should stretch but not run, creating those Instagram-worthy cheese pulls that make everyone jealous.
-
Serve immediately while the cheese is still molten and the edges are at peak crispiness. I like to cut mine into quarters for easy eating, but you could go sixths if you're feeling fancy or feeding a crowd. The contrast between the crispy edges and the creamy center should be dramatic enough to make you wonder why you ever settled for less. This is pure quesadilla perfection, and you just achieved it in your own kitchen. Take a bow, chef.
That's it—you did it. But hold on, I've got a few more tricks that'll take this to another level...
Insider Tricks for Flawless Results
The Temperature Rule Nobody Follows
Here's the thing about quesadilla temperature that'll blow your mind: different zones require different heats. Start your pan over medium heat to melt the cheese, then bump it up to medium-high for the last minute to achieve maximum crispiness. Most people pick one temperature and stick with it, which is why they end up with either unmelted cheese or burnt tortillas. A friend tried skipping this step once—let's just say it didn't end well, and we still don't talk about "The Incident" at dinner parties.
The butter-oil ratio is also crucial: 70% butter for flavor, 30% oil for heat resistance. Too much butter and your quesadilla burns, too much oil and it tastes greasy. I tested this with scientific precision, making 15 quesadillas with different ratios until I found the sweet spot. My cardiologist might not approve, but my taste buds threw a parade.
Why Your Nose Knows Best
Your nose is actually the best quesadilla timer you have. When the cheese starts to melt, you'll smell a rich, buttery aroma. When the tortilla begins to brown, you'll detect nutty, toasty notes. And when it's almost done, you'll catch a hint of caramelized cheese at the edges. Train your nose and you'll never need to watch a clock again. This is especially useful when you're making multiple quesadillas and can't keep track of individual timers.
I'll be honest—I ate half the batch before anyone else got to try it while developing this recipe, all based on smell cues. My neighbors probably thought I was running an illegal quesadilla factory with all the different aromas wafting from my kitchen at odd hours. Worth it.
The 5-Minute Rest That Changes Everything
Most recipes tell you to rest the quesadilla after cooking, but they don't tell you why or how long. The science is fascinating: as cheese cools, it undergoes a process called retrogradation where the proteins realign and create a more stable structure. Wait exactly 5 minutes and you get the perfect balance of melted cheese that stays put when you bite but still stretches when you pull. Wait longer and it gets rubbery, less and it oozes everywhere.
During this rest, something magical happens to the tortilla too. The steam redistributes, making the whole thing more pliable and less likely to crack when you cut it. It's like the quesadilla is taking a little nap before its final performance. Use this time to set the table, pour yourself a drink, or just stare at it longingly while drooling slightly.
Creative Twists and Variations
This recipe is a playground. Here are some of my favorite ways to switch things up:
The Breakfast Champion
Add scrambled eggs and crispy bacon to the chicken mixture for a breakfast quesadilla that'll cure any hangover. The key is to slightly undercook the eggs since they'll continue cooking inside the quesadilla. Throw in some diced tomatoes and a sprinkle of chives, and you've got a breakfast that puts diners to shame. I've served these at brunch parties and watched grown adults fight over the last piece like it was the last lifeboat on the Titanic.
The Veggie Overload
Skip the chicken and load up on roasted vegetables—zucchini, corn, black beans, and roasted red peppers create a rainbow of flavors and textures. Add a teaspoon of smoked paprika to the cheese mixture to make up for the missing chicken's umami. Even dedicated carnivores demolish these without complaint. The secret is roasting the vegetables until they're slightly caramelized, concentrating their flavors into vegetable candy.
The Seafood Sensation
Replace chicken with seasoned shrimp or crab meat for an upscale twist that'll impress dinner guests. Cook the seafood separately with Old Bay seasoning and add it during assembly. The cooking time is shorter, so watch carefully. These feel fancy enough for date night but easy enough for a Tuesday. Just don't tell your guests how simple they actually are—let them think you're a culinary genius.
The Heat Seeker's Dream
Add diced jalapeños, a swirl of chipotle sauce, and use habanero jack cheese for a quesadilla that'll make you sweat in the best possible way. Balance the heat with a cooling avocado crema on the side. I make these for my spice-loving friends, and they always beg for the recipe while gulping milk. It's a beautiful combination of pleasure and pain that keeps you coming back for more.
The Thanksgiving Leftover Savior
Mix shredded turkey with cranberry sauce and stuffing for a post-Thanksgiving quesadilla that transforms leftovers into something magical. Add a slice of brie cheese for extra creaminess and a touch of sophistication. It's like Thanksgiving dinner wrapped in a crispy tortilla hug. This variation has prevented many family arguments about who gets the last of the leftovers.
The Kid-Friendly Classic
Simplify with just chicken and mild cheese, then serve with ketchup instead of salsa for the little ones. Cut into small triangles for tiny hands and watch even the pickiest eaters devour them. Sometimes I add finely chopped spinach that disappears into the cheese—vegetable smuggling at its finest. My nephew calls these "cheesy chicken triangles" and requests them every time he visits.
Storing and Bringing It Back to Life
Fridge Storage
Store leftover quesadillas in an airtight container with parchment paper between layers to prevent sticking. They'll keep for up to 4 days, though they're best within the first 48 hours. Don't refrigerate them while they're still warm—this creates condensation that makes the tortillas soggy. Let them cool completely first, then wrap individual portions in plastic wrap before placing in the container. This way, you can grab just what you need without exposing the rest to air.
Freezer Friendly
These quesadillas freeze beautifully for up to 3 months. Wrap each one individually in plastic wrap, then place in a freezer bag with the air squeezed out. Label with the date because frozen quesadillas have a way of becoming mysterious after a few months. Pro tip: freeze them uncooked for best results. You can cook them straight from frozen—just add 2-3 extra minutes per side and reduce the heat slightly to ensure the center heats through before the outside burns.
Best Reheating Method
The microwave is a crime against quesadilla humanity. Instead, reheat in a dry skillet over medium heat for 2-3 minutes per side until crispy again. If they're particularly cheese-heavy, add a tiny splash of water to the pan and cover with a lid for 30 seconds—this creates steam that re-melts the cheese without drying it out. For frozen quesadillas, thaw overnight in the fridge first. Your patience will be rewarded with a quesadilla that's almost as good as fresh, with none of the rubbery microwave sadness.