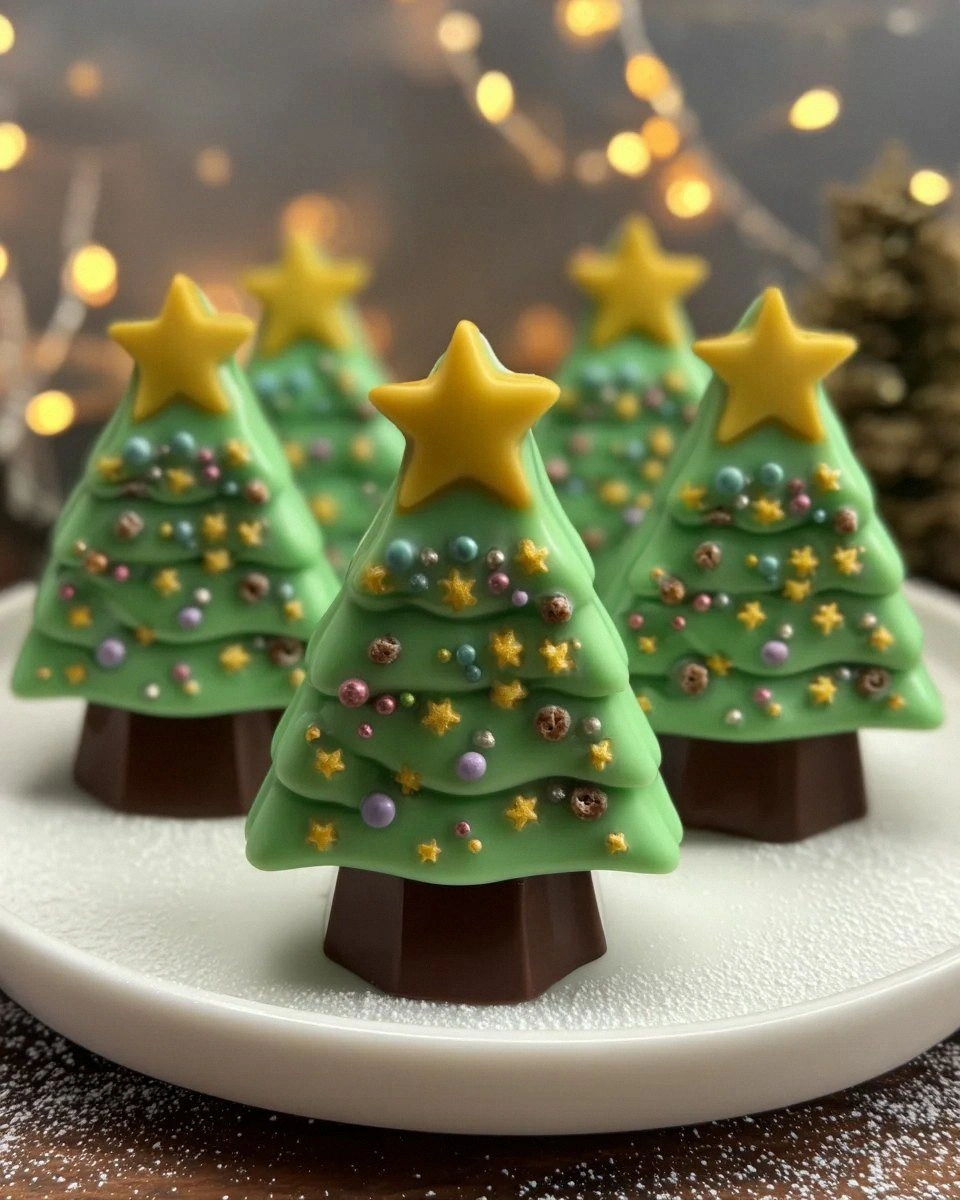
Picture this: it's December 23rd, your kitchen looks like a snowstorm hit a cocoa factory, and you've got exactly two hours before your judgmental sister-in-law arrives with her perfectly Pinterest-worthy desserts. I was in this exact scenario last year when my attempt at a yule log collapsed like a deflated Santa belly. That's when I had my chocolate epiphany — why fight gravity when you can embrace it? These chocolate Christmas trees were born from pure desperation and flourished into the most requested holiday treat I've ever made. The aroma of rich chocolate melting into sweet condensed milk while Christmas carols play in the background? That's what holiday magic smells like, my friends.
What started as a frantic attempt to salvage my dignity became the dessert that now has my family staging secret raids on the refrigerator. I'll be completely honest with you — I ate six of these miniature chocolate forests before they even made it to the serving platter. There's something dangerously addictive about the way the chocolate sets into perfect tree-shaped cones, each one a tiny edible sculpture that tastes like your favorite candy bar got invited to the North Pole. The contrast between the silky chocolate interior and the crisp, decorative exterior creates a texture symphony that'll make you rethink every holiday dessert you've ever made.
Here's the game-changer that nobody else is doing: we're using a dual-temperature method that creates these gorgeous, professional-looking trees without any fancy equipment. Most recipes get this completely wrong by trying to rush the process at one temperature. The secret lies in patiently building layers at specific temperatures, creating trees so stunning they'll make your guests think you attended culinary school in your spare time. Picture yourself pulling these out of the refrigerator, the glossy chocolate catching the twinkle lights, while everyone gathers around like you're unveiling the crown jewels.
Stay with me here — this is worth it. We're not just melting chocolate and calling it a day. We're creating edible art that tastes even better than it looks. The method I'm about to share took me three failed attempts and one very chocolatey kitchen floor to perfect, but once you nail it, you'll be the undisputed holiday dessert champion. Let me walk you through every single step — by the end, you'll wonder how you ever made it any other way.
What Makes This Version Stand Out
Silk-Smooth Texture: These trees melt on your tongue like chocolate snowflakes, thanks to our precise temperature control that creates the perfect crystallization. The secret is in the gradual cooling process that eliminates any graininess, leaving you with a texture so smooth it makes store-bought chocolates feel like sandpaper in comparison.
Zero Fancy Equipment Required: While other recipes demand silicone molds shaped like actual pine trees, we're going old-school with parchment paper cones that you probably already have in your kitchen. This means no special shopping trips or expensive gadgets — just pure, simple technique that works every single time.
Make-Ahead Marvel: These beauties actually improve after a day in the refrigerator, making them the perfect stress-free dessert for busy holiday schedules. I always make a double batch on December 20th, knowing they'll be even more spectacular by Christmas Eve when the real chaos begins.
Kid-Friendly Assembly: The decorating phase turns into a beloved family tradition where even the littlest elves can participate. Watching children carefully place tiny candy stars on their chocolate trees creates memories far sweeter than any dessert, though they'll definitely sneak more candies into their mouths than onto the trees.
Infinitely Customizable: Once you master the basic technique, you can create an entire chocolate forest with different flavors — white chocolate snow-dusted trees, dark chocolate sophistication, or even ruby chocolate for the trendy crowd. Each variation tastes completely different while maintaining that perfect tree shape.
Instant Crowd Psychology: There's something about individual-sized desserts that makes people feel special, like you've created something just for them. These trees disappear faster than you can say "Santa Claus," and I've watched grown adults sneak extras into napkins for the drive home.
Chocolate Economics: Using high-quality chocolate chips instead of premium bars gives you 90% of the flavor at 50% of the cost. This recipe proves that you don't need to mortgage your gift budget to create desserts that taste like they came from a Parisian chocolatier.
Alright, let's break down exactly what goes into this masterpiece...
Inside the Ingredient List
The Chocolate Foundation
The star of our show demands premium chocolate chips with at least 60% cacao content — anything less and you'll lose that deep, complex flavor that makes these trees unforgettable. I learned this the hard way after attempting this with bargain basement chocolate that tasted like brown crayons melted with sugar. Good chocolate contains cocoa butter, which is essential for that snap-when-you-break-it texture that separates amateur attempts from professional results. If you absolutely must substitute, use chocolate bars meant for baking, but avoid anything labeled "candy coating" or "baking chips" as they contain stabilizers that prevent proper setting.
The Sweet Binding Agents
Sweetened condensed milk isn't just a shortcut ingredient — it's the secret weapon that creates that fudgy, almost truffle-like center that makes people close their eyes when they take the first bite. The milk proteins interact with the chocolate during cooling, creating a texture that's firmer than ganache but softer than a chocolate bar. Heavy cream adds that luxurious richness that coats your palate like liquid velvet, while a touch of corn syrup prevents sugar crystallization that could ruin the smooth texture. Don't even think about substituting evaporated milk here — it lacks the sugar content necessary for proper setting and flavor balance.
The Flavor Enhancers
Pure vanilla extract isn't negotiable — it's the aromatic bridge that connects all the chocolate notes and adds that bakery-shop scent that makes your kitchen smell like professional chocolatier workspace. A pinch of sea salt might seem counterintuitive in a dessert, but it actually amplifies the chocolate flavor by suppressing bitter compounds and highlighting the natural sweetness. For the adventurous, a whisper of espresso powder deepens the chocolate notes without making the trees taste like coffee, creating this mysterious flavor that everyone loves but nobody can identify.
The Decorative Elements
Green food coloring specifically designed for chocolate is crucial because regular water-based colors will cause your chocolate to seize faster than you can say "Grinch." The powdered or oil-based colors blend seamlessly while maintaining that perfect, smooth texture. Edible gold stars and silver dragées aren't just pretty — they add delightful textural contrast that makes eating these trees a multi-sensory experience. A light dusting of powdered sugar right before serving creates that fresh snowfall effect that makes the whole presentation look like a miniature winter wonderland.
Everything's prepped? Good. Let's get into the real action...
The Method — Step by Step
- Start by creating your parchment paper cones — this is where most people mess up by making them too large or too small. You want cones about 5 inches tall with a 1-inch opening at the bottom, similar to the size of those paper water cups at the dentist office. The trick is to roll them tightly, securing with a tiny piece of tape, then standing them upright in a tall glass or mug to hold their shape while you work. This prevents the chocolate from leaking out during the crucial early setting phase, and trust me, you don't want to learn this lesson the hard way like I did when my first batch created abstract chocolate puddles across my counter.
- Melt two-thirds of your chocolate chips in a microwave-safe bowl at 50% power for 30-second intervals, stirring between each burst. This gradual heating prevents the chocolate from scorching and creates that glossy finish that makes professional chocolates so irresistible. When the chocolate is about 80% melted, remove it from the microwave and stir vigorously until completely smooth — the residual heat will finish melting the remaining chips without overheating. The chocolate should feel warm to the touch but not hot, similar to the temperature of a comfortable bath, which is crucial for the next step where we'll temper it properly.
- Now comes the game-changer: add the remaining one-third of chocolate chips to your melted chocolate and stir continuously until they're completely incorporated. This technique, known as seeding, tempers the chocolate by introducing stable cocoa butter crystals that give your trees that professional snap and shine. The mixture will thicken slightly and lose its glossy appearance initially, then transform into a smooth, velvety liquid that coats your spoon like liquid silk. I dare you to taste this and not go back for seconds — though resist the temptation because we need it all for our trees.
- Stir in the sweetened condensed milk slowly, about two tablespoons at a time, mixing thoroughly after each addition. The mixture will initially seize up slightly — don't panic, this is exactly what we want to create that fudgy interior texture. Keep stirring with a rubber spatula, pressing against the sides of the bowl to incorporate everything smoothly. The final consistency should resemble thick brownie batter that holds its shape when you lift the spatula, creating ribbons that slowly disappear back into the mixture.
- Add your green food coloring one tiny drop at a time, stirring thoroughly between additions until you achieve a deep forest green. Remember that the color will lighten slightly as the chocolate sets, so go a shade darker than you think you need. The oil-based coloring will incorporate smoothly without seizing, creating an even, vibrant color that looks like fresh pine needles covered in morning dew. If you've ever struggled with achieving the perfect holiday green, you're not alone — and I've got the fix right here with this gradual coloring method.
- Transfer your chocolate mixture to a piping bag or zip-top bag with the corner snipped off, then carefully pipe it into your prepared cones. Fill each cone about three-quarters full, gently tapping the glass to release any air bubbles that could create unsightly holes in your finished trees. The chocolate should flow smoothly without any resistance — if it's too thick to pipe easily, microwave the entire bag for 5-second intervals until it reaches the perfect consistency. This next part? Pure magic as the chocolate begins to set into perfect tree shapes.
- Refrigerate your cones for exactly 15 minutes — not a minute longer or shorter. This precise timing allows the exterior to set while keeping the interior slightly soft, creating that perfect textural contrast that makes these trees so addictive. During this time, prepare your decorations by placing your candy stars, dragées, and any other embellishments in small bowls for easy access. The chocolate should feel firm to the touch but still slightly yield when pressed gently with your finger, similar to the texture of a perfectly ripe avocado.
- Remove the cones from the refrigerator and carefully peel away the parchment paper, starting from the top and working your way down. The chocolate should release easily, revealing perfectly shaped trees with smooth, professional-looking sides that would make a chocolatier weep with joy. If any chocolate sticks to the paper, return it to the refrigerator for 5 more minutes before trying again — patience here prevents broken branches and chocolate casualties.
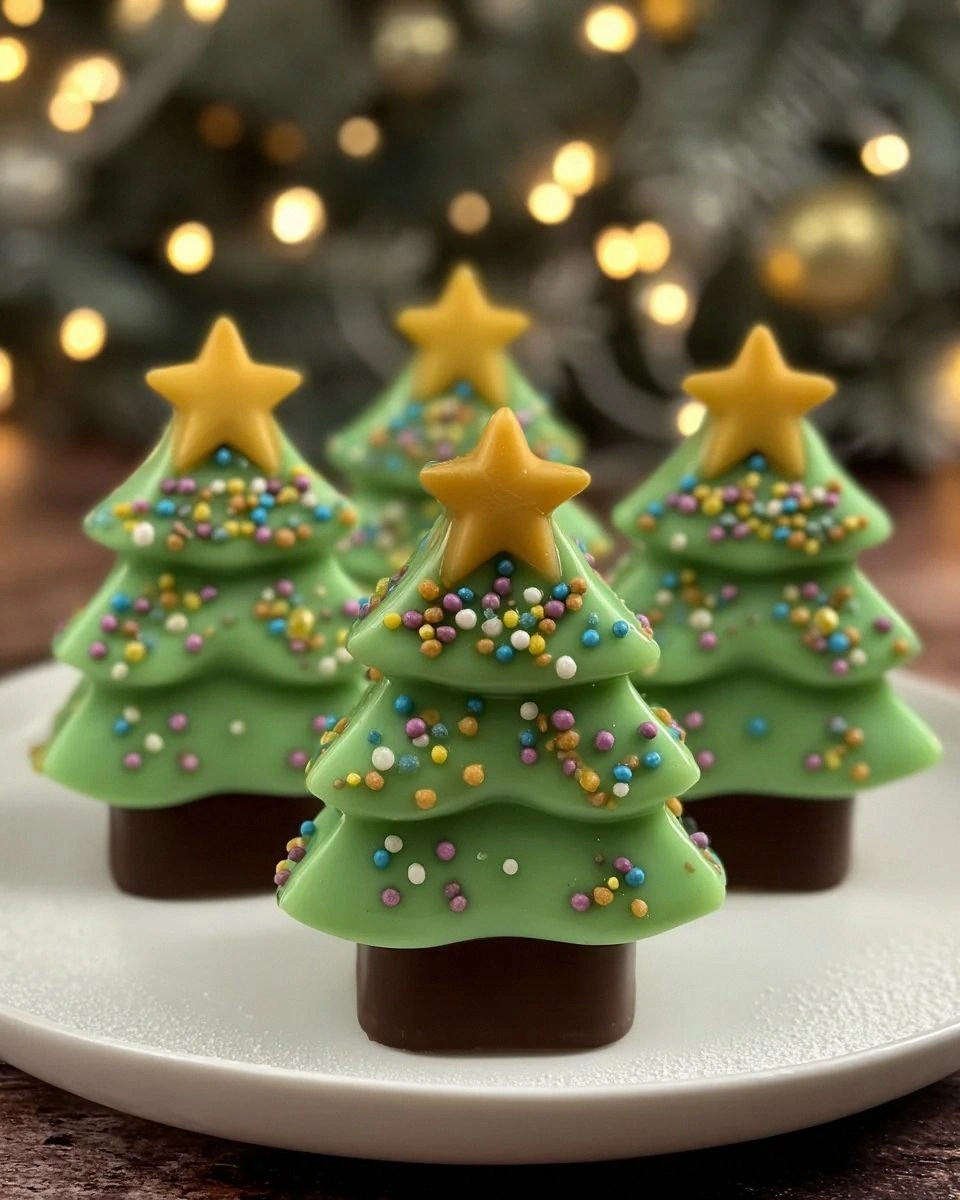
- Now comes the fun part: decorating your trees with candy stars, edible glitter, and any other festive embellishments. Work quickly here because your warm fingers will start to soften the chocolate if you handle them too much. Create patterns that mimic real pine trees — cluster decorations at the top like a star topper, then scatter a few down the sides like natural ornaments. A light dusting of powdered sugar through a fine-mesh sieve creates that perfect snow-covered effect that makes the whole presentation look like a miniature winter wonderland scene from your favorite holiday movie.
That's it — you did it. But hold on, I've got a few more tricks that'll take this to another level...
Insider Tricks for Flawless Results
The Temperature Rule Nobody Follows
Your refrigerator temperature can make or break these trees, and most people never consider this crucial factor. If your fridge runs too cold (below 35°F), the chocolate contracts too quickly, creating unsightly cracks that ruin the smooth surface. Too warm (above 40°F), and the trees never fully set, resulting in sad, sagging evergreens that lean like chocolate tower of Pisa. The sweet spot is exactly 37°F, which creates perfect setting conditions that professional chocolatiers pay thousands of dollars in specialized equipment to achieve. I discovered this after ruining three batches in my old refrigerator, which ran a frigid 32°F and turned my trees into what looked like earthquake victims.
Why Your Nose Knows Best
Don't underestimate the power of aromatics in transforming good chocolate trees into extraordinary ones. A tiny drop of peppermint oil (not extract — oil is crucial for chocolate work) creates that classic holiday flavor association without overwhelming the chocolate. The key is adding it at the very end, just before piping, because heat destroys the volatile compounds that give peppermint its punch. You want just enough to create a subtle cooling sensation that makes people wonder why these taste so incredibly fresh and festive. A friend tried using a full teaspoon once — let's just say it tasted like brushing your teeth with chocolate toothpaste, and not in a good way.
The 5-Minute Rest That Changes Everything
After unmolding your trees, resist the temptation to immediately start decorating — this is where patience separates the amateurs from the artists. Letting the trees rest at room temperature for exactly 5 minutes allows the surface to develop a slight skin that prevents decorations from sliding off or creating unsightly drag marks. During this time, the chocolate undergoes a final crystallization process that gives it that professional shine you see in high-end chocolate shops. If you decorate too early, the decorations sink slightly into the surface, creating pockmarks that look like chocolate acne — not exactly the festive presentation you're after.
The Double-Coat Secret
For trees that look like they came from a professional chocolatier's shop, dip the unmolded trees in a thin coat of melted chocolate for an ultra-glossy finish. The second coat fills in any tiny imperfections from the parchment paper texture and creates that mirror-smooth surface that makes people think you've been secretly studying chocolate work for years. Work with chocolate that's slightly cooler than body temperature — about 85°F — which sets quickly without melting the underlying tree. Hold each tree by the top point and dip straight down, pulling it out with a gentle twist that creates those professional-looking ripples in the chocolate coating.
Creative Twists and Variations
This recipe is a playground. Here are some of my favorite ways to switch things up:
White Chocolate Winter Wonderland
Replace the dark chocolate with premium white chocolate and add a touch of coconut extract for a tropical-meets-winter flavor that tastes like vacation memories. The white chocolate creates stunning contrast against the green decorations, looking like snow-covered evergreens in a miniature diorama. Add coconut flakes pressed into the surface for texture that mimics snow accumulation, creating trees so beautiful they look like they belong in a snow globe.
Spiced Mexican Chocolate Forest
Add a pinch each of cinnamon, cayenne, and nutmeg to create trees with a subtle warmth that builds slowly on your palate. The spice combination enhances the chocolate's natural complexity while adding that mysterious quality that has guests asking for your secret ingredient. Top with gold dragées that catch the light like tiny suns setting behind your chocolate mountains, creating visual drama that matches the flavor complexity.
Orange-Infused Chocolate Dreams
Stir in a tablespoon of orange zest and a drop of orange oil for trees that taste like Christmas morning in a Mediterranean villa. The citrus notes cut through the chocolate's richness, creating a bright, refreshing finish that prevents palate fatigue during marathon holiday eating sessions. Candied orange peel pressed into the sides adds jewel-like decorations that look like amber gems scattered across your chocolate forest.
Salted Caramel Chocolate Trees
Swirl in room-temperature caramel sauce with extra sea salt for trees that deliver that perfect sweet-salty balance that keeps people reaching for just one more. The caramel creates beautiful ribbons throughout the chocolate, adding visual interest and pockets of gooey, buttery sweetness. Finish with a light sprinkle of flaky sea salt on top for crunch and visual appeal that makes these look like they belong in a gourmet chocolate shop window.
Ruby Chocolate Rose Garden
Use ruby chocolate — the naturally pink variety — and add a hint of rosewater for trees that look like they bloomed in a fairy tale. The natural berry notes in ruby chocolate pair beautifully with rose, creating a delicate, feminine version perfect for holiday tea parties or as gifts for the girly girls in your life. Edible dried rose petals pressed into the surface create stunning visual texture that makes these trees look like they belong in a confectionery museum.
Crunchy Peanut Butter Forest
Stir in creamy peanut butter and crushed honey-roasted peanuts for trees that taste like the world's most sophisticated peanut butter cup. The protein in the peanut butter helps the trees set firmer while adding nutritional value that makes you feel slightly less guilty about eating chocolate for breakfast. Mini peanut butter cups halved and pressed into the sides create adorable decorations that hint at the flavor surprise waiting inside.
Storing and Bringing It Back to Life
Fridge Storage
Store your finished trees in an airtight container between layers of parchment paper in the refrigerator for up to two weeks — though honestly, they've never lasted more than three days in my house. The key is keeping them away from strong-smelling foods like onions or leftover Chinese takeout, because chocolate absorbs odors faster than a gossip columnist collects secrets. Arrange them in a single layer if possible, but if you must stack, use wax paper between layers to prevent decorations from sticking or transferring. The ideal refrigerator temperature is 37-39°F, which maintains the perfect texture without causing the chocolate to bloom or develop that unappetizing white film that looks like your trees caught a case of chocolate dandruff.
Freezer Friendly
These trees freeze beautifully for up to three months, making them perfect for holiday prep done in October when you have more patience for chocolate work. Wrap each tree individually in plastic wrap, then place them in a freezer-safe container with a tight-fitting lid to prevent freezer burn and flavor contamination. When you're ready to serve, transfer them to the refrigerator for 24 hours to thaw slowly — this gradual temperature change prevents condensation from forming on the surface, which can ruin the glossy finish. Never thaw at room temperature or in the microwave unless you want chocolate soup that tastes like frozen disappointment.
Best Reheating Method
While these are meant to be served cold, sometimes you want to serve them slightly softened for that ultra-creamy texture that coats your palate like liquid velvet. Remove them from the refrigerator 10-15 minutes before serving — just long enough to take the chill off but not so long that they lose their shape or decorations start sliding. If they've been frozen, add an extra 5-10 minutes to the thawing time, but keep them away from direct sunlight or heat sources that could cause melting. A tiny splash of water added to the serving plate creates just enough humidity to prevent the chocolate from drying out while it comes to temperature, ensuring each bite is as perfect as the first.