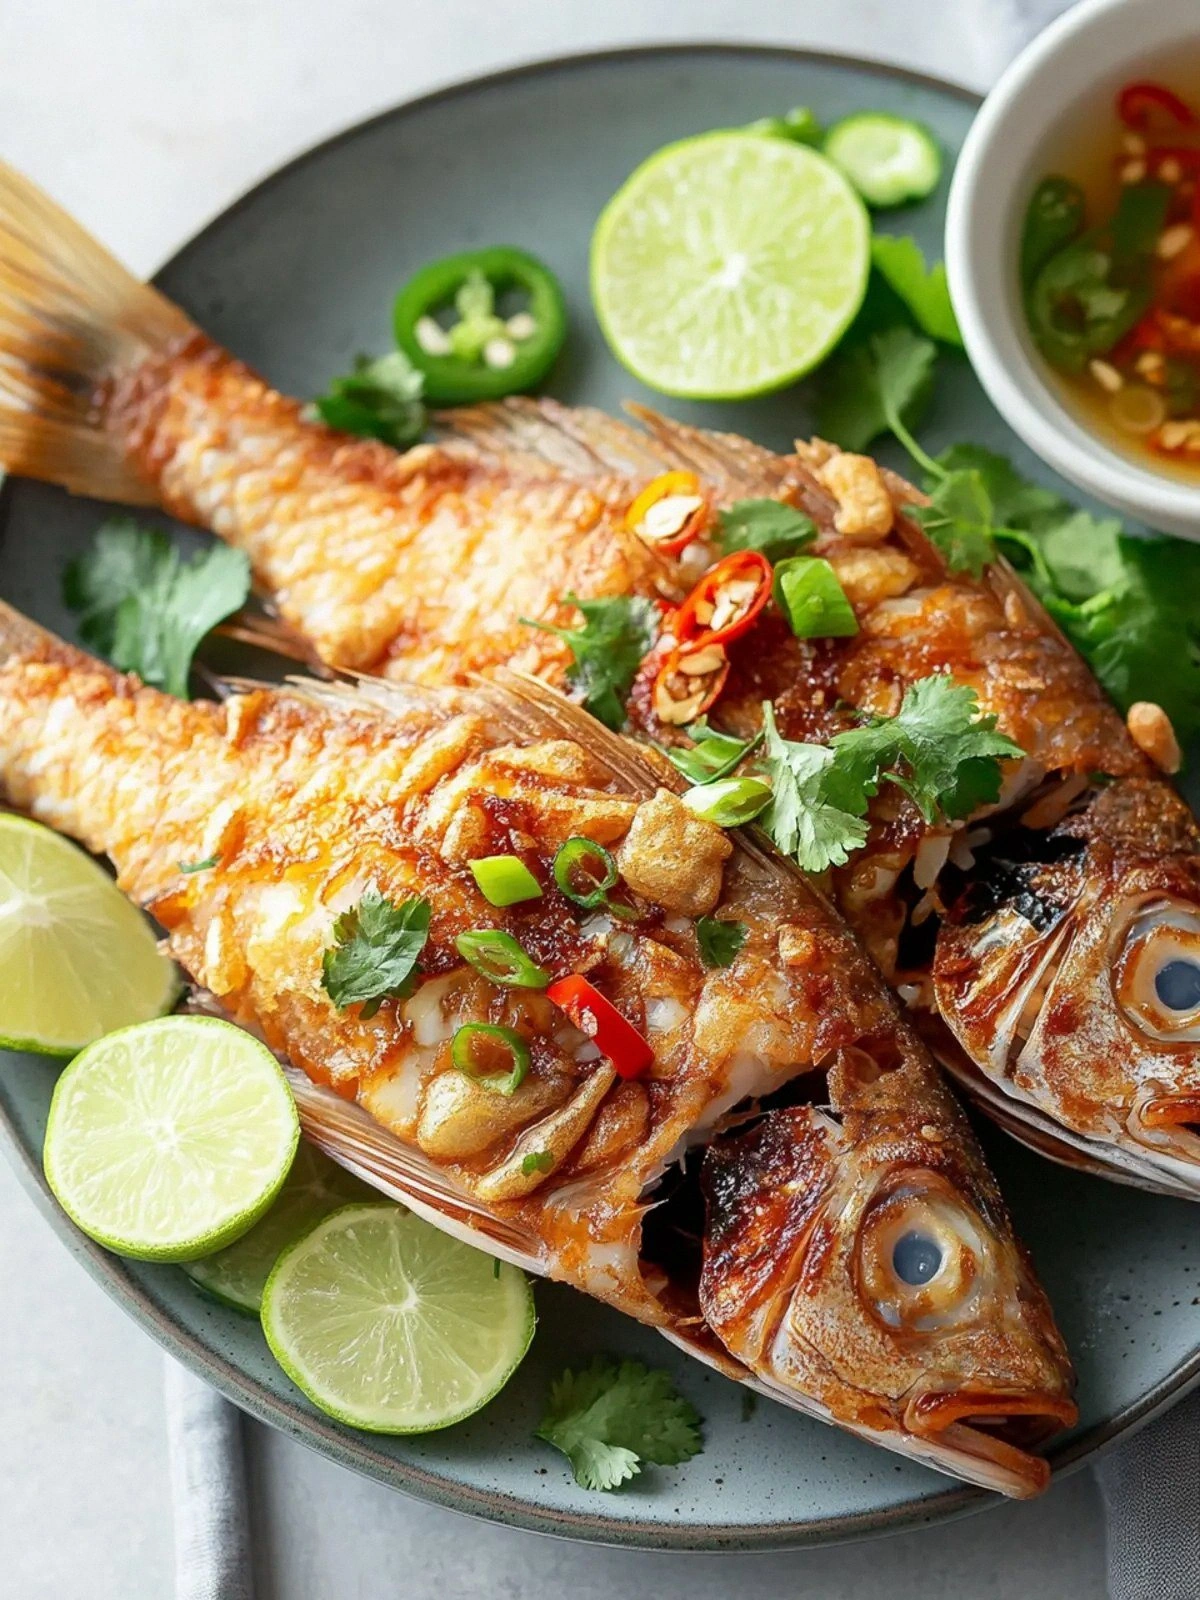
When I was trying to salvage a last‑minute dinner for my friends, I pulled a bag of red tilapia from the freezer, a bottle of soy sauce from the pantry, and a dash of desperation. The kitchen was a mess, the timer was ticking, and my friends were staring at the pot like it was a magic trick. I laughed, flipped the fish, and the sizzle that erupted was the soundtrack of triumph. That night, the dish turned out so good that I still hear the clink of chopsticks and the delighted sighs echoing in my kitchen. If you’ve ever stared at a raw fish fillet and wondered why it feels like a culinary dare, this is your answer.
Picture this: a sheet of golden‑brown, crackling skin that shatters like thin ice, the scent of garlic and ginger rising like incense, and the first bite delivering a sweet‑savory punch that lingers on the tongue. The fish is so tender that it melts in your mouth, yet the coating remains crisp enough to crunch audibly. It’s a dish that feels both comforting and adventurous, a nod to street‑food stalls in Hanoi and a testament to the power of simple, honest ingredients. I dare you to taste this and not go back for seconds. This is hands down the best version you'll ever make at home.
Most people think fried fish is just another fried fish. That’s where the magic of this recipe kicks in. I’ve tweaked the classic Vietnamese technique by adding a splash of water to the sauce for a glossy finish, using a blend of MSG and fish sauce for depth, and coating the fish in corn starch rather than flour for an ultra‑crisp exterior. The result? A dish that’s both light and indulgent, with a flavor profile that sings with every bite. The moment the fish hits the hot oil, the aroma is unmistakably savory, the sound of the sizzling is pure music, and the anticipation is palpable.
Let me walk you through every single step — by the end, you’ll wonder how you ever made it any other way. I’ll share the secrets that keep the coating crunchy, the sauce silky, and the fish moist. I’ll also drop a teaser about a technique that you won’t expect: a quick water rinse that eliminates excess starch and keeps the coating from clumping. Ready? Let’s dive in.
What Makes This Version Stand Out
- Taste: The sauce is a symphony of soy, oyster, fish, and a hint of sweetness that balances the brininess of the fish. It coats every inch of the fillet, turning each bite into a flavor explosion that lingers on the palate.
- Texture: The corn starch creates a thin, crackly shell that stays crisp even after the fish finishes cooking. The interior remains silky, a contrast that delights the senses.
- Ingredient Quality: Using fresh red tilapia and high‑quality soy sauce gives the dish depth that cheap substitutes simply cannot match.
- Method Simplicity: The process is straightforward: season, coat, fry, glaze. No fancy equipment, no time‑consuming marination.
- Crowd Reaction: This dish has become a party favorite. Guests rave about the crispiness and the sauce’s umami punch.
- Make‑Ahead Potential: The fried fish can be prepared ahead of time and reheated with minimal loss of crunch. The sauce can be stored separately and re‑heated.
- Versatility: It works as a main course, a side dish, or an appetizer. Pair it with jasmine rice, noodles, or a simple salad.
Inside the Ingredient List
The Flavor Base
Red tilapia is the star of this dish, chosen for its mild flavor and firm texture. It takes the sauce’s umami punch and turns it into a silky coating. If you can’t find tilapia, a firm white fish like cod or halibut works fine, but the flavor profile will shift slightly toward a cleaner taste. The key is to keep the fillets whole; cutting them into pieces can cause uneven cooking and a loss of that coveted crisp edge.
The Texture Crew
Corn starch is the secret weapon for crunch. Unlike flour, it absorbs less oil, creating a light, airy coating that doesn’t become soggy. If you’re allergic to corn, arrowroot powder or rice flour can be a good substitute, but the texture will be a touch different. The amount of starch matters—too little and the coating flakes; too much and it becomes dry. Aim for a 1:1 ratio of fish to starch by weight for the best results.
The Unexpected Star
The sauce is a blend of soy, oyster, and fish sauces with a touch of sugar. It’s the glue that binds the coating to the fish and adds depth. The MSG amplifies the umami, but if you’re wary of MSG, you can replace it with a pinch of dehydrated mushroom powder or a splash of mushroom broth. The sugar is crucial—it caramelizes slightly, giving the glaze that glossy sheen.
The Final Flourish
Fresh aromatics—garlic, ginger, cilantro, and green onions—add brightness and contrast to the savory sauce. They’re tossed in at the end of cooking to preserve their fresh, slightly peppery notes. If you’re looking for a twist, a splash of lime juice or a sprinkle of chili flakes can add a new dimension of flavor.
Everything's prepped? Good. Let's get into the real action…
The Method — Step by Step
- Begin by rinsing the tilapia fillets under cold water to remove any surface grit or excess salt from the packaging. Pat them dry with paper towels until they feel almost crisp to the touch. This step is critical—any moisture will cause the starch coating to stick to the pan and ruin the crunch.
- Season the fillets with 1 tsp salt, 1 tsp ground black pepper, and 1 tsp MSG. Toss them in a shallow dish until every surface is evenly coated. Let them sit for 5 minutes; this brief resting period allows the spices to penetrate the flesh.
- Whisk together 1 cup corn starch and 1 tsp of water in a bowl until the mixture is smooth and free of lumps. This slurry will act as the binder, keeping the starch clinging to the fish during frying. If you prefer a thicker coating, add a splash more water.
- Heat 1 cup vegetable oil in a deep skillet over medium‑high heat. The oil should shimmer but not smoke. Test the temperature by dropping a small pinch of starch; if it sizzles immediately and floats, the oil is ready.
- Dip each seasoned fillet into the starch slurry, ensuring a generous, even coating. Shake off excess starch—this prevents clumping and keeps the coating light.
- Carefully slide the fillets into the hot oil. Do not overcrowd the pan; use a single layer so each piece gets a uniform crisp. Fry for 3–4 minutes on each side or until the coating turns a deep golden brown and the fish flakes easily with a fork.
- Remove the fillets and place them on a rack or paper towels to drain excess oil. While the fish is resting, prepare the glaze.
- In a small saucepan, combine 5 tbsp soy sauce, 1 tbsp oyster sauce, 1 tbsp fish sauce, 2 tbsp sugar, 1/2 cup water, 3 cloves minced garlic, and 1 inch grated ginger. Bring to a gentle boil over medium heat, stirring until the sugar dissolves.
- Reduce the heat to low and let the sauce simmer for 2 minutes until it thickens slightly and the aromatics meld. The glaze should be glossy, not syrupy.
- Return the fried fillets to the pan and pour the glaze over them, turning the fish to coat every surface. Cook for an additional minute so the sauce caramelizes and adheres to the crunchy coating.
- Add 1/4 cup chopped cilantro and 2 stems of sliced green onions to the pan. Toss gently to combine, letting the fresh herbs release their aroma while the sauce continues to thicken.
- Serve immediately with a side of jasmine rice, a drizzle of lime, or a handful of fresh salad greens. The dish is best enjoyed hot, when the coating is still crisp and the glaze is still shiny.
That's it — you did it. But hold on, I've got a few more tricks that'll take this to another level. Let’s dig into insider knowledge that can elevate even the most confident cooks.
Insider Tricks for Flawless Results
The Temperature Rule Nobody Follows
Many people fry at “high heat,” but the ideal oil temperature for this dish is around 350°F (175°C). If you’re unsure, use a thermometer or drop a small amount of starch into the oil; it should sizzle and rise to the surface within a second. A hotter oil will sear the coating too quickly, leaving the fish undercooked, while a cooler oil will make the coating soggy.
Why Your Nose Knows Best
Before you start frying, sniff the oil. A clean, neutral scent indicates it’s ready. If you detect a faint metallic or burnt aroma, let the oil cool before re‑heating. Your nose is a reliable indicator of oil quality and will save you from a batch of fish that tastes like a burnt snack.
The 5‑Minute Rest That Changes Everything
After frying, let the fish rest on a rack for 5 minutes. This brief pause allows steam to escape, preventing the coating from becoming soggy. It also gives the glaze a chance to set, creating that glossy finish that makes the dish visually stunning.
Keep the Sauce Separate Until the Last Moment
Storing the glaze separately ensures you can re‑heat it without losing its viscosity. When you’re ready to serve, simply pour the glaze over the fish and let it simmer for a minute. This technique keeps the fish crisp and the sauce vibrant.
Use Fresh, Not Frozen, Fish
Frozen fish can release water during cooking, making the coating stick and the texture rubbery. If you must use frozen fish, thaw it completely and pat it dry. The fresher the fish, the better the contrast between the crunchy coating and the tender interior.
Creative Twists and Variations
This recipe is a playground. Here are some of my favorite ways to switch things up:
Spicy Chili Crunch
Add 1 tsp of red pepper flakes to the starch slurry or sprinkle them on the finished dish. The heat complements the sweetness of the glaze and adds a smoky undertone that pairs well with a cool cucumber salad.
Herb‑Infused Twist
Replace the cilantro with Thai basil or mint for a fresh, aromatic finish. The herbs add a subtle sweetness that balances the savory sauce, creating a dish that feels both exotic and familiar.
Gluten‑Free Version
Swap corn starch for arrowroot powder or rice flour, and use a gluten‑free soy sauce. The texture remains crisp, and the flavor profile stays intact, making it safe for gluten‑sensitive diners.
Asian Noodle Bowl
Serve the fried fish over a bed of rice noodles, topped with fresh sliced carrots, cucumber, and a drizzle of hoisin sauce. This turns the dish into a complete meal, with layers of crunch and umami.
Breakfast Power Plate
Pair the fried fish with a poached egg and a sprinkle of sesame seeds. The runny yolk adds richness, while the sesame offers a nutty crunch that complements the fish.
Low‑Calorie Lightening
Use an air fryer instead of deep frying. Coat the fish lightly with starch and spray with cooking oil. The result is a lighter version that still delivers the signature crunch.
Storing and Bringing It Back to Life
Fridge Storage
Cool the fish completely, then wrap it in parchment paper and place it in an airtight container. Store in the refrigerator for up to 2 days. When reheating, use a skillet over low heat; a splash of water will keep the coating from drying out.
Freezer Friendly
Place the cooled fish in a freezer‑safe bag, removing as much air as possible. Freeze for up to 3 months. Thaw overnight in the refrigerator before reheating. A quick steam in a pot of hot water before frying restores the crispness.
Best Reheating Method
Reheat in a skillet over medium heat, adding a splash of water or a few drops of oil. Flip once to re‑crisp the coating. Serve immediately for the best texture.