Picture this: it’s a rainy Saturday afternoon, the kind where the clouds are so low they seem to press against the kitchen window, and you’re staring at a half‑finished chocolate cake that looks more like a sad pancake than a masterpiece. I was in the middle of a culinary crisis, a flour‑covered disaster that tasted like regret, when a friend dared me to create something that would make even the most stoic dessert snob swoon. I accepted the challenge, grabbed a jar of tart cherries, and set out to engineer the ultimate upside‑down cake that could turn any gloomy day into a sweet celebration. I promise, this is hands down the best version you’ll ever make at home.
The moment the butter hit the pan, it sang a buttery sizzle that felt like applause from an unseen audience. The air filled with a perfume that married deep cocoa with the bright, almost tart perfume of cherries, and I swear the kitchen walls started humming. The batter, glossy and thick, clung to the whisk like a secret, and when it hit the oven, the whole house seemed to inhale as one. The sound of the timer ticking was a metronome for anticipation, and the first glimpse of the caramelized cherries peeking through the chocolate top was pure visual poetry. That sizzle when it hits the pan? Absolute perfection.
What sets this version apart isn’t just the ingredients—it’s the method, the timing, and a few cheeky tricks that most recipes completely miss. Most recipes get this completely wrong, either drowning the cherries in syrup or baking a soggy bottom that collapses like a house of cards. I’ve cracked the code: a butter‑sugar caramel base that locks in the cherries, a cocoa‑infused batter that stays moist, and a splash of boiling water that creates a silk‑like crumb. I dare you to taste this and not go back for seconds. And yes, I’ll be honest — I ate half the batch before anyone else got to try it.
Let me walk you through every single step — by the end, you’ll wonder how you ever made it any other way. Okay, ready for the game‑changer? This next part? Pure magic. Stay with me here — this is worth it.
What Makes This Version Stand Out
- Depth: The combination of dark cocoa and tart cherries creates a flavor contrast that feels like a midnight sky punctuated by fireworks.
- Moisture: The boiling water folded into the batter guarantees a cake that stays tender for days, not just hours.
- Simplicity: Only a single bowl for the batter, a single pan for the caramel, and no fancy equipment beyond a trusty whisk.
- Visual Drama: When you flip the cake, the glossy cherry‑cocoa surface glistens like a jewel, instantly impressing guests.
- Crowd‑Pleaser: Even the pickiest eaters love the sweet‑tart balance; it’s the kind of dessert that sparks conversation.
- Ingredient Quality: Using real tart cherries (not the sugary canned kind) and high‑quality cocoa powder elevates the whole experience.
- Method Mastery: The caramel base is cooked just right—no burnt sugar, no soggy bottom, just pure, buttery gloss.
- Make‑Ahead Potential: This cake keeps beautifully in the fridge, and a quick re‑heat brings it back to life as if it just left the oven.
Inside the Ingredient List
The Flavor Base
Unsalted Butter (1/4 cup): This is the backbone of the caramel, providing richness and a silky mouthfeel. If you skip it, the cherry layer becomes dry and loses that luxurious sheen. For a dairy‑free twist, try clarified ghee—it melts faster and adds a nutty depth.
Granulated Sugar (3/4 cup + 1 cup): The first portion sweetens the butter, creating the caramel, while the second portion sweetens the batter without overpowering the cherries. Using raw cane sugar adds a subtle molasses note that deepens the flavor profile. If you’re watching sugar, reduce the second cup by a quarter and add a splash of maple syrup.
Pitted Tart Cherries (2 cups): The star of the show, these cherries bring a bright acidity that cuts through the chocolate richness. Fresh cherries are ideal in season; otherwise, high‑quality canned cherries in their own juice work just as well. Rinse them briefly to remove excess syrup, then pat dry for a cleaner caramel.
The Texture Crew
All‑Purpose Flour (1 1/2 cups): Provides structure while keeping the crumb tender. Using cake flour would make it too delicate; whole‑wheat would add a gritty texture you don’t want. If you’re gluten‑free, swap with a 1:1 blend of rice flour and tapioca starch.
Unsweetened Cocoa Powder (1/2 cup): Gives the cake its deep, velvety chocolate flavor. Dutch‑process cocoa yields a smoother, less acidic taste, while natural cocoa adds a slight bitterness that balances the cherries. Don’t over‑mix, or you’ll develop a gritty texture.
Baking Powder (1 tsp) & Baking Soda (1/2 tsp): The leavening duo ensures the cake rises evenly. Baking soda reacts with the buttermilk’s acidity, creating tiny air pockets that keep the crumb airy. If you omit either, the cake will be dense and heavy.
Salt (1/4 tsp): A pinch of salt amplifies every other flavor, preventing the chocolate from tasting flat. Sea salt adds a subtle crunch if sprinkled on top before baking.
The Unexpected Star
Eggs (2 large): Eggs bind the batter, add richness, and help the cake rise. If you’re vegan, replace each egg with a “flax egg” (1 tbsp ground flax + 3 tbsp water) and add a teaspoon of apple cider vinegar for lift.
Buttermilk (1 cup): Its tangy acidity reacts with the baking soda, giving the cake a tender crumb and a slight tang that brightens the chocolate. If you don’t have buttermilk, mix 1 cup milk with 1 tbsp lemon juice and let sit 5 minutes.
Vegetable Oil (1/2 cup): Oil keeps the cake moist and prevents it from drying out during the flip. Butter alone would make the crumb too dense. Canola or light olive oil work just as well.
The Final Flourish
Boiling Water (1 cup): This is the secret weapon that creates a “liquid chocolate” effect, dissolving the cocoa fully and ensuring a smooth batter. Adding it at the end prevents over‑mixing and yields a cake that stays moist for days. If you’re nervous about steam, let the water cool slightly before adding.
Everything's prepped? Good. Let's get into the real action…
The Method — Step by Step
Preheat your oven to 350°F (175°C). While the oven warms, melt the 1/4 cup unsalted butter in a 9‑inch round cake pan over medium heat. As the butter bubbles, sprinkle in the 3/4 cup granulated sugar and stir continuously until the mixture turns a light amber and the sugar fully dissolves. This caramel base will coat the cherries and prevent them from sinking.
Kitchen Hack: If the caramel starts to darken too quickly, remove the pan from heat for a few seconds, then return it. This prevents burning without losing gloss.Gently fold the pitted tart cherries into the caramel, coating each piece thoroughly. Let the cherries simmer for about 2 minutes, just until the mixture bubbles around them. This step locks in their natural juices, creating a glossy, jewel‑like topping that will shine through the chocolate cake.
In a separate large bowl, whisk together the 1 1/2 cups flour, 1/2 cup cocoa powder, 1 tsp baking powder, 1/2 tsp baking soda, and 1/4 tsp salt. This dry mix ensures even distribution of leavening agents and prevents clumps of cocoa.
In another bowl, beat the 2 large eggs with the remaining 1 cup granulated sugar until the mixture is pale and fluffy, about 3 minutes. Add 1/2 cup vegetable oil and continue whisking until fully incorporated. The mixture should look glossy and slightly thick.
Combine the wet and dry ingredients by adding the flour mixture to the egg‑sugar‑oil blend in three additions, mixing gently after each addition. Over‑mixing will develop gluten and make the cake tough; stop as soon as the batter is smooth.
Stir in the 1 cup buttermilk, followed by the 1 cup boiling water. The batter will look thin and almost runny—that’s exactly what you want. The hot water activates the cocoa, turning the batter a deep, silky chocolate hue.
Watch Out: Adding boiling water too quickly can cause the batter to splatter. Pour slowly in a steady stream while whisking gently.Give the pan a gentle shake to level the batter over the caramelized cherries. The batter should spread evenly, creating a thin blanket that will rise and envelop the fruit as it bakes. If you notice any air bubbles on the surface, tap the pan lightly on the counter.
Slide the pan into the preheated oven and bake for 30‑35 minutes. The cake is done when a toothpick inserted into the center comes out with just a few moist crumbs, and the edges start pulling away from the pan. You’ll also notice the top turning a deep, glossy mahogany color.
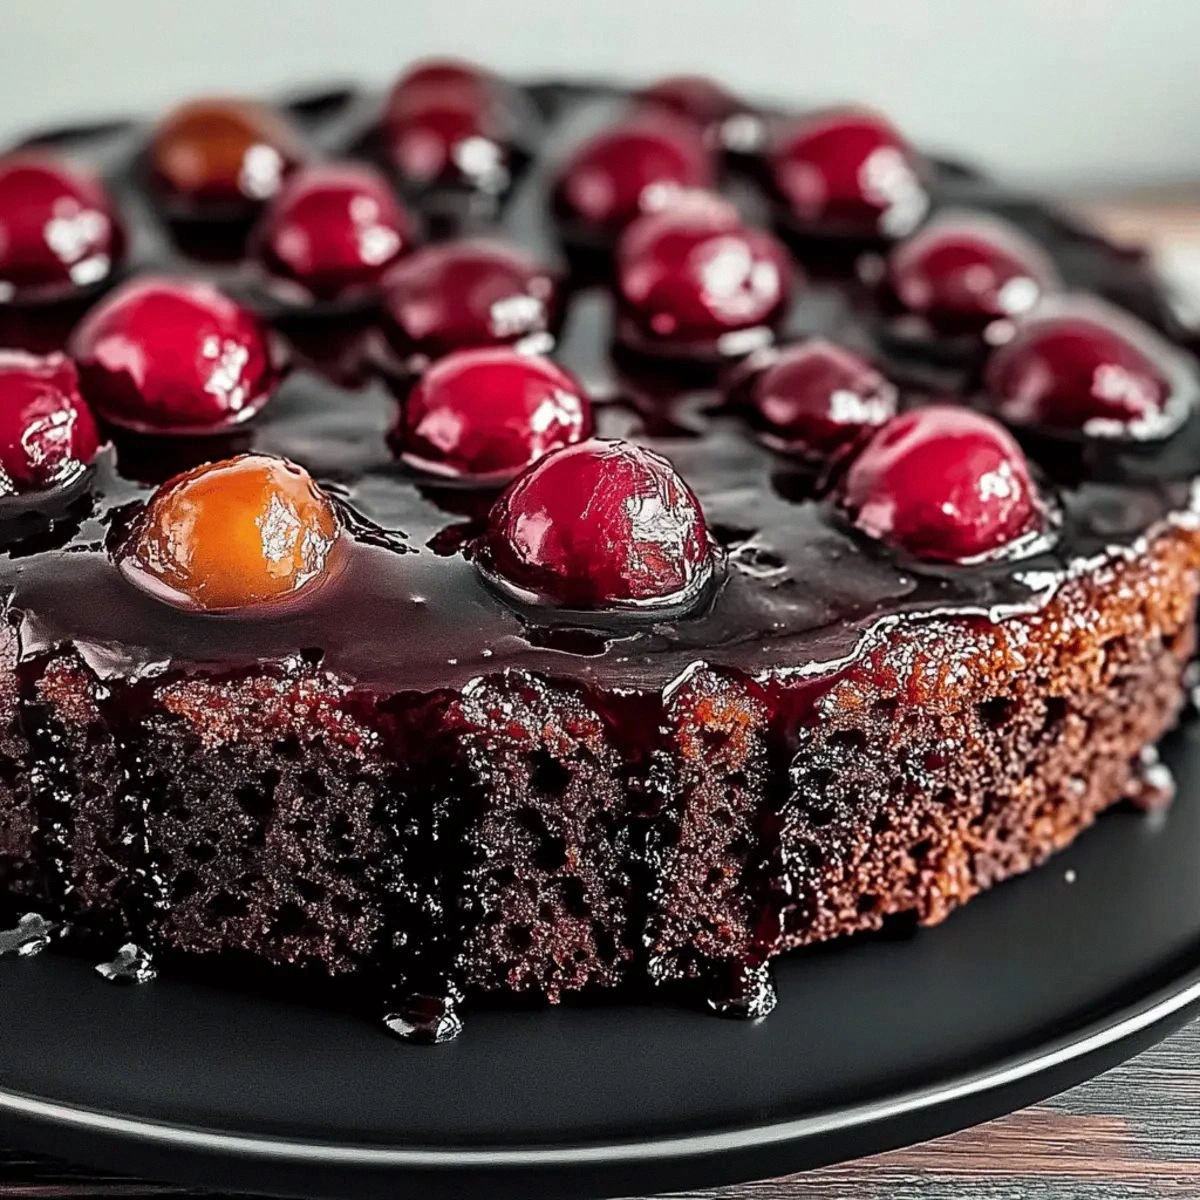
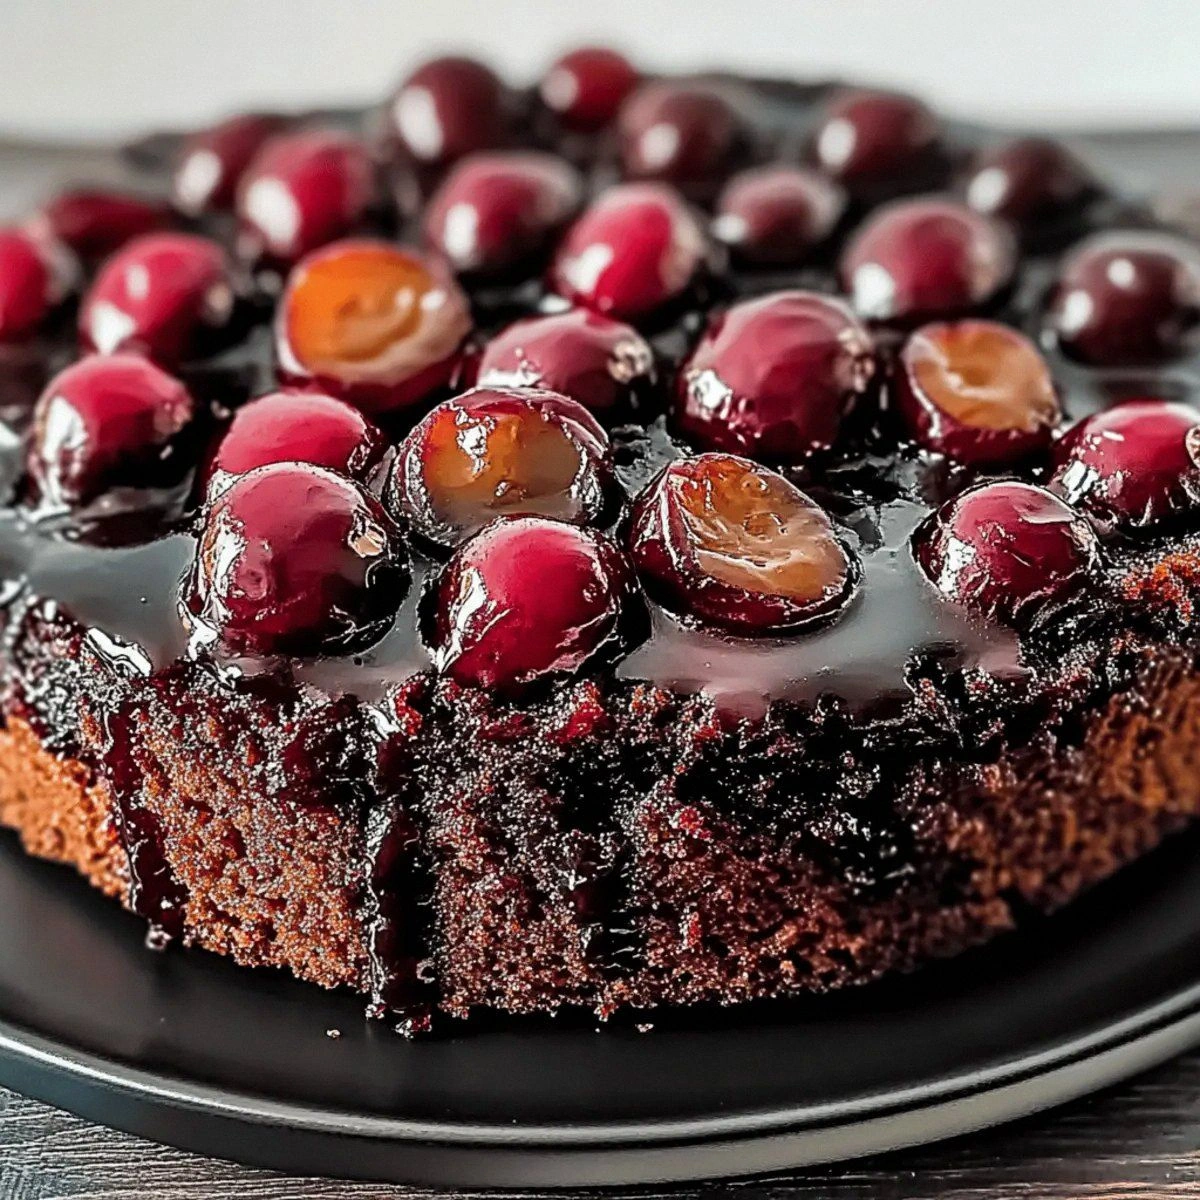
Remove the cake from the oven and let it rest for 5 minutes. This short cooling period allows the caramel to set just enough so that when you invert the cake, the cherries stay intact and the glossy surface doesn’t slip.
Place a serving plate over the pan and, with a confident flick of the wrist, invert the cake. Watch the caramel cascade over the chocolate, creating a glossy glaze that glistens like a sunrise over a dark sea. Let the cake cool on the plate for another 10 minutes before slicing.
Kitchen Hack: To avoid a broken cake, run a thin metal spatula around the edges before flipping. It releases any stuck caramel and ensures a clean release.
That's it — you did it. But hold on, I've got a few more tricks that'll take this to another level…
Insider Tricks for Flawless Results
The Temperature Rule Nobody Follows
Never bake a cake straight from the fridge. Let the batter sit at room temperature for 10 minutes before it meets the oven. This small pause lets the butter and oil meld, preventing a dense, uneven crumb. I once tried to rush the process and ended up with a gummy center that clung to the fork like a bad habit.
Why Your Nose Knows Best
When the caramel reaches a light amber, trust your nose more than a timer. The aroma of toasted butter and caramelized sugar is a reliable cue that the base is ready. If you rely solely on the clock, you risk a burnt bottom that ruins the whole cake.
The 5‑Minute Rest That Changes Everything
After baking, let the cake sit in the pan for exactly five minutes before flipping. This rest allows the caramel to firm slightly, creating a glossy glaze that doesn’t run off. Skipping this step means a soggy bottom and a sad presentation.
Butter Brush Magic
Before adding the caramel, brush the pan with a thin layer of melted butter. This creates a non‑stick barrier that makes the flip effortless and adds an extra buttery sheen to the final product. One time I forgot this step, and the cake stuck like a stubborn toddler refusing to leave the playground.
Cool‑Down Trick for Perfect Slices
Allow the cake to cool on a wire rack for at least 15 minutes after inversion. This cooling period lets the crumb set, making slicing clean and preventing crumbs from scattering like confetti.
Creative Twists and Variations
This recipe is a playground. Here are some of my favorite ways to switch things up:
Orange‑Infused Cherry
Add a teaspoon of orange zest to the caramel and swap half the cherries for orange‑segment slices. The citrus brightens the chocolate, giving the cake a holiday‑like sparkle.
Espresso Boost
Dissolve 1 tablespoon of instant espresso powder in the boiling water before adding it to the batter. The coffee deepens the chocolate flavor, turning the cake into a sophisticated after‑dinner treat.
Nutty Crunch
Stir in ½ cup toasted chopped hazelnuts into the batter for a crunchy surprise. The nuts complement the cherries and add a buttery texture that contrasts beautifully with the soft crumb.
Vegan Delight
Replace butter with coconut oil, eggs with flax “eggs,” and use almond milk plus a splash of lemon juice instead of buttermilk. The result is a dairy‑free version that still boasts that glossy caramel and moist crumb.
Spiced Autumn
Mix ½ teaspoon ground cinnamon and a pinch of ground nutmeg into the dry ingredients. The warm spices echo the tartness of the cherries, making the cake perfect for cooler evenings.
Gluten‑Free Freedom
Swap the all‑purpose flour for a 1:1 gluten‑free blend, and add 1 tablespoon xanthan gum to mimic the elasticity of gluten. The cake retains its structure while staying friendly to sensitive stomachs.
Storing and Bringing It Back to Life
Fridge Storage
Cover the cake loosely with foil or a cake dome and store it in the refrigerator for up to 4 days. The caramel will stay glossy, and the crumb remains moist thanks to the butter and oil.
Freezer Friendly
Wrap the entire cake tightly in plastic wrap, then a layer of aluminum foil, and freeze for up to 2 months. When you’re ready to enjoy it, thaw overnight in the fridge and let it sit at room temperature for 30 minutes before serving.
Best Reheating Method
Preheat your oven to 300°F (150°C), place the slice on a baking sheet, and heat for 8‑10 minutes. Add a tiny splash of water (about a tablespoon) to the edge of the slice before reheating; the steam revives the cake’s moisture, making it taste as fresh as day one.