I was standing in the middle of my kitchen, a pot of caramelized sugar bubbling in the pan, when my friend dared me to turn a humble ube cake into a showstopper. The air was thick with the sweet scent of vanilla and the sharp, almost metallic tang of egg yolks as they sizzled against the heat. I laughed, because I knew that what I was about to create would not just be a dessert, it would be a statement. I had the ingredients ready, but I was about to add a twist that would make every bite feel like a secret whispered into a velvet night.
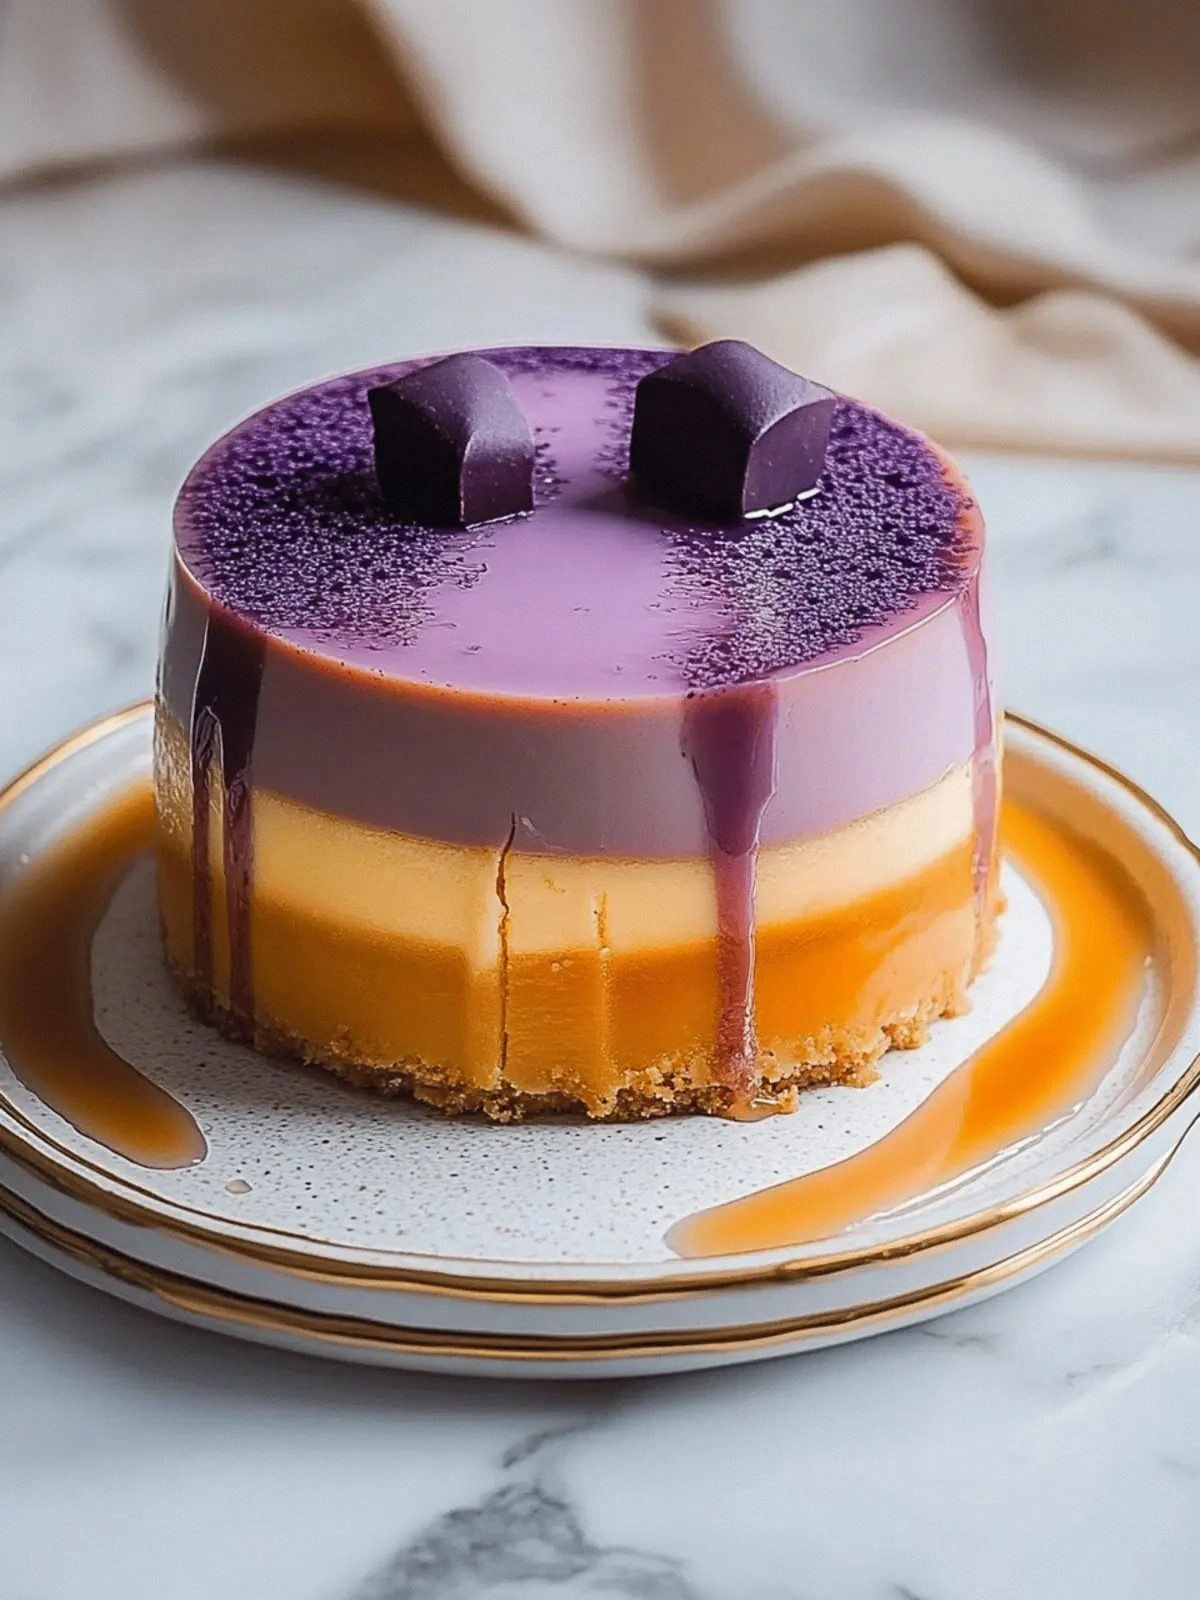
Picture this: a glossy, deep‑purple cake base that looks like it was kissed by royalty, topped with a silky leche flan that glistens like a polished gem. The first thing you notice is the aroma—warm, buttery, with a faint, comforting sweetness that feels like a hug. As you slice into it, the sound of a crisp edge that shatters like thin ice is followed by the gentle, creamy pour of custard that coats the layers like velvet. The texture is a dance of soft cake and smooth custard, each bite melting into the next with an almost hypnotic rhythm.
I dare you to taste this and not go back for seconds. This is hands down the best version you'll ever make at home because it balances the rich, earthy flavor of ube with the classic, comforting sweetness of leche flan in a single bite. If you've ever struggled with making a custard that sets without overcooking, you’re not alone—and I’ve got the fix. Most recipes get this completely wrong by using too much sugar or too much milk, resulting in a watery texture. Picture yourself pulling this out of the oven, the whole kitchen smelling incredible, and then watching the golden top crackle as it cools.
Okay, ready for the game‑changer? Let me walk you through every single step—by the end, you'll wonder how you ever made it any other way. I’ll keep you by my side, sharing every sizzle, every stir, every sigh of triumph. This isn’t just a recipe; it’s a culinary adventure that will have your guests begging for the recipe card. Trust me, the moment you taste the first bite, you’ll know you’ve discovered something truly special.
What Makes This Version Stand Out
- Flavor Depth: The combination of ube halaya and leche flan creates a layered flavor profile that ranges from sweet and earthy to smooth and buttery. The ube adds a subtle nutty undertone that balances the caramelized sugar, while the leche flan’s vanilla base lifts the overall taste. This contrast makes each bite a revelation.
- Texture Harmony: The cake base is airy yet dense enough to hold the custard, while the flan layer sets to a silky, custard‑like consistency that melts on the tongue. The result is a multi‑sensory experience where the cake and custard complement each other rather than compete. The texture is the secret weapon that turns a simple cake into a showstopper.
- Visual Appeal: The vibrant purple hue of the ube cake is eye‑catching, especially when contrasted with the golden caramelized top of the leche flan. This visual contrast makes the dessert as impressive to look at as it is to taste. The glossy finish invites you to dig in.
- Ease of Execution: Despite its layered complexity, the recipe requires only basic kitchen tools and a single oven. Each step is straightforward, with clear temperature guidelines and timing cues. Even novice bakers can achieve professional results with minimal fuss.
- Make‑Ahead Friendly: Once the layers are assembled, the cake can be refrigerated or frozen, allowing you to prepare ahead of time. The custard layer sets well in the fridge, and the cake can be thawed and baked just before serving. This flexibility makes it ideal for parties and special occasions.
- Ingredient Quality: Using fresh, high‑quality ube halaya and premium condensed milk elevates the entire dish. The recipe emphasizes the importance of using real ube flavoring rather than artificial dyes, ensuring authenticity in every bite. Quality ingredients mean a richer, more satisfying dessert.
- Crowd Reaction: Guests often comment that the dessert tastes like a dream, with the perfect balance of sweetness and creaminess. The vibrant color and elegant presentation also impress, making it a conversation starter at any gathering. This recipe consistently wins over both the eyes and the palate.
- Future‑Proof Flavor: The base flavors of ube and leche flan are timeless, yet the recipe’s modern twist—layering and glazing—adds a contemporary flair. It’s a dessert that can be tweaked for holidays, birthdays, or casual get‑togethers, making it a versatile addition to any menu.
Alright, let's break down exactly what goes into this masterpiece...
Inside the Ingredient List
The Flavor Base
3/4 cup Sugar is the sweet anchor that caramelizes into a golden crust during the final bake. It also balances the natural earthiness of the ube. Skipping it would leave the cake tasting flat and under‑seasoned. If you’re watching calories, you can swap for a sugar substitute, but be prepared for a slightly different texture.
10 large Egg Yolks provide richness and a silky mouthfeel to the leche flan layer. They act as emulsifiers, binding the milk and sugar into a smooth custard. Removing even a few yolks would thin the custard and make it harder to set. For a lighter version, use 8 yolks and 2 whites, but expect a slightly looser texture.
1 can Sweetened Condensed Milk contributes both sweetness and a creamy body that gives the flan its signature thickness. It’s a staple in Filipino desserts, and using it ensures authenticity. If you can’t find it, you can combine 1 cup whole milk with 1/2 cup heavy cream and 1/2 cup sugar, but the result will be less dense.
1 can Evaporated Milk adds a subtle caramel note and helps the custard set without over‑cooking. It’s a key ingredient that gives leche flan its silky texture. Skipping it would result in a thinner custard that might not hold its shape. If you’re lactose intolerant, you can replace it with a non‑dairy milk like oat milk, but the texture may change.
1 tsp Vanilla Extract enhances the overall flavor profile, adding warmth and depth to both the cake and the custard. Vanilla is a classic pairing with ube, and its aroma elevates the dessert. If you’re in a pinch, a dash of almond extract can work, but it will alter the flavor slightly.
The Texture Crew
1 cup Cake Flour gives the base its structure, ensuring it rises properly and remains tender. Using cake flour instead of all‑purpose flour reduces gluten, resulting in a softer crumb. If you only have all‑purpose flour, sift it twice to mimic cake flour’s lightness.
1.5 tsp Baking Powder is the leavening agent that creates lift. It also reacts with the acidic ube halaya to produce a lighter texture. Too much can cause a bitter taste, while too little will make the cake dense. Measure accurately to maintain balance.
1/4 tsp Salt is a flavor enhancer that brings out the sweetness and balances the richness. It also counteracts any bitterness from the ube. A pinch is enough; more will make the cake taste metallic.
5 large Egg Yolks (in the second set) are used for the ube cake batter, adding richness and moisture. They also help the batter hold the ube halaya evenly. Skipping them would make the cake dry and crumbly.
1/4 cup Sugar in the second set provides a subtle sweetness that complements the ube. It also helps the batter rise slightly by creating steam during baking. If you prefer a less sweet cake, reduce this amount, but be prepared for a slightly drier texture.
1/4 cup Oil keeps the cake moist and tender, preventing it from drying out during the long bake. It also contributes to a silky mouthfeel. If you prefer an oil‑free version, use melted butter, but the texture may be denser.
The Unexpected Star
1/3 cup Ube Halaya is the star that gives the cake its signature purple color and unique flavor. It’s a sweet, jam‑like puree of purple yam, and it adds natural sweetness without the need for extra sugar. Using fresh ube puree instead of halaya will give a fresher taste but may alter the texture.
1/2 tsp Ube Extract intensifies the ube flavor and deepens the color. It’s a small but powerful addition that elevates the dessert. If you don’t have extract, a few drops of natural food coloring can mimic the color, but the flavor will be less authentic.
1/3 cup Water balances the batter’s moisture, ensuring the cake doesn’t become too dry. It also helps the ube halaya integrate smoothly into the batter. If you’re using a thicker halaya, reduce the water slightly to avoid a watery batter.
The Final Flourish
5 large Egg Whites are whipped with cream of tartar to create a fluffy, airy foam that is folded into the batter. This technique lightens the cake, giving it a delicate crumb. Without the whites, the cake would be heavy and dense.
1/4 tsp Cream of Tartar stabilizes the egg whites, ensuring they hold their volume and don’t collapse. It also adds a slight tang that balances the sweetness. A pinch of salt can be used as a substitute, but cream of tartar gives a cleaner rise.
Everything's prepped? Good. Let's get into the real action...
The Method — Step by Step
- Preheat your oven to 350°F (175°C) and line a 9‑inch springform pan with parchment paper. The parchment ensures easy removal and prevents sticking. While the oven warms, mix the dry ingredients—cake flour, baking powder, salt—in a bowl. This step guarantees even distribution of leavening agents. If you skip this, the cake might develop uneven peaks or a dense crumb.
- Whisk the 5 egg yolks with 1/4 cup sugar until pale and thick. This creates a smooth base that will blend seamlessly with the ube. The yolks also add richness and help the batter set. If you’re short on time, you can use an electric mixer on low speed to speed up the process. Remember, the yolks must be fully integrated for the cake to rise properly.
- Fold in the 1/3 cup ube halaya, 1/2 tsp ube extract, and 1/3 cup water. Mix until the batter is silky and the purple hue is uniform. This step ensures the ube flavor permeates every bite. If the batter feels too thick, add a splash more water. The batter should pour smoothly but still be thick enough to hold its shape.
- Whisk the 5 egg whites with cream of tartar until soft peaks form. This airy foam will lighten the cake’s crumb. Gently fold the whites into the batter, using a spatula to preserve volume. Over‑mixing will deflate the whites, resulting in a dense cake. The goal is to keep the batter light and fluffy.
- Pour the batter into the prepared pan, smoothing the top with a spatula. Tap the pan lightly on the counter to release air bubbles. Bake for 35 minutes, or until a toothpick inserted in the center comes out clean. The cake should rise evenly, forming a gentle dome. Keep an eye on the edges—they should not brown too quickly.
- While the cake bakes, prepare the leche flan custard. In a saucepan, combine 10 egg yolks, 3/4 cup sugar, 1 can sweetened condensed milk, 1 can evaporated milk, and 1 tsp vanilla extract. Heat over medium heat, stirring constantly, until the sugar dissolves and the mixture thickens slightly. This custard will be poured over the cooled cake. Don’t let it boil; a gentle simmer preserves the silky texture.
- Once the cake is baked, remove it from the oven and let it cool for 10 minutes. Then, carefully transfer the cake to a silicone mold or a small baking dish to make room for the custard. Pour the warm leche flan over the cake, ensuring even coverage. The heat from the custard will slightly warm the cake, helping the layers meld together. The custard should swirl into the cake’s surface like a gentle tide.
- Return the assembled cake to the oven and bake at 325°F (160°C) for 45 minutes. The lower temperature allows the custard to set without cracking. Watch the top—once it turns a golden caramel color, the cake is ready. Let it cool completely in the pan; this step is crucial for a firm yet tender finish. The result is a layered masterpiece that glows with a caramel sheen.
- Refrigerate the cake for at least 4 hours, preferably overnight. This chilling period allows the custard to firm up and the flavors to meld. When you’re ready to serve, run a knife around the edges to loosen the cake, then invert onto a plate. The cake will slide out smoothly if it’s properly chilled. The final touch is a dusting of powdered sugar or a drizzle of caramel sauce for extra flair.
- Serve with a splash of coconut milk or a dollop of whipped cream. These accompaniments add a creamy contrast that heightens the ube’s earthiness. You can also garnish with toasted coconut flakes for a subtle crunch. This final plate presentation turns a simple dessert into an edible piece of art. Enjoy each bite as a celebration of flavors.
That's it — you did it. But hold on, I've got a few more tricks that'll take this to another level. These insider tips will help you master every nuance, from the perfect rise to the flawless finish.
Insider Tricks for Flawless Results
The Temperature Rule Nobody Follows
Maintain a steady oven temperature. Even a slight dip can cause the cake to sink or the custard to become lumpy. Preheat the oven for at least 15 minutes, and use an oven thermometer to verify the actual temperature. If your oven runs hot, lower the setting by 25°F. Consistency is key to a uniform rise.
Why Your Nose Knows Best
Use your sense of smell to gauge doneness. A caramelized top will emit a warm, buttery scent that signals readiness. If the smell is too sweet, the custard may be overcooked; if it’s more buttery, you need more time. This olfactory cue saves you from over‑baking and ensures the custard remains silky.
The 5-Minute Rest That Changes Everything
Let the cake rest for 5 minutes before removing it from the pan. This brief pause allows the steam to settle, preventing the cake from collapsing. A sudden temperature drop can cause the cake to sink, ruining the layered look. This simple step is often overlooked but makes a noticeable difference.
The Right Pan Matters
Choose a springform pan for easy release. The removable side helps you lift the cake without tearing it. A standard pan can leave a crusty edge that’s difficult to separate. If you don’t have a springform, line the pan with parchment and use a paper towel to support the cake during removal.
The Secret of Even Layers
Pour the custard slowly and evenly. Use a small ladle or a piping bag to control the flow. A steady pour ensures the custard spreads uniformly, preventing pockets of thick custard that set too quickly. This technique guarantees a smooth top and a consistent texture.
Creative Twists and Variations
This recipe is a playground. Here are some of my favorite ways to switch things up:
Coconut‑Infused Ube
Swap the water for coconut milk in the batter and add a tablespoon of toasted coconut flakes to the custard. The tropical flavor pairs wonderfully with ube’s earthiness. Guests who love coconut will find this version irresistible.
Chocolate‑Covered Flan
After the cake has cooled, drizzle melted dark chocolate over the top. The bittersweet chocolate contrasts the sweet custard, creating a multi‑layered flavor profile. This variation is perfect for chocolate lovers.
Salted Caramel Drizzle
Finish the cake with a drizzle of homemade salted caramel sauce. The salty notes cut through the sweetness and add a luxurious finish. This version is a crowd‑pleaser for any gathering.
Lemon‑Zest Twist
Add a teaspoon of lemon zest to the custard to introduce a bright, citrusy note. The lemon balances the richness of the ube and the custard, giving the dessert a fresh lift. This variation is especially delightful in spring or summer.
Mini Layered Cups
Use silicone muffin molds to create individual servings. Bake each cup separately, then pour the custard over each mini cake. This makes it easy to serve at parties and adds a playful element.
Storing and Bringing It Back to Life
Fridge Storage
Store the chilled cake in an airtight container. Keep it refrigerated for up to 3 days. The custard layer will remain firm, and the cake will retain its moisture. When you’re ready to serve, let it sit at room temperature for 15 minutes for the best flavor.
Freezer Friendly
Wrap the cake tightly in plastic wrap and then foil. Freeze for up to 2 months. When you want to serve, thaw overnight in the fridge. Reheat in a low oven at 300°F (150°C) for 10 minutes to restore its softness. This method preserves the texture and flavor.
Best Reheating Method
To reheat, add a splash of water to the bottom of the pan. This creates steam that helps the custard stay moist. Warm the cake in a preheated oven at 300°F (150°C) for 5 minutes, then remove and let it cool slightly before serving. The cake will taste freshly baked.