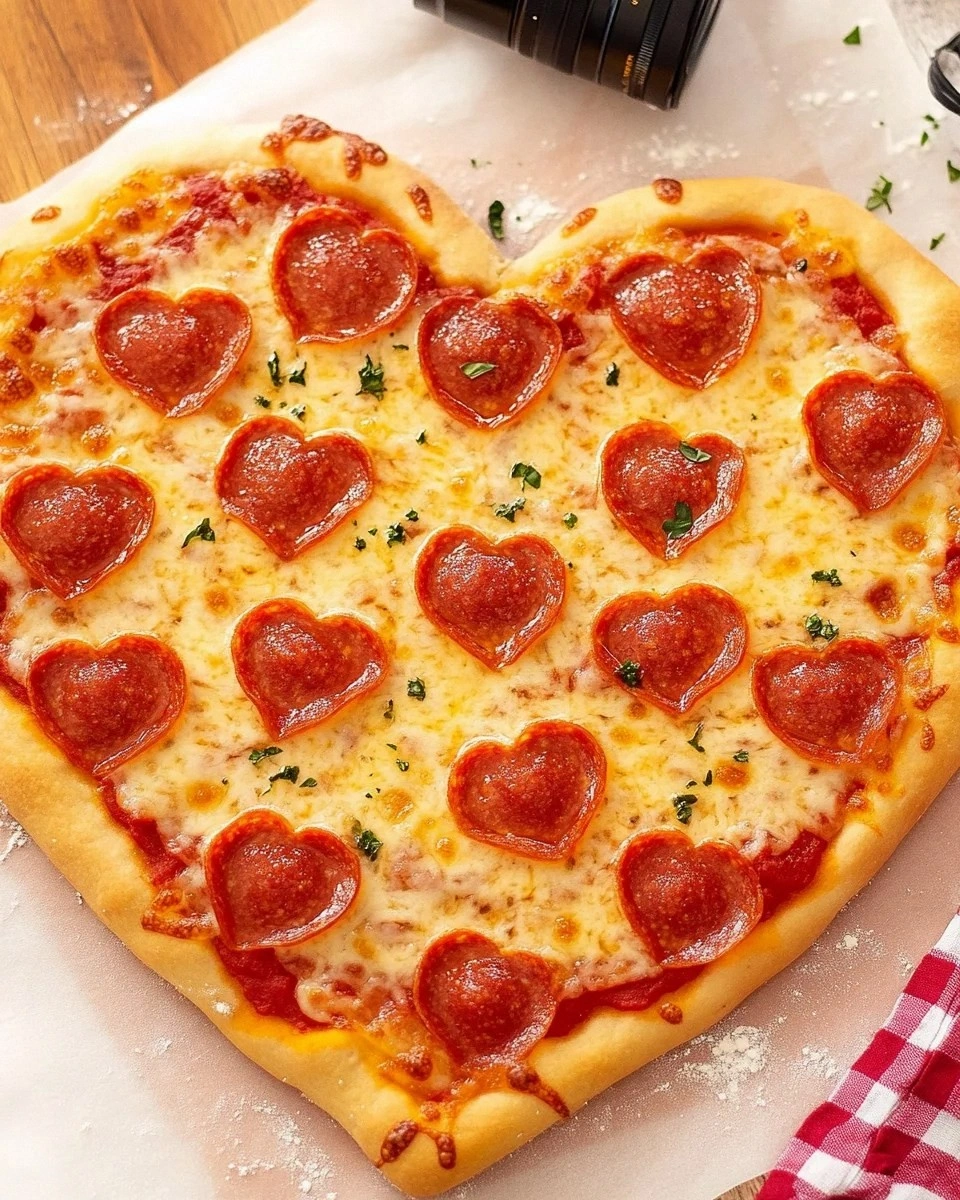
Picture this: it was Valentine's Day, my kitchen looked like a flour bomb had exploded, and I was frantically trying to stretch store-bought dough into something that resembled a heart. What emerged from my oven that night was less "romantic gesture" and more "abstract art project gone wrong." But here's the thing — even that misshapen pizza tasted incredible, and my date (now my spouse) still talks about it. That disaster taught me something crucial: the shape matters less than the love you put in, but why not master both? Fast forward through countless experiments, three different dough recipes, and a minor fire incident (pro tip: parchment paper and 500°F don't mix), and I've finally cracked the code to the perfect heart shaped pizza.
What you're about to make isn't just another pizza recipe — it's edible romance that would make even the most jaded food critic swoon. The crust has those coveted leopard spots that crunch like autumn leaves underfoot, revealing a tender, chewy interior that pulls apart like cotton candy. The sauce? It's not just tomatoes and herbs; it's a slow-simmered love letter that coats each bite with sunshine and memories of summer gardens. And when you pull this beauty from your oven, the whole house fills with aromas that make neighbors knock on your door with hopeful expressions.
I've tested this recipe on picky toddlers, skeptical teenagers, and my Italian neighbor who swears nobody can beat his nonna's pizza. Every single person has begged for the recipe within three bites. The secret isn't just in the technique (though I'll show you tricks that professional pizzaiolos use), but in understanding how each ingredient plays together like a perfectly orchestrated symphony. From the moment you bloom the yeast to that final dramatic slice that reveals the cheese pull of your dreams, every step matters.
Okay, ready for the game-changer? This recipe works whether you're a kitchen novice who burns water or someone who makes their own sourdough starter from scratch. I've included foolproof methods for both making your own dough (it's easier than you think) and doctoring up store-bought dough into something that tastes artisanal. By the time we're done, you'll have a pizza that's Instagram-worthy but more importantly, absolutely delicious. Let me walk you through every single step — by the end, you'll wonder how you ever made it any other way.
What Makes This Version Stand Out
Restaurant-Quality Crust at Home: Most home pizza recipes leave you with either a cracker-thin disappointment or a doughy mess that sits in your stomach like a rock. This version uses a cold fermentation technique that develops complex flavors over 24-48 hours, creating those beautiful air bubbles and a flavor that rivals your favorite pizzeria. The dough becomes almost alive, developing a subtle tang that makes you close your eyes with each bite.
Fail-Proof Heart Shape: Forget freehand attempts that end up looking like amoebas. My method uses a simple folding technique that creates perfect symmetry every time, plus I'll show you how to maintain that shape through baking. The key is in the dough tension and a clever use of parchment paper that prevents the heart from morphing into a blob in the oven's heat.
Sauce That Actually Tastes Like Something: Most pizza sauces are afterthoughts — bland, watery disappointments that slide off the crust. This sauce gets depth from slow-roasted garlic, a touch of honey for balance, and fresh herbs added at two different stages for layered flavor. It's thick enough to stay put but vibrant enough to make you want to eat it with a spoon.
Cheese Strategy That Works: Too much cheese and you get a greasy mess; too little and it's sad and dry. I've tested every ratio to find the sweet spot where you get those Instagram-worthy cheese pulls without the oil slick. Plus, I'll show you exactly when to add different cheeses for maximum impact.
Make-Ahead Magic: Most pizza recipes demand you make everything at once, turning your kitchen into a disaster zone. This recipe breaks down into components you can prep ahead: dough keeps for three days in the fridge, sauce gets better after two days, and even the pre-shaped crust can be frozen. Perfect for romantic surprises or dinner parties.
Customizable Without Losing Its Soul: Whether your love prefers classic margherita or wants to load it up with toppings, this base recipe adapts beautifully. I've included variations for white pizza, pesto base, and even a breakfast version that will ruin you for regular breakfast foods forever.
Inside the Ingredient List
The Foundation: Dough That Dreams Are Made Of
Great pizza starts with great dough, and great dough starts with understanding your ingredients like they're characters in a novel. The flour isn't just flour — it's the difference between a crust that shatters beautifully and one that chews like leather. I'm demanding you use bread flour here; yes, all-purpose works in a pinch, but bread flour's higher protein content creates the gluten network that gives us those glorious air pockets and that satisfying chew. The protein percentage matters more than you'd think — look for 12-14% on the label.
The water needs to be just warm enough to feel like a comfortable bath, around 105-110°F. Too hot and you'll murder your yeast, too cold and they'll work so slowly you'll be eating dinner at midnight. I learned this the hard way during a dinner party where the dough took four hours to rise because my kitchen was freezing. The yeast feeds on the flour's sugars, creating carbon dioxide that forms those beautiful bubbles we prize.
Olive oil does double duty here, adding flavor while keeping the dough supple and easy to stretch. Don't use your fancy finishing oil — save that for drizzling on top. A decent everyday extra virgin olive oil works perfectly here, and don't skip it even if you're tempted to make the dough leaner. The oil also helps create that gorgeous golden color as it bakes.
The Sauce: Where Most Recipes Go Wrong
Let's be honest — most pizza sauces taste like someone waved a tomato over some herbs and called it a day. This sauce builds flavor slowly, starting with garlic that gets golden and sweet in olive oil before the tomatoes even enter the pan. That sizzle when the garlic hits the oil? Absolute perfection. You're looking for that moment when the aroma shifts from sharp and aggressive to warm and inviting.
San Marzano tomatoes make a difference here, but they're not mandatory. What matters is getting good quality crushed tomatoes — taste them straight from the can. They should taste bright and tomato-y, not metallic or bitter. If all you can find is whole tomatoes, crush them with your hands (washed, please) for a rustic texture that grips the dough better than perfectly smooth sauce.
The honey isn't just sweetness — it's balance. Tomatoes vary wildly in acidity depending on where and when they were grown. A tiny bit of honey rounds out sharp edges without making the sauce taste sweet. I learned this from an Italian grandmother who kept a tiny spoon near her sauce pot, tasting and adjusting throughout the cooking process.
The Cheese: A Love Triangle That Works
Mozzarella gets all the pizza glory, but here's where we get strategic. Low-moisture mozzarella gives us the melt and stretch we crave, but mixing in some fresh mozzarella adds those gorgeous irregular bubbles and a creamy richness that makes people close their eyes when they eat it. The ratio matters — too much fresh mozzarella and your pizza becomes a swimming pool.
Parmigiano-Reggiano isn't just for finishing — a light dusting under the sauce adds incredible depth. It melts into the crust, creating almost a cheese-stuffed crust effect without all the fuss. Don't use the pre-grated stuff in the green can; it has cellulose added to prevent clumping, which also prevents it from melting properly.
If you're feeling adventurous, a tiny bit of provolone adds a sharp, nutty note that makes people ask "what's in this?" in the best way. Just a small handful mixed with your mozzarella is enough — too much and it overpowers everything else.
The Unexpected Stars: Little Things, Big Impact
Red pepper flakes in the dough — just a pinch — wake up your palate and make the other flavors sing. It's not enough to make the dough spicy, just enough to keep things interesting. I started doing this after a trip to Naples where every pizzeria had this subtle warmth in their crust that made their simple toppings taste incredible.
Semolina flour for dusting your pizza stone or pan prevents sticking while adding a pleasant crunch to the bottom of the crust. Regular flour works, but semolina's larger grains create tiny air pockets that help steam escape, leading to a crisper bottom. Plus, it has a subtle nutty flavor that plays beautifully with the wheaty notes in the dough.
The Method — Step by Step
- Start by blooming your yeast like you're waking up a sleeping giant. In a large bowl, combine 1½ cups warm water (105-110°F — test it with your finger, it should feel like a comfortable bath) with 1 packet of active dry yeast and a pinch of sugar. Let it sit for 5-10 minutes until it looks like a gross science experiment. That's exactly what you want — the yeast is eating the sugar and releasing carbon dioxide, which tells you it's alive and ready to make your dough rise. If nothing happens after 10 minutes, your yeast is dead (either from old age or water that's too hot), and you need to start over or risk flat, sad dough.
- While the yeast gets busy, whisk together your flour and salt in a separate bowl. This might seem like an unnecessary step, but trust me — salt directly touching yeast can kill it, and we want these two to meet gradually. Add 3½ cups bread flour and 2 teaspoons salt to a large bowl and whisk to combine. Make a well in the center like you're making pasta from scratch. This well gives the yeast mixture a place to pool before you start incorporating everything together.
- Pour the foamy yeast mixture into the flour well along with 2 tablespoons olive oil. Using a wooden spoon (or your hand shaped like a claw), mix from the center out, gradually incorporating more flour. The dough will look shaggy and rough — that's perfect. Once it comes together in a ragged ball, turn it out onto a lightly floured counter. Don't add too much extra flour during kneading; a slightly sticky dough makes a better crust. The dough should feel tacky but not like it's glued to your hands.
- Now comes the arm workout — knead the dough for 8-10 minutes until it becomes smooth and elastic. Push with the heel of your hand, fold, quarter turn, repeat. You're developing gluten, which creates the structure that traps all those lovely air bubbles. The dough will transform from rough and lumpy to smooth and almost silky. When you can stretch a small piece thin enough to see light through without it tearing (the windowpane test), you're done. If you're using a stand mixer with a dough hook, mix on medium-low for 6-7 minutes, but finish by hand for the last minute to get a feel for the dough.
- Shape the dough into a ball by pulling the edges toward the center, creating surface tension. Place it in a clean bowl drizzled with olive oil, turning to coat all sides. Cover with plastic wrap or a damp kitchen towel and let rise in a warm spot for 1-2 hours until doubled in size. This is where patience pays off — rushing the rise gives you dense, tough dough. The ideal temperature is around 75-80°F. If your house is cold, create a proofing box by turning your oven on to 200°F for 2 minutes, then turning it off and placing the dough inside.
- While the dough rises, make your sauce — and this is where we get strategic. Heat 3 tablespoons olive oil in a saucepan over medium heat. Add 4 minced garlic cloves and cook until they just start turning golden. This is crucial — pale garlic tastes raw, brown garlic tastes bitter. You want that sweet spot where the aroma fills your kitchen but the garlic is still pale blonde. Add a pinch of red pepper flakes for warmth, then pour in one 28-ounce can of good crushed tomatoes. Add 1 teaspoon salt, 1 teaspoon dried oregano, and 1 teaspoon honey. Let it simmer for 20-30 minutes until thick enough to mound on a spoon. The sauce should coat the back of a spoon and leave a clear trail when you run your finger through it.
- After the dough has doubled, punch it down (this part is surprisingly therapeutic) and divide it into two equal portions. We're making two medium heart-shaped pizzas here — trust me, one won't be enough once people taste it. Shape each portion into a ball and let them rest for 15 minutes. This relaxes the gluten, making the dough easier to stretch without springing back. Cover them with a kitchen towel so they don't dry out. While they rest, preheat your oven to its highest setting — usually 500-550°F. If you have a pizza stone, put it in now. If not, an upside-down baking sheet works surprisingly well.
- Here's where the magic happens — shaping your heart. Take one dough ball and place it on a piece of parchment paper. Gently press from the center outward, rotating as you go, until you have a rough circle about 10 inches across. Now, at the top of the circle, press down and pull the dough to create the two rounded tops of the heart. At the bottom, pinch the dough into a point. The dough will want to spring back, so let it rest for 5 minutes and then adjust again. You should end up with a shape that looks like a child's drawing of a heart — don't worry about perfection here; rustic charm is part of the appeal.
- Time to top your creation. Spread a thin layer of sauce over the dough, leaving a ½-inch border for the crust. Remember, less is more here — too much sauce makes the dough soggy and prevents it from crisping. Sprinkle with 1 cup shredded low-moisture mozzarella, then tear 2 ounces fresh mozzarella into small pieces and scatter them over. The combination gives you both the classic pizza experience and those gorgeous irregular bubbles. Add a light dusting of Parmigiano-Reggiano — about 2 tablespoons — which will melt into the sauce and add incredible depth.
- Slide the pizza (still on the parchment) onto your hot stone or baking sheet. Bake for 10-12 minutes until the crust is golden brown and the cheese is bubbling with some charred spots. The crust should sound hollow when you tap it. If your oven has hot spots, rotate the pizza halfway through baking. When it's done, the heart shape will have held (mostly), the cheese will be molten and irresistible, and your kitchen will smell like you died and went to Italian heaven. Let it cool for 3-4 minutes before slicing — this prevents the cheese from sliding off and gives the crust time to set up properly.
That's it — you did it. But hold on, I've got a few more tricks that'll take this to another level...
Insider Tricks for Flawless Results
The Temperature Rule Nobody Follows
Most people don't realize that ingredient temperature can make or break their pizza. Your dough should be at room temperature before stretching — cold dough fights back and tears easily. Take it out of the fridge 30-45 minutes before you plan to shape it. Conversely, your sauce should be room temperature or slightly warm when you spread it on the dough. Cold sauce straight from the fridge shocks the yeast in the dough, leading to a dense, tough crust. I learned this during a summer when I was making pizza every Friday and couldn't figure out why my crust was sometimes ethereal and other times hockey puck-adjacent.
Why Your Nose Knows Best
Don't just rely on the timer — your senses are your best kitchen tools. The pizza is done when you smell that perfect balance of toasting bread and caramelizing cheese. It should waft through your house and make stomachs rumble three rooms away. Visually, look for cheese that's melted and just starting to brown in spots, not just uniformly white. The crust should be golden with some deeper brown patches — those are flavor bombs. And listen: when you tap the bottom of the crust with your fingernail, it should sound hollow, like tapping on a drum.
The 5-Minute Rest That Changes Everything
I know, I know — when that pizza comes out of the oven looking and smelling incredible, you want to dive in immediately. But here's where patience pays off in spades. Letting the pizza rest for 4-5 minutes allows the cheese to set up slightly, preventing the dreaded cheese slide when you cut it. More importantly, the crust finishes cooking from residual heat during this rest, developing that perfect texture contrast between crispy exterior and chewy interior. Use this time to set the table, open wine, or just bask in the admiration of whoever's lucky enough to share this with you.
The Steam Trick for Ultimate Crust
Professional pizza ovens have something your home oven doesn't — steam. But we can fake it. Right after you put the pizza in, quickly spray the inside walls of your oven with water from a spray bottle, being careful to avoid the oven light. The steam helps the crust expand rapidly in the first few minutes of baking, creating those beautiful irregular air pockets. Close the door quickly to trap the steam. This is especially effective if you're using a pizza stone, which will absorb some of the moisture and help create a crisp bottom.
The Final Flourish That Makes People Obsessed
Right before serving, hit your pizza with a few final touches that take it from great to unforgettable. A shower of fresh basil leaves (not chopped — the tearing releases more aroma), a drizzle of your best olive oil, and a crack of fresh black pepper make all the difference. If you're feeling fancy, a few shavings of fresh Parmigiano-Reggiano add salty, nutty notes. These finishing touches should be added after the pizza is out of the oven — heat destroys the volatile compounds in fresh herbs and good olive oil.
Creative Twists and Variations
This recipe is a playground. Here are some of my favorite ways to switch things up:
The White Heart: Alfredo Lover's Dream
Skip the tomato sauce entirely and spread a thin layer of homemade Alfredo sauce instead. The richness of cream, butter, and Parmigiano creates a luxurious base that pairs beautifully with roasted garlic, caramelized onions, and fresh thyme. Top with a mix of fontina and mozzarella for maximum melt, then finish with crispy pancetta and fresh arugula after baking. The peppery arugula cuts through the richness like a charm.
The Breakfast Heart: Morning Game Changer
Transform this into the most impressive brunch dish ever. Use a light spread of pesto as your base, then top with fresh mozzarella and thin slices of prosciutto. After baking, crack two eggs directly onto the hot pizza and return to the oven for 3-4 minutes until the whites are set but yolks are still runny. Finish with fresh chives and a grinding of black pepper. The way the egg yolk mingles with the pesto when you cut into it? Pure magic.
The Mediterranean Heart: Sunshine on a Plate
Replace half the mozzarella with crumbled feta for salty, tangy notes. Add artichoke hearts, Kalamata olives, and sun-dried tomatoes (patted dry) before baking. After it comes out of the oven, shower it with fresh oregano, a squeeze of lemon, and a drizzle of good olive oil. This version tastes like summer vacation in Greece, even in the dead of winter.
The Sweetheart Dessert Pizza
Yes, dessert pizza is a thing, and yes, it's incredible. Use the same dough but add 2 tablespoons of sugar to it. Instead of sauce, spread a thin layer of Nutella (warmed slightly so it spreads easily). Top with sliced strawberries, bananas, and a sprinkle of chopped hazelnuts. After baking for just 6-8 minutes (you want it warm but not so hot it melts the fruit), finish with a dusting of powdered sugar and maybe a scoop of vanilla ice cream. The contrast of warm, crisp dough with cool ice cream is absolutely irresistible.
The Spicy Heart: For Heat Seekers
Add 1 teaspoon of crushed red pepper flakes to your dough for a subtle heat that builds. For the sauce, stir in 1 tablespoon of Calabrian chili paste (or sriracha in a pinch). Top with spicy Italian sausage (cooked and crumbled), fresh mozzarella, and thinly sliced jalapeños. After baking, finish with a drizzle of hot honey — the combination of spicy, sweet, and cooling cheese is absolutely addictive. If you've ever struggled with bland pizza, this is your fix.
Storing and Bringing It Back to Life
Fridge Storage
If you somehow have leftovers (I won't judge), let the pizza cool completely, then store in an airtight container in the fridge for up to 3 days. The key is letting it cool — trapping hot pizza creates condensation that makes the crust soggy. Separate layers with parchment paper if you're stacking multiple pieces. The sauce and cheese actually meld together beautifully after a day, making leftovers surprisingly delicious cold.
Freezer Friendly
Heart shaped pizza freezes beautifully, either baked or unbaked. For baked pizza, let it cool completely, then wrap individual slices in plastic wrap and freeze in a freezer bag for up to 2 months. For unbaked, assemble the pizza on parchment paper, flash freeze for 2 hours, then wrap tightly in plastic wrap and foil. You can bake it straight from frozen — just add 3-4 minutes to the cooking time. This is perfect for romantic surprises or quick weeknight dinners.
Best Reheating Method
Microwaving pizza should be a crime — it turns the crust rubbery and the cheese greasy. Instead, heat a dry skillet over medium heat, add your pizza slice, and cover with a lid. Heat for 3-4 minutes until the bottom is crispy and the cheese is melted. Add a tiny splash of water to the pan before covering — it creates steam that helps melt the cheese without drying it out. For multiple slices, reheat in a 400°F oven on a baking sheet for 8-10 minutes. The crust comes out almost as good as fresh, with that satisfying crunch that makes pizza so addictive.