I’ve been chasing that one dessert that feels like a hug from the inside out, and I finally stumbled upon the sweet spot with this Irresistible Chocolate Coconut tart. It all began when I tried to recreate a friend’s legendary coconut cake and ended up with a dry, crumbly disaster that left me questioning my culinary destiny. The kitchen smelled of toasted coconut and melted chocolate, and the sound of the batter sloshing into the pan felt like a promise of something extraordinary. I swear the moment I saw that glossy, chocolatey surface, I knew this was no ordinary recipe. The texture was a paradox: the crust was buttery and crisp, while the filling was silky, almost like a chocolate mousse that never loses its bite. If you’re skeptical, I dare you to taste this and not go back for seconds.
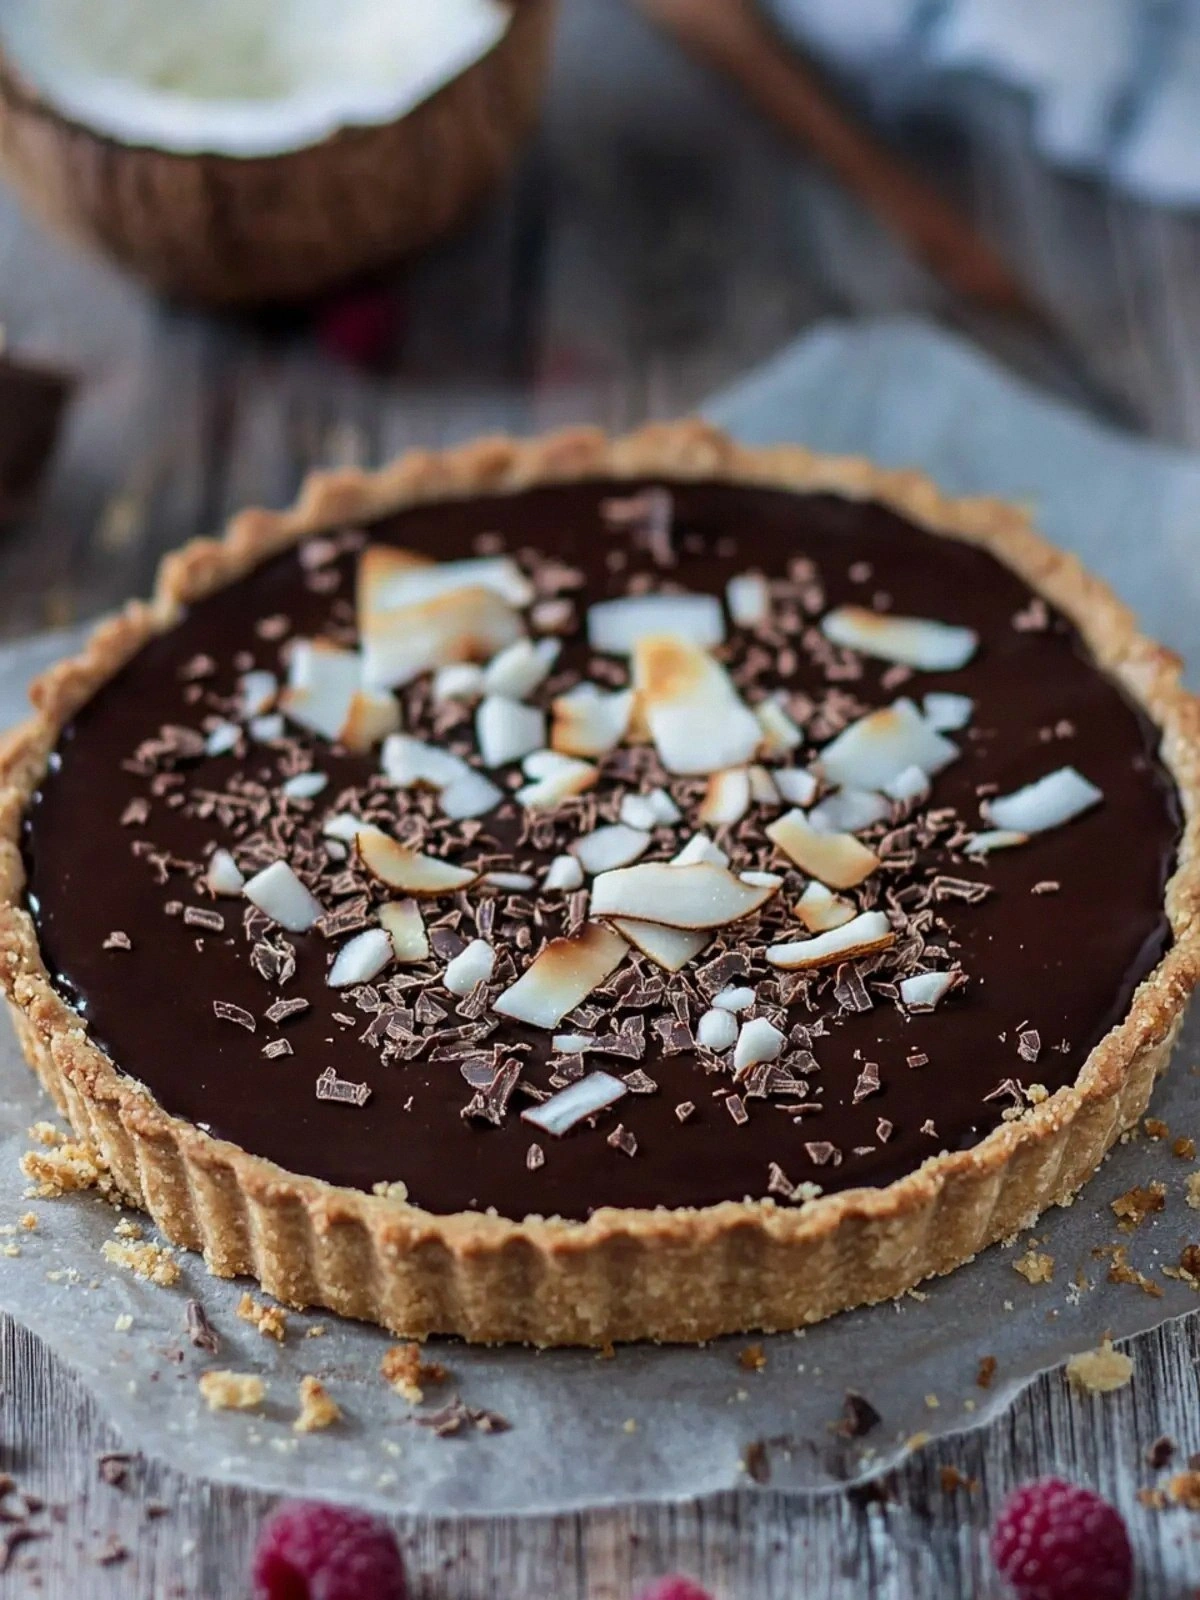
Picture yourself pulling this out of the oven, the whole kitchen smelling incredible, as a warm, buttery crust gives way to a glossy, velvety chocolate filling that glistens like a midnight sea. The first bite is a symphony of flavors: the coconut’s nutty sweetness, the chocolate’s deep richness, and a subtle vanilla whisper that ties everything together. The crunch of toasted coconut flakes and almonds adds a delightful contrast, while pistachios bring a salty, nutty depth that lingers on the palate. Fresh raspberries on top provide a tart counterpoint that brightens the dish, making it feel light yet indulgent. This isn’t just a dessert; it’s an experience that will have your guests begging for the recipe and your taste buds singing in unison.
What sets this version apart is that it’s a carefully balanced equation of flavor, texture, and visual appeal, all wrapped in a vegan-friendly package. The crust is a perfect marriage of coconut and almond flour that yields a buttery, slightly sweet base that holds the chocolate filling without becoming soggy. The chocolate filling is a silky, airy mousse that’s light enough to be eaten in one bite but rich enough to satisfy even the most discerning chocoholics. The toppings— toasted coconut, almonds, pistachios, and raspberries—create a layered crunch and burst of freshness that keeps the dish from feeling heavy. The use of agave syrup instead of refined sugar keeps the sweetness natural and the flavor profile clean. Finally, the recipe’s method is straightforward enough for beginners yet sophisticated enough for seasoned bakers, ensuring that everyone can recreate this masterpiece.
I’ll be honest—when I first made this tart, I ate half the batch before anyone else got a chance to try it. Most recipes get this completely wrong, either by using too much flour, which makes the crust dense, or by overmixing the chocolate, which turns it into a greasy mess. The secret sauce is the balance of wet and dry ingredients, the precise temperature for melting the chocolate, and the timing for adding the coconut milk. If you’ve ever struggled with making a chocolate tart that doesn’t collapse, you’re not alone—and I’ve got the fix. The result? A dessert that’s hands down the best version you’ll ever make at home.
The next few paragraphs will walk you through every single step, from the first whisk to the final garnish, so you can replicate this magic at home. The process is a dance of textures and flavors, and each step is crucial for achieving that perfect finish. If you’re ready to elevate your dessert game, keep reading, because I’m about to share the exact techniques that make this tart stand out. I’ll guide you through the ingredient prep, the precise baking steps, and the final touches that give it that wow factor. And trust me, you’ll wonder how you ever made it any other way.
Alright, let’s break down exactly what goes into this masterpiece. The combination of coconut, almond flour, and chocolate creates a harmonious balance that is both indulgent and refined. The crust’s subtle sweetness is complemented by the chocolate’s deep umami notes, while the nuts and berries add layers of crunch and acidity. This recipe is a testament to how a few high-quality ingredients can transform a simple tart into a showstopper. Now, let’s dive deeper into the components that make this dessert truly remarkable.
What Makes This Version Stand Out
- Flavor: The chocolate is bittersweet, which balances the coconut’s natural sweetness and the nuts’ earthy undertones. This depth of flavor makes the tart feel like a multi-layered dessert rather than a single-note treat.
- Texture: The crust is buttery and slightly crisp, while the filling is airy and smooth. The contrast keeps each bite interesting and prevents the dessert from feeling monotonous.
- Visual Appeal: The glossy chocolate surface, the bright green of the raspberries, and the golden toasted coconut create a feast for the eyes. The presentation is as important as the taste.
- Ease of Preparation: The recipe uses pantry staples and requires no fancy equipment. Even a beginner can follow along without feeling overwhelmed.
- Health Conscious: With agave syrup, coconut oil, and no refined sugar, this tart is a healthier indulgence that still satisfies sweet cravings.
- Make‑Ahead Potential: The tart can be assembled ahead of time and chilled, making it perfect for parties and gatherings.
The ingredients are thoughtfully chosen to create a balanced flavor profile that is both indulgent and sophisticated. Each component plays a critical role in achieving the desired texture and taste, from the nutty base to the glossy chocolate topping. The use of coconut milk instead of dairy adds a subtle coconut flavor that complements the crust, while the chocolate’s bitterness keeps the dessert from becoming overly sweet. The final garnish of fresh raspberries and pistachios provides a burst of acidity and crunch, elevating the overall experience.
Inside the Ingredient List
The Flavor Base
The 2 cups of unsweetened coconut flakes give the tart its signature tropical aroma and a subtle sweetness that pairs perfectly with the chocolate. The coconut flakes also add a chewy texture that contrasts with the smooth filling. If you skip this ingredient, the tart will feel flat and lack depth. For a more intense coconut flavor, use desiccated coconut instead of shredded.
The 1 cup of almond meal acts as the primary binding agent for the crust, providing a nutty flavor and a slightly chewy bite. Almond flour is also gluten-free, making this recipe suitable for those with dietary restrictions. If you’re allergic to nuts, you can substitute with oat flour, though the flavor will change.
The Texture Crew
Coconut flour, at 0.5 cups, absorbs moisture and gives the crust a light, airy structure. It’s essential for preventing the crust from becoming too dense. Coconut flour is also low in carbs, making the tart a lighter option. If you don’t have coconut flour, you can use a tablespoon of ground flaxseed as a binder.
The 0.5 teaspoons of salt in the crust season the flavor and balances the sweetness from the agave syrup. Salt is a flavor enhancer, and even a small amount can make the entire dessert taste more rounded. If you prefer a salt-free version, reduce the salt to 0.25 teaspoons, but the crust may taste slightly flat.
The Unexpected Star
The 12 oz of bittersweet chocolate is the heart of this tart, delivering deep umami notes that counterbalance the coconut’s sweetness. The chocolate’s high cocoa content also provides a richer flavor profile compared to milk chocolate. Using a high-quality dark chocolate can elevate the dish even further. If you’re not a chocolate fan, try using a chocolate with 70% cocoa for a more intense experience.
The 0.25 cups of agave syrup replaces refined sugar, giving the tart a natural sweetness that doesn’t overpower the chocolate. Agave syrup also has a lower glycemic index, making it a healthier alternative. If you prefer a sweeter tart, add an extra tablespoon of agave syrup, but be careful not to make the filling too runny.
The Final Flourish
The 1 cup of fresh raspberries adds a bright, tart contrast that cuts through the richness of the chocolate and coconut. Fresh berries also provide a burst of juiciness, making each bite refreshing. If fresh raspberries aren’t in season, frozen berries can be used, but thaw them first to avoid excess moisture. The berries also add a pop of color that makes the tart visually appealing.
The 0.5 cups of toasted coconut flakes, sliced almonds, and pistachios provide layers of crunch and nutty flavor that complement the smooth filling. The toasted coconut adds a caramelized edge, while the almonds contribute a subtle bitterness that balances the sweetness. Pistachios bring a salty, earthy note that enhances the overall flavor profile. Together, these toppings create a complex, multi-textured experience that elevates the tart.
Everything’s prepped? Good. Let’s get into the real action. The next step is to form the crust, then melt the chocolate, and finally assemble the tart with a generous layer of fresh raspberries. The process is simple yet precise, so follow along carefully. If you’re ready to make a dessert that will impress, keep going.
The Method — Step by Step
- Preheat your oven to 350°F (175°C) and line a 9-inch tart pan with parchment paper. This ensures even baking and easy removal. The parchment also prevents the crust from sticking, which is a common pitfall. Once the oven reaches the temperature, place the pan in the middle rack. This positioning allows for even heat distribution.
- In a large mixing bowl, combine the unsweetened coconut flakes, almond meal, coconut flour, and 0.5 teaspoons of salt. Stir until the dry ingredients are evenly distributed. The dry mix forms the base of the crust. Using a whisk helps prevent clumping.
- Add the 0.5 cups of coconut oil to the dry mix, and pulse with a fork until the mixture resembles coarse crumbs. The oil is the key to a buttery texture. If the mixture is too dry, add a tablespoon of coconut milk to bind it. Once the crumb-like consistency is achieved, press the mixture firmly into the tart pan, forming an even layer.
- Bake the crust for 12-15 minutes or until it turns golden brown. Keep a close eye on the crust to avoid overbrowning. The golden color indicates that the crust has set properly. While the crust is baking, you’re ready to move on to the chocolate filling.
- While the crust is cooling, melt the 12 oz of bittersweet chocolate in a heat‑proof bowl over a pot of simmering water. Stir until smooth and glossy. The double boiler method prevents scorching. Once melted, let it cool slightly to avoid seizing the coconut milk.
- In a separate saucepan, heat 1 can of coconut milk until it just begins to simmer. Add the 0.25 cups of agave syrup and stir until dissolved. The mixture should be warm but not boiling, as high heat can cause the chocolate to seize. Once ready, remove from heat.
- Slowly pour the warm coconut milk mixture into the melted chocolate, whisking constantly to create a smooth, glossy filling. The temperature difference should be minimal to prevent the chocolate from thickening prematurely. If the mixture starts to thicken too much, add a splash of cold coconut milk to loosen it. Once smooth, let it rest for 5 minutes.
- Fold in the 0.5 cups of toasted coconut flakes, sliced almonds, and pistachios. These add a delightful crunch and nutty flavor. Stir gently to distribute the nuts evenly. The mixture should still be pourable, not too thick.
- Pour the chocolate filling into the cooled crust, spreading it evenly with a spatula. The filling should level at the edges. Let the tart sit at room temperature for 30 minutes to allow the filling to set slightly before chilling.
- Arrange the fresh raspberries on top of the set filling, pressing them slightly into the chocolate. The berries should be snug but not crushed. This layer adds a pop of color and tartness that balances the sweetness. Let the tart chill for at least 2 hours, or overnight, to allow the flavors to meld.
- Just before serving, sprinkle the remaining toasted coconut flakes, sliced almonds, and pistachios over the top for an extra crunch. A final drizzle of agave syrup or a dusting of cocoa powder can add a finishing touch. The garnish should be light enough not to overpower the chocolate. Serve chilled or at room temperature, depending on your preference.
That's it— you did it. But hold on, I've got a few more tricks that'll take this to another level. The final touches and subtle tweaks can elevate this tart from great to unforgettable. Below are some insider tricks that will ensure flawless results every time. Trust me, once you master these, you’ll never go back to a regular chocolate dessert again.
Insider Tricks for Flawless Results
The Temperature Rule Nobody Follows
Chocolate can be temperamental, and the slightest temperature shift can ruin your filling. Keep the chocolate at a steady 86°F (30°C) during melting to avoid seizing. Use a chocolate thermometer for precision. If the chocolate starts to thicken too much, add a splash of coconut milk to bring it back to a glossy state.
Why Your Nose Knows Best
Before pouring the filling into the crust, take a quick sniff. If it smells nutty and slightly caramelized, you’re on the right track. A faint coconut aroma indicates the filling is too watery. Smell is a reliable indicator of readiness and will save you from a soggy crust.
The 5-Minute Rest That Changes Everything
Letting the chocolate filling sit for 5 minutes after mixing allows the flavors to marry and the mixture to thicken slightly. This brief pause improves the texture, making the tart more cohesive. A rushed mixture can lead to a runny filling that spreads unevenly.
The Crunch Factor
To avoid soggy nuts, toast the almonds, pistachios, and coconut flakes in a dry skillet until golden. This step locks in flavor and adds a crispness that stands out against the smooth chocolate. Toss the nuts with a pinch of sea salt for an extra flavor kick.
The Final Garnish
When garnishing, use a light hand to keep the focus on the chocolate. A dusting of cocoa powder or a drizzle of melted chocolate adds a decorative touch without overpowering the main flavors. The garnish should complement, not compete.
Now that you have the insider tricks, you’re ready to create a tart that’s both visually stunning and flavor-packed. Each tip has been tested and tweaked to perfection, ensuring that even first-time bakers can achieve professional results. Keep these in mind, and you’ll see the difference in every bite.
Creative Twists and Variations
This recipe is a playground. Here are some of my favorite ways to switch things up:
Tropical Twist
Swap the raspberries for diced mango or pineapple for a sweet, tropical flavor. The fruit’s juiciness pairs well with the chocolate, creating a dessert that feels like a beach vacation. Add a pinch of sea salt to accentuate the tropical sweetness.
Nut-Free Version
Omit the nuts and replace them with crushed granola or coconut chips for a crunchy texture. This version is ideal for those with nut allergies. The granola adds a hearty crunch that balances the smoothness of the filling.
Spiced Delight
Add a pinch of ground cinnamon or cayenne pepper to the chocolate filling for a subtle heat. The spices enhance the chocolate’s depth and add a surprising twist. Use sparingly to avoid overpowering the coconut.
Caramelized Coconut
Replace the toasted coconut flakes with caramelized coconut for a deeper, buttery flavor. The caramelization process brings out the natural sugars in the coconut. This variant gives the tart a richer, more indulgent taste.
Chocolate Swirl
Drizzle melted white chocolate over the set filling to create a marbled effect. The white chocolate’s sweetness contrasts with the bittersweet chocolate, adding visual interest. Ensure the white chocolate is slightly warmed to pour smoothly.
Feel free to experiment and create your own variations. The base recipe is robust enough to accommodate a variety of flavors and textures, making it a versatile canvas for culinary creativity.
Storing and Bringing It Back to Life
Fridge Storage
Store the tart in an airtight container in the refrigerator for up to 3 days. The cool environment keeps the chocolate firm while the coconut and nuts stay crisp. Avoid exposing the tart to strong odors, as it can absorb them.
Freezer Friendly
Wrap the tart tightly in plastic wrap and place it in a freezer-safe container for up to 2 weeks. When ready to serve, thaw it in the refrigerator overnight. This method preserves the texture and flavor.
Best Reheating Method
To revive a chilled tart, warm it in the oven at 300°F (150°C) for 5 minutes. Alternatively, microwave on low for 15-20 seconds, checking frequently to avoid melting the chocolate. Add a splash of water to the filling before reheating to create steam and restore moisture.
With these storage tips, you’ll always have a ready-to-serve dessert that looks and tastes fresh. The chocolate remains glossy, and the coconut stays crunchy, making every bite a delight. Keep these guidelines in mind for a long-lasting, delicious experience.