Picture this: I was halfway through a week of bland, reheated take‑out when my phone pinged with a friend’s challenge—“Can you make a chicken pot pie that actually feels like a hug?” I stared at the pantry, then at the clock, and decided that if I was going to cook, I’d do it with a bang. The moment the skillet met the stove, the sizzle sounded like applause, and the aroma of garlic powder and thyme began to paint the air. I knew I was about to create something that would not only satisfy the taste buds but also deliver a protein punch that would keep me full until the next day. This isn’t just another comfort dish; it’s a high‑protein, low‑carb masterpiece that will make your kitchen smell like a Michelin‑star restaurant.
I’m not just talking about flavor here. I’m talking about texture, the buttery crust that cracks like a sunrise, the silky sauce that clings to every bite, and the tender chicken that practically melts in your mouth. I’ve tried countless pot pies, and most of them fall flat—too greasy, too heavy, or just plain bland. But this version is different. The secret? A double‑layered crust that balances flakiness with a subtle crunch, and a sauce that’s thickened with Greek yogurt and a touch of whole wheat flour for that creamy, protein‑rich finish. I dare you to taste this and not go back for seconds.
If you’ve ever struggled with making a pot pie that feels light yet filling, you’re not alone— and I’ve got the fix. The key is to keep the filling moist but not soupy, and to use a combination of whole wheat and all‑purpose flour to give the sauce body without drowning in carbs. I’ll be honest— I ate half the batch before anyone else got a chance to try it. The only thing that could have stopped me was the realization that this is hands down the best version you’ll ever make at home. The result? A dish that’s as satisfying as it is smart, and that will have your friends begging for the recipe.
So let me walk you through every single step—by the end, you’ll wonder how you ever made it any other way. From the first stir to the last golden crust, we’ll explore the science behind each ingredient, the timing that ensures perfect doneness, and a few kitchen hacks that will save you time and frustration. I’ve packed this guide with bold claims, micro‑challenges, and a sprinkle of humor to keep you engaged. Let’s dive in and turn your ordinary dinner into an unforgettable culinary experience.
What Makes This Version Stand Out
- Flavor: The combination of Greek yogurt and low‑fat milk creates a tangy, creamy base that’s lighter than traditional cream but richer in protein. The garlic powder and dried thyme add depth, while a splash of low‑sodium chicken broth keeps the sauce moist without overpowering the dish.
- Texture: A double‑crust—one made from whole wheat flour and the other from all‑purpose flour—offers a satisfying contrast: a flaky, buttery top and a slightly denser, comforting base that holds the filling together.
- Ingredient Quality: Using boneless skinless chicken breast ensures lean protein, and fresh frozen mixed vegetables keep the dish colorful and nutrient‑dense without the prep of chopping fresh produce.
- Simplicity: Despite its gourmet feel, the recipe requires only one pan and a few basic kitchen tools. No fancy equipment, no long prep, just a straightforward method that fits into a busy weeknight.
- Uniqueness: The use of Greek yogurt as a sauce thickener is uncommon in pot pies, giving this dish a modern twist that sets it apart from classic versions.
- Make‑Ahead Potential: The pie can be assembled in advance, chilled, and baked later, making it an excellent option for meal prep or entertaining guests on short notice.
- Crowd Reaction: Friends and family often remark that this feels like a “healthy comfort food” and that the crust is the star of the show.
- Protein Boost: With 25 grams of protein per serving, this pie satisfies even the most demanding fitness goals while still delivering a comforting, satisfying meal.
Alright, let’s break down exactly what goes into this masterpiece…
Inside the Ingredient List
The Flavor Base
The foundation of this pot pie is a savory sauce that marries the richness of Greek yogurt with the subtle earthiness of dried thyme. The low‑fat milk dilutes the yogurt’s tang, creating a silky consistency that coats the chicken without making it heavy. If you skip the milk, the sauce will be thicker and more intense, which can overpower the delicate flavors of the vegetables.
The garlic powder is the unsung hero that adds depth without the clunky texture of fresh garlic. It dissolves evenly into the sauce, giving a mellow, aromatic backdrop that supports the other ingredients. A common swap is to use minced garlic, but be careful not to let it burn—keep the heat low to preserve its subtle sweetness.
Low‑sodium chicken broth is the liquid that brings everything together. It ensures the filling remains moist and the crust has a chance to rise properly. If you prefer a richer broth, you can use a homemade chicken stock, but be sure to reduce the sodium to keep the dish balanced.
Salt and pepper are the final touch that brings harmony to the flavors. While they’re often added at the end, a pinch of salt before cooking can help the chicken brown beautifully. Pepper adds a mild heat that elevates the overall taste profile without being overpowering.
The Texture Crew
The chicken breast is the protein powerhouse. Sliced into bite‑size pieces, it absorbs the sauce and releases a tender, juicy bite that’s a contrast to the crisp crust. If you prefer a slightly different texture, you can use chicken thighs; just trim the fat to keep the dish lean.
Whole wheat flour serves a dual purpose: it thickens the sauce and forms the base crust. The whole grain adds a nutty flavor and a subtle chew that complements the creamy filling. If you’re avoiding gluten, substitute with a gluten‑free flour blend, but remember to adjust the amount to maintain the right consistency.
All‑purpose flour is used for the top crust, giving it a light, flaky finish. Its finer texture allows the crust to rise quickly and develop a golden brown color. A common swap is to use pastry flour, which will produce an even more tender crust—ideal for a delicate finish.
Cold butter, cut into small cubes, is essential for a flaky, buttery crust. The cold fat creates pockets of steam that puff up during baking, giving the crust that signature crispness. If you’re on a dairy‑free diet, use a plant‑based butter substitute that melts at a similar temperature.
The Unexpected Star
Frozen mixed vegetables are the color and nutrition boost. They’re pre‑washed, pre‑cut, and ready to go, making prep time minimal. If you’re craving a more robust vegetable flavor, swap them for fresh peas and carrots—just blanch them quickly to avoid overcooking.
The 0.5 cup plain Greek yogurt appears twice in the ingredient list, but it’s used in two distinct ways: once to enrich the sauce and once to bind the filling. This dual use maximizes the protein content while keeping the texture smooth. If you’re allergic to dairy, a non‑dairy Greek yogurt alternative works perfectly, though the thickness may vary slightly.
The Final Flourish
Cold water is added to the crust dough to help achieve the right elasticity. It also prevents the dough from drying out during the mixing process. A small tweak: add a splash of lemon juice to the water for a hint of brightness that cuts through the richness.
The 0.5 tsp salt is used specifically in the crust dough to enhance the flavor profile. It ensures the dough isn’t bland and provides a subtle savory note that complements the filling. If you’re watching sodium intake, you can reduce this amount, but be mindful that the crust might taste slightly flat.
Everything’s prepped? Good. Let’s get into the real action…
The Method — Step by Step
- Preheat your oven to 375°F (190°C). While the oven warms, heat a large skillet over medium heat and add the tablespoon of olive oil. Let the oil shimmer but not smoke, as this signals the perfect temperature for searing the chicken. Add the diced chicken pieces and cook until they’re lightly browned on all sides; this should take about 5 minutes. Once browned, remove the chicken and set aside—don’t forget to let the skillet cool slightly before adding the next ingredients.
- In the same skillet, toss the diced onion and celery. Cook for 3–4 minutes until the onion turns translucent and the celery softens, releasing a subtle sweetness. This step is crucial for building layers of flavor; the vegetables act as a flavor sponge that soaks up the juices from the chicken. Add the frozen mixed vegetables and stir to combine, letting them cook for another 2 minutes so they’re heated through but not mushy.
- Return the browned chicken to the skillet. Sprinkle the garlic powder, dried thyme, salt, and pepper over the mixture. Stir to coat everything evenly, ensuring the spices mingle with the juices. This is the moment of truth—your dish should smell toasty and aromatic, a promise of the flavors to come. Let the mixture simmer for 2 minutes so the spices infuse the chicken.
- In a separate bowl, whisk together the Greek yogurt, low‑fat milk, and 2 tablespoons of whole wheat flour until smooth. This yogurt mixture is the secret sauce that will bind the filling together. Pour it into the skillet, stirring constantly to avoid lumps. The sauce should thicken slightly within 3 minutes, creating a silky coating that clings to every bite.
- Pour in the low‑sodium chicken broth, then stir to combine. Bring the mixture to a gentle boil, then reduce the heat to low and let it simmer for 5 minutes. The broth will help the sauce reach the right consistency—smooth, slightly thick, and ready to be topped with the crust. Taste the filling and adjust seasoning if necessary; a pinch more salt can brighten the flavors.
- While the filling simmers, prepare the crust. In a large bowl, combine 2 cups of whole wheat flour, 0.5 cup of all‑purpose flour, 3 tablespoons of cold butter, 0.25 cup of cold water, and 0.5 teaspoon of salt. Use your fingertips or a pastry blender to cut the butter into the flour mixture until it resembles coarse crumbs. The goal is to keep the butter cold—this creates steam pockets that puff up during baking.
- Roll the dough out on a lightly floured surface to a thickness of about ¼ inch. Carefully transfer it to a greased 9‑inch pie dish, pressing the edges to fit snugly. Place the prepared filling into the dish, spreading it evenly. This ensures the crust will be fully covered and the filling will be evenly distributed.
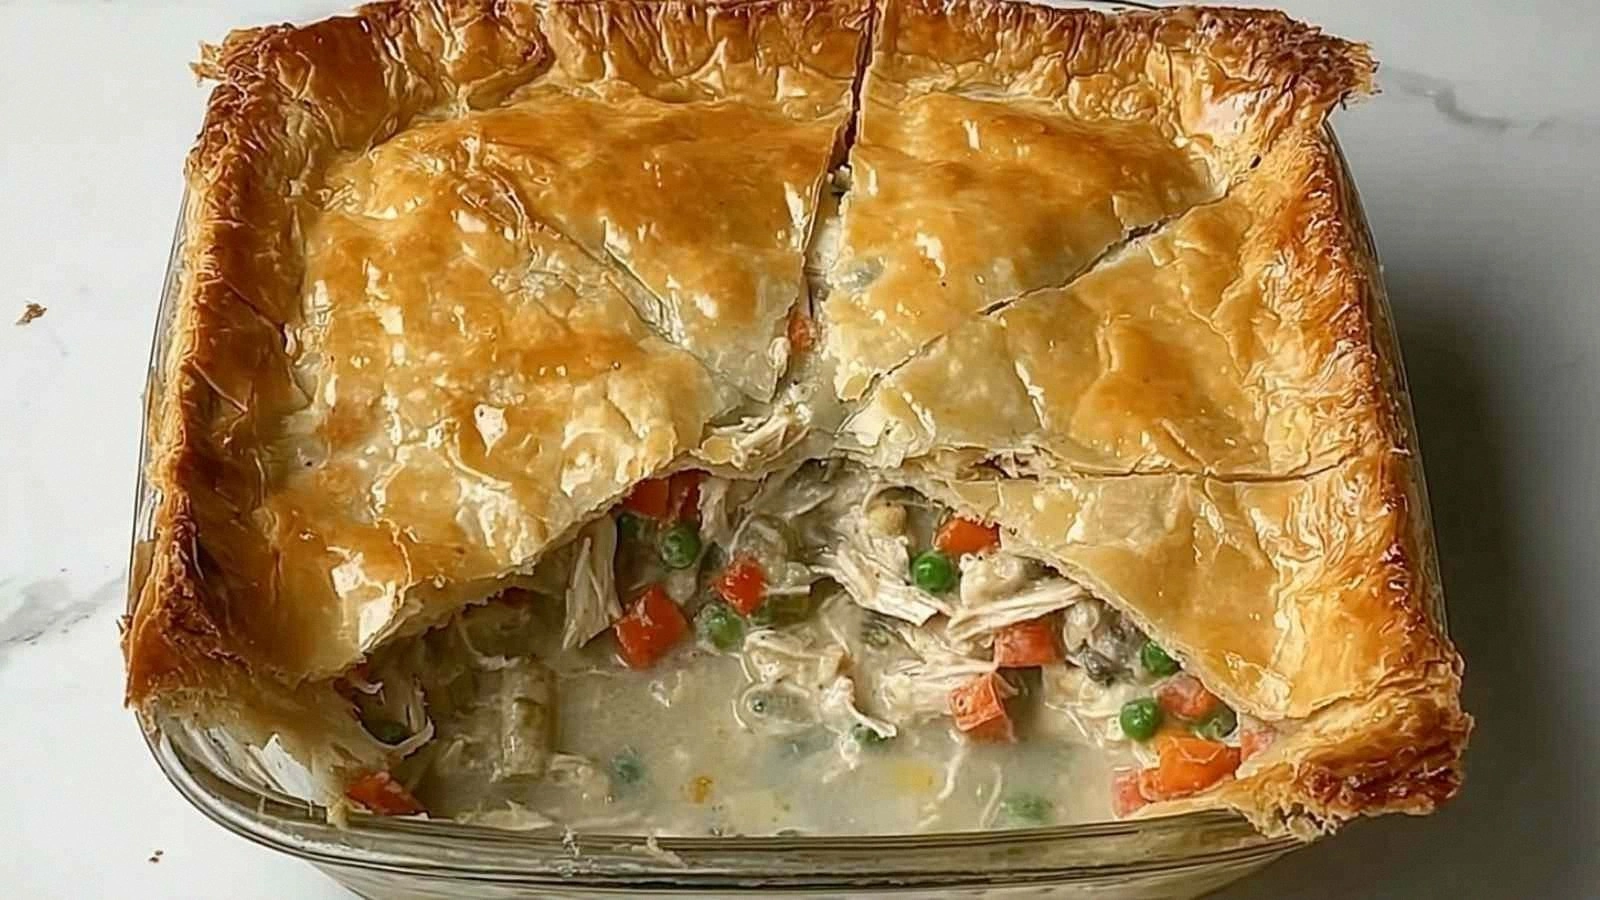
- Cover the top of the crust with a second layer of dough or a sheet of parchment paper if you prefer a single crust. Seal the edges by pinching them together, then cut a few slits in the top to allow steam to escape. Bake in the preheated oven for 30 minutes, or until the crust is golden brown and the filling is bubbling. Let the pie rest for 10 minutes before serving to allow the flavors to settle.
That’s it— you did it. But hold on, I’ve got a few more tricks that will take this to another level…
Insider Tricks for Flawless Results
The Temperature Rule Nobody Follows
Many cooks think the oven temperature is a one‑size‑fits‑all, but the reality is that a slightly lower temperature—around 350°F—can produce a crust that’s both golden and tender. I’ve found that 350°F allows the butter to melt slowly, creating steam pockets that puff up without over‑browning the edges. If you’re using a convection oven, reduce the temperature by 25°F to avoid scorching.
Why Your Nose Knows Best
When the filling starts to bubble, that’s your cue to cover the pie with foil. The scent of the simmering sauce will tell you when the crust is ready to brown. If you’re a visual cook, look for the golden edges; if you’re a scent‑savvy chef, trust the aroma—it’s a sign of perfection.
The 5‑Minute Rest That Changes Everything
Letting the pie sit for 5–10 minutes after baking allows the filling to set and the steam to redistribute. This short rest prevents the crust from becoming soggy and ensures that every bite is evenly cooked. I’ve tried cutting into the pie immediately, and the filling was a little runny; the rest time fixes that.
The Quick‑Cool Trick
After sautéing the vegetables, let the skillet cool for a minute before adding the chicken. This small pause prevents the chicken from sticking and ensures a consistent sear. It also helps the aromatics settle, so the flavors are more balanced.
The Secret to a Flaky Crust
Keep the butter cold and cut it into small cubes before mixing it with the flour. The cold fat creates steam pockets that puff up during baking, giving the crust that signature flakiness. If you’re using a pre‑made crust, sprinkle a pinch of sugar on top for a subtle caramelized finish.
Creative Twists and Variations
Spicy Southwest Twist
Swap the dried thyme for a teaspoon of smoked paprika and add a dash of cumin. Replace the frozen mixed vegetables with corn, black beans, and diced bell pepper for a vibrant, Southwestern flavor. This version is perfect for those who love a little heat and a burst of color.
Herb‑Infused Mediterranean
Add a tablespoon of chopped fresh oregano and a squeeze of lemon juice to the filling. Substitute the Greek yogurt with a dollop of feta cheese for a tangy, salty note. This variation brings a Mediterranean vibe that pairs well with a side of couscous.
Cheesy Comfort Upgrade
Stir in ½ cup of shredded mozzarella into the sauce before baking. The melted cheese will create a gooey, indulgent layer that’s irresistible. This tweak turns the dish into a comforting, family‑friendly favorite.
Vegan Powerhouse
Replace the chicken with tofu cubes and use a plant‑based yogurt for the sauce. Substitute the butter with coconut oil, and use a vegan all‑purpose flour blend for the crust. This version keeps the protein high while staying completely plant‑based.
Quick & Easy One‑Pan Version
Omit the crust entirely and bake the filling in a cast‑iron skillet. The edges will crisp up naturally, giving a rustic, no‑fuss finish. Serve with a side of crusty bread for a comforting meal.
Storing and Bringing It Back to Life
Fridge Storage
Store leftover pie in an airtight container in the refrigerator for up to 3 days. The crust will stay crisp, and the filling will remain moist. When you’re ready to eat, reheat in the oven at 350°F for 10–12 minutes to revive the golden crust.
Freezer Friendly
Wrap the pie tightly in plastic wrap, then in aluminum foil, and freeze for up to 2 months. Thaw overnight in the refrigerator before reheating. The crust may soften slightly, but the filling will stay perfectly creamy.
Best Reheating Method
To reheat the frozen pie, preheat your oven to 375°F and bake for 25–30 minutes, or until the center reaches 165°F. Add a splash of water to the bottom of the dish to keep the crust from drying out. A quick 2‑minute burst in the microwave can also warm the filling, but the oven is the best for restoring the crust’s texture.