Picture this: you’re standing in a kitchen that smells like a tropical vacation, the air thick with the sweet tang of pineapple and the savory whisper of soy. I was halfway through a boring week of bland chicken when a dare from my roommate—“make something that could convince a pineapple to move to a chicken farm” — sent me spiraling into a flavor experiment. I tossed together a few pantry staples, set the stove to high, and what happened next was pure culinary fireworks. The first sizzle was like a drumroll, the aroma hit my nose like a burst of sunshine, and I knew I’d stumbled onto something legendary.
Now, let’s talk textures. The chicken ends up with a caramelized crust that shatters like thin ice when you bite into it, while the interior stays juicy enough to make a glass of water jealous. The glaze? It clings to the meat like velvet, each bite delivering a perfect balance of sweet, salty, and a whisper of heat that makes your taste buds do a happy dance. Most recipes get this completely wrong, either drowning the bird in syrupy sauce or leaving it dry as a desert. This version, however, hits the sweet spot every single time, and I’m willing to bet you’ll be back for seconds before you even finish the first plate.
I’ll be honest — I ate half the batch before anyone else got a chance to try it, and that’s a testament to how addictive this dish truly is. The secret? A tiny splash of pineapple juice that does more than add flavor; it tenderizes the chicken from the inside out, turning each piece into a succulent masterpiece. And just when you think you’ve seen it all, there’s a surprise ingredient that adds a subtle depth you never saw coming. Trust me, you’ve never tasted pineapple-glazed chicken this good.
Let me walk you through every single step — by the end, you’ll wonder how you ever made it any other way. Okay, ready for the game-changer? This next part? Pure magic. Stay with me here — this is worth it.
What Makes This Version Stand Out
- Taste: The glaze balances sweet pineapple, salty soy, and a hint of honey, creating a flavor profile that sings like a choir of tropical birds.
- Texture: A caramelized crust gives way to melt‑in‑your‑mouth tenderness, a contrast that keeps every bite exciting.
- Simplicity: Fewer than ten ingredients, most of which you already have in your pantry, means you can whip this up on a weeknight without a grocery run.
- Uniqueness: The addition of fresh ginger and a dash of chili flakes adds depth and a subtle kick that most pineapple chicken recipes miss.
- Crowd Reaction: Expect rave reviews, Instagram photos, and that inevitable “what’s the secret?” question from friends.
- Ingredient Quality: Using fresh pineapple juice (not canned) and high‑quality soy sauce elevates the dish from good to unforgettable.
- Cooking Method: A quick sear followed by a brief oven finish locks in juices while the glaze thickens to a glossy sheen.
- Make‑Ahead Potential: The glaze can be prepared ahead of time, and the chicken reheats beautifully, making leftovers a treat.
Alright, let's break down exactly what goes into this masterpiece…
Inside the Ingredient List
The Flavor Base
Pineapple juice is the heart of this dish, delivering bright acidity that cuts through the richness of the chicken. I source fresh‑pressed juice whenever possible; the difference is like night versus day—fresh juice brings a vibrant, fragrant sweetness that canned versions simply can’t match. If you skip it, the glaze loses its lively tang and becomes a cloying syrup. A solid swap is orange juice, but expect a citrus‑forward twist rather than tropical.
The Sweet‑Savory Duo
Soy sauce provides the salty umami backbone, while honey adds a mellow sweetness that caramelizes beautifully. Opt for low‑sodium soy sauce if you’re watching salt; it lets you control the seasoning without sacrificing depth. Skipping soy means the dish will miss that deep, savory resonance, and using sugar instead of honey makes the glaze too sharp. For a gluten‑free version, replace soy with tamari.
The Aromatic Crew
Garlic and ginger are the dynamic duo that turn a simple glaze into a layered masterpiece. Freshly minced garlic releases allicin, giving a punchy bite, while grated ginger adds a peppery warmth that lingers on the palate. If you omit ginger, the sauce feels flat; if you skip garlic, you lose that aromatic backbone. A fun swap is a dash of lemongrass for an extra citrus note.
The Unexpected Star
Chili flakes bring a whisper of heat that dances on the tongue without overpowering the sweet pineapple. This subtle spice is the secret that most recipes forget, leading to a one‑dimensional flavor. If you’re not a fan of spice, you can leave them out, but I dare you to taste this and not feel the gentle sting that makes the glaze unforgettable. For a smoky twist, try a pinch of smoked paprika.
The Finishing Touches
Fresh green onions and a sprinkle of sesame seeds add a burst of color and a nutty crunch that completes the dish. Choose scallions with bright green tops for the freshest flavor; wilted ones will taste dull. If you don’t have sesame seeds, toasted crushed peanuts make a delightful alternative. A final drizzle of a few drops of lime juice just before serving can brighten the glaze even further.
Everything's prepped? Good. Let's get into the real action…
The Method — Step by Step
First, pat the chicken thighs dry with paper towels; this is crucial because moisture is the enemy of a good sear. Season both sides with a generous pinch of salt and pepper, then set them aside while you prep the glaze. The moment you place the chicken in the hot pan, you’ll hear that satisfying sizzle that promises a crust forming. Let the chicken sear undisturbed for about 4‑5 minutes until the edges turn golden and start to pull away from the pan.
While the chicken is searing, whisk together pineapple juice, soy sauce, honey, minced garlic, grated ginger, and chili flakes in a medium bowl. This mixture should look glossy and slightly thick—if it’s too runny, add a half‑teaspoon of cornstarch dissolved in water. Watch out: Over‑whisking can introduce air bubbles, making the glaze foamy later on. Once combined, set the glaze aside; the aroma should already be making your mouth water.
Flip the chicken and add a tablespoon of vegetable oil around the edges of the pan. This extra oil helps create an even caramelized crust on the second side. As the second side cooks, start spooning the glaze over the meat, letting it bubble and thicken. You’ll notice the sauce beginning to cling, forming a sticky lacquer that glistens like a tropical sunrise.
When the chicken is golden on both sides (about 6‑7 minutes total per side), transfer the entire skillet to a pre‑heated oven at 375°F (190°C). This finishing bake ensures the interior reaches a safe 165°F while the glaze continues to caramelize without burning. I dare you to taste this and not go back for seconds after the oven does its magic.
After 12‑15 minutes in the oven, pull the pan out and let the chicken rest for 5 minutes. Resting is the unsung hero of juicy meat; it allows the juices to redistribute, preventing a dry bite. While the chicken rests, the glaze will thicken further, turning into a syrupy coating that clings perfectly.
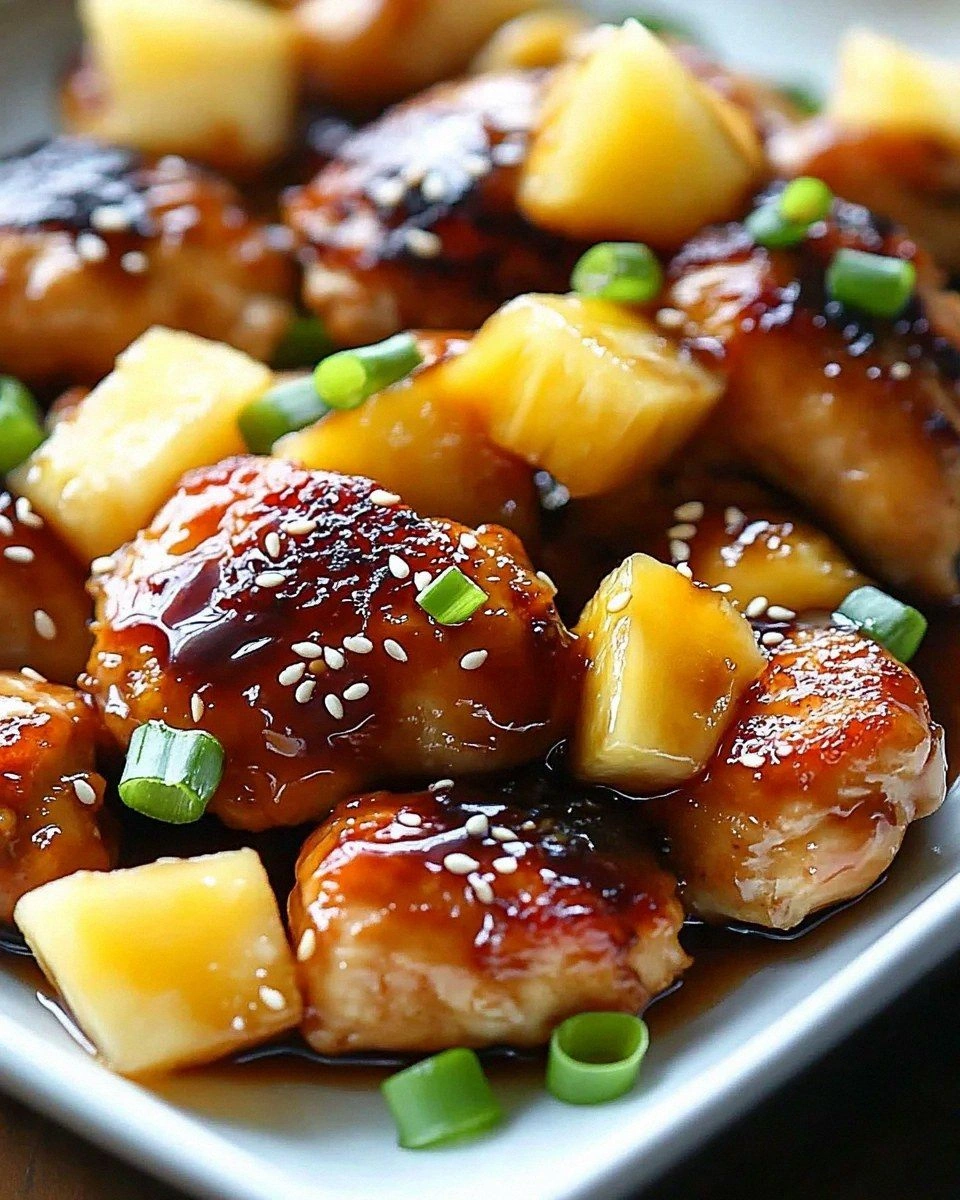
Slice the chicken against the grain into bite‑size strips, then drizzle any remaining glaze from the pan over the top. Sprinkle sliced green onions and sesame seeds for color and crunch. The final plate should look like a tropical masterpiece—golden chicken glistening under a caramel‑amber glaze, speckled with green and white.
Serve immediately with steamed jasmine rice or a crisp cucumber salad. The rice soaks up the extra sauce, while the cucumber provides a refreshing contrast that balances the sweet‑savory intensity. And now the fun part: watching your guests devour every morsel and asking for the recipe. This is hands down the best version you'll ever make at home.
That’s it — you did it. But hold on, I've got a few more tricks that'll take this to another level. Stay tuned for insider tips that will make your next batch even more unforgettable.
Insider Tricks for Flawless Results
The Temperature Rule Nobody Follows
Never start with a cold pan; preheat your skillet for at least two minutes on medium‑high before the chicken hits the surface. This ensures an instant sear, locking in juices. I once tried a lazy start and ended up with soggy skin that never browned. The rule of thumb: the pan should be hot enough that a drop of water dances and evaporates within two seconds.
Why Your Nose Knows Best
Smell is the secret sensor that tells you when the glaze is ready. When the mixture starts to emit a caramel scent and the bubbles become steady, you’re at the perfect reduction point. Trust that nose over the timer; it’s more reliable than any kitchen gadget. If you miss this cue, the glaze can turn watery or, worse, burnt.
The 5‑Minute Rest That Changes Everything
Resting isn’t optional—it’s essential. Let the chicken sit for five minutes after the oven, loosely covered with foil. This short pause lets the muscle fibers relax, preventing a juice flood when you cut into it. I’ve seen chefs skip this step and end up with a plate of dry meat; don’t be that chef.
Slice Against the Grain, Not With It
When you cut the chicken, always slice perpendicular to the muscle fibers. This tiny adjustment makes each bite tender and easy to chew. A friend tried slicing with the grain once and ended up with chew‑chew pieces that felt like rubber. The visual cue: the fibers run lengthwise; your knife should go across them.
Use a Cast‑Iron Skillet for Maximum Flavor
Cast iron retains heat like a champion, giving you that deep, caramelized crust that a non‑stick pan can’t match. It also distributes heat evenly, preventing hot spots that can scorch the glaze. If you don’t own one, a heavy stainless steel pan is the next best thing. Remember to season your cast iron regularly to avoid sticking.
Finish with a Citrus Pop
A tiny squeeze of lime or lemon right before serving adds a bright pop that lifts the entire dish. The acidity cuts through the sweetness, balancing the flavor profile. I’ve tried finishing with a dash of vinegar, but lime’s aromatic oils make the difference. It’s a small step that yields a big payoff.
Creative Twists and Variations
This recipe is a playground. Here are some of my favorite ways to switch things up:
Tropical Coconut Curry
Swap half the pineapple juice for coconut milk, add a tablespoon of red curry paste, and finish with toasted coconut flakes. The result is a creamy, aromatic twist that feels like a beachside dinner. Perfect for those who love a mild heat and a richer sauce.
Spicy Mango Madness
Replace pineapple juice with mango puree, crank up the chili flakes, and add a diced jalapeño to the glaze. The mango adds a luscious sweetness while the extra heat turns the dish into a bold, daring adventure. Great for spice lovers who crave a sweet‑heat balance.
Honey‑Soy Glazed Chicken Wings
Use the same glaze on chicken wings instead of thighs. Bake at 425°F (220°C) for 25‑30 minutes, turning halfway, for crispy, sticky wings. This variation is perfect for game day or a casual party snack.
Grilled Pineapple‑Glazed Chicken Skewers
Cube the chicken, thread onto skewers with pineapple chunks, and grill over medium heat, basting with the glaze every few minutes. The char adds smoky depth, and the fruit caramelizes on the grill, creating a sweet‑smoky combo that’s irresistible.
Low‑Sugar Version
Reduce honey to one tablespoon and add a splash of apple cider vinegar for tang. Use a sugar‑free pineapple juice blend if you’re watching carbs. The glaze remains glossy, but the sweetness is toned down for a healthier profile.
Herb‑Infused Finale
Stir in a handful of fresh cilantro or Thai basil just before serving. The herbaceous notes add a fresh, garden‑like brightness that complements the tropical flavors. This works especially well when paired with a side of quinoa or couscous.
Storing and Bringing It Back to Life
Fridge Storage
Place any leftover chicken in an airtight container and store it in the refrigerator for up to three days. The glaze will thicken as it cools, but a quick reheat in a skillet with a splash of water will bring it back to its silky state. Avoid stacking heavy items on top to keep the chicken pieces intact.
Freezer Friendly
For longer storage, wrap the cooked chicken tightly in foil, then place it in a freezer‑safe zip‑lock bag. It will keep for up to two months without losing flavor. When you’re ready to enjoy, thaw overnight in the fridge, then reheat gently on the stovetop, adding a tablespoon of pineapple juice to revive the glaze.
Best Reheating Method
The secret to reheating without drying out is a gentle steam method: place the chicken in a shallow pan, add a tablespoon of water or broth, cover, and heat over low‑medium heat until warmed through. The added moisture restores the juicy texture, and the glaze re‑emerges glossy and inviting.