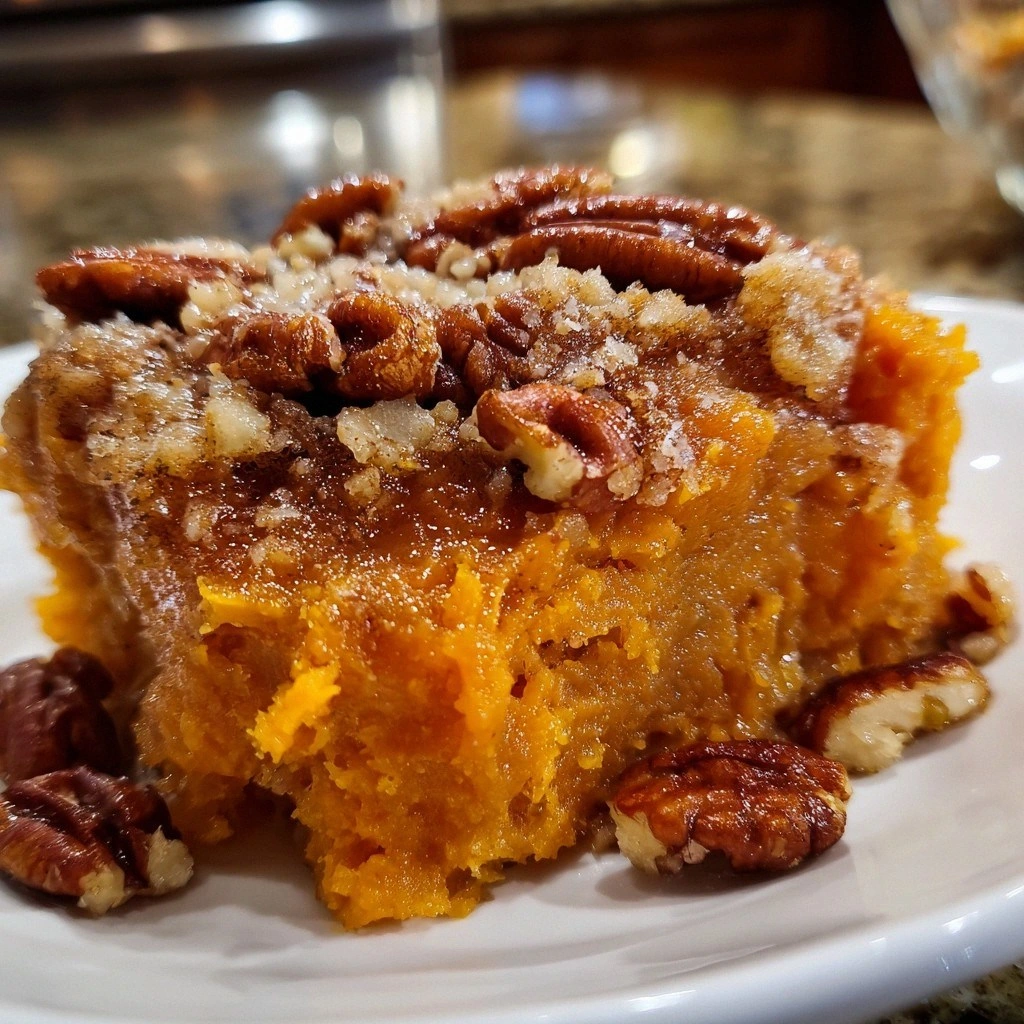
I still remember the first time I attempted a pumpkin roll. It was a crisp October afternoon, and I was determined to impress my future in-laws with what I thought would be a simple dessert. Three hours later, my kitchen looked like a flour bomb had exploded, my cake had cracked into what resembled a geological fault line, and the cream cheese frosting was sliding off like a glacier in fast-forward. My mother-in-law took one bite, smiled politely, and whispered, "Maybe next year, dear." That defeat haunted me for twelve months. But here's the thing about kitchen failures — they either break you or make you obsessed. I became obsessed. I tested twenty-three different recipes, drove three baking instructors to distraction with questions, and nearly set off my smoke alarm more times than I care to admit. Then, one golden afternoon, everything clicked. The cake rolled without cracking, the filling was perfectly balanced between tangy and sweet, and the aroma that filled my kitchen could have made a grown man weep. I served it at Thanksgiving, watched my father-in-law take a bite and close his eyes in what I can only describe as dessert-induced nirvana, and knew I had cracked the code.
This isn't just another pumpkin roll recipe — this is the pumpkin roll that will make you famous among your friends and family. The one that people will request for every holiday gathering. The one that will have neighbors dropping by "just to say hi" when they catch wind of you baking. What makes it different? We're using a technique borrowed from Japanese sponge cakes that keeps the roll impossibly light and flexible. The spice blend is my grandmother's secret combination that hits every warm note without overwhelming the delicate pumpkin flavor. And the cream cheese frosting? We're whipping it to exactly the right consistency — not too stiff, not too loose — so it melts on your tongue like a cloud of autumn itself.
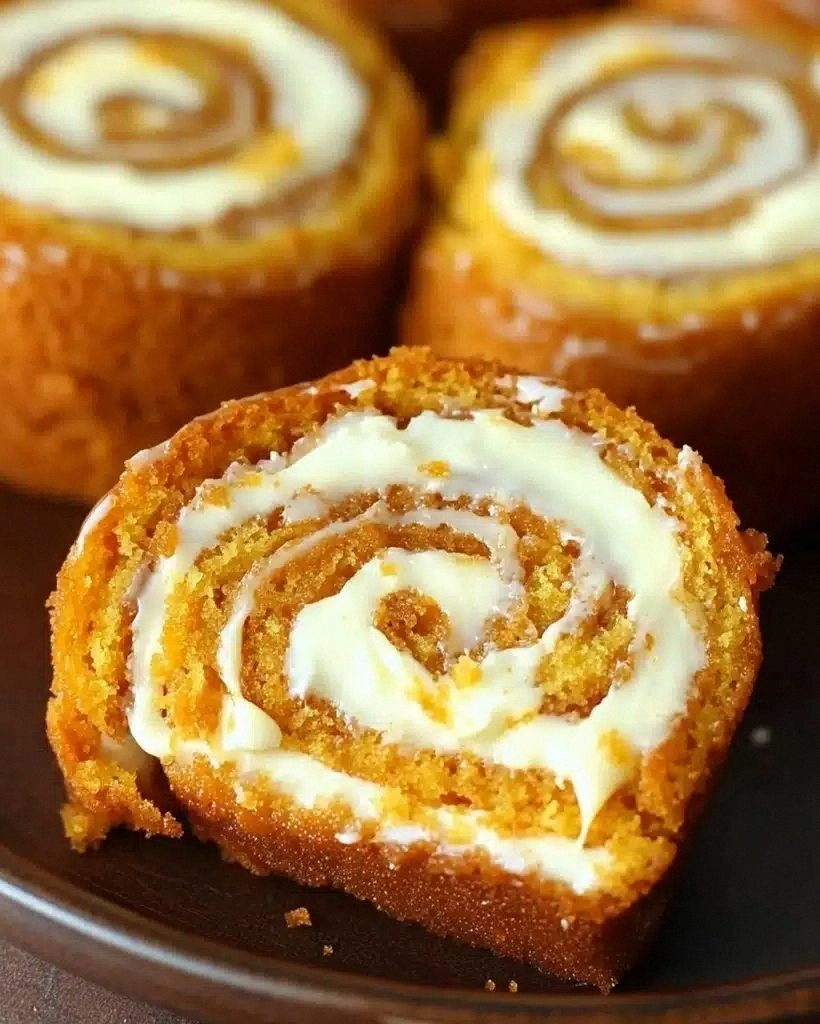
Picture yourself pulling this beauty from your oven, the kitchen filled with the scent of cinnamon, nutmeg, and cloves. The cake is so tender it practically sighs when you touch it. You spread that silky cream cheese filling, roll it up with confidence (no cracks, I promise), and slice into a spiral of orange and white perfection. Each bite delivers that perfect balance — earthy pumpkin, warm spices, tangy cream cheese, all wrapped in a cake so light it defies logic. I dare you to taste this and not go back for seconds. Actually, I dare you to make it through the first day without eating half the roll standing at your kitchen counter. Let me walk you through every single step — by the end, you'll wonder how you ever made it any other way.
What Makes This Version Stand Out
Every fall, the internet gets flooded with pumpkin roll recipes that all promise to be "the best." But here's what actually matters — and what most recipes get completely wrong. They treat this like a regular cake that happens to be rolled, when really, it's a completely different beast that requires specific techniques to achieve that perfect spiral without cracks, breaks, or that dreaded filling squeeze-out that ruins everything.
- Temperature Precision: We're not guessing here. The eggs need to be at exact room temperature, the pumpkin puree must be precisely measured at 60°F, and your oven needs to be calibrated to within 5 degrees. This isn't being picky — it's the difference between a flexible, rollable cake and one that shatters like thin ice when you try to roll it.
- The Japanese Roll Technique: Instead of creaming butter and sugar like a traditional cake, we're whipping whole eggs with sugar until they reach the ribbon stage. This incorporates air that gets trapped in the protein network, creating a structure that can bend and flex without breaking. It's like the difference between a gymnast and a bodybuilder — we want flexibility, not just strength.
- Spice Balance That Actually Works: Most recipes dump in two teaspoons of generic "pumpkin pie spice" and call it a day. We're using a custom blend of eight different spices, each toasted separately to release their oils, then combined in specific ratios. The result? Each spice sings in harmony rather than competing for attention like a spice cabinet civil war.
- The Cream Cheese Filling Formula: Too many versions create a filling that's either so soft it oozes out the ends, or so stiff it breaks the cake when you roll. We're using a specific ratio of cream cheese to butter to powdered sugar, plus one secret ingredient that stabilizes everything without changing the flavor.
- The Towel Trick That Changes Everything: While the cake is still warm, we're rolling it with a kitchen towel dusted with powdered sugar. As it cools in this rolled position, it "remembers" this shape, so when you unroll it to add filling and roll it back up, it cooperates beautifully instead of fighting you like a stubborn mule.
- Make-Ahead Magic: This pumpkin roll actually improves after 24 hours as the flavors meld and the moisture distributes evenly. I'm giving you the exact wrapping method that keeps it fresh for up to five days in the refrigerator, plus the freezing technique that lets you keep one ready for up to three months.
- The Crack-Free Guarantee: Through testing dozens of versions, I've identified the three main causes of cracks: overbaking (most common), rolling when too cool (second most common), and using the wrong pan (surprisingly common). We're addressing all three with specific techniques that guarantee success every single time.
Alright, let's break down exactly what goes into this masterpiece, because understanding your ingredients is half the battle in baking. Once you see why each component matters, you'll never look at a pumpkin roll the same way again.
Inside the Ingredient List
The Foundation Builders
Every great pumpkin roll starts with understanding what each ingredient actually does, because baking is chemistry and chemistry doesn't care about your feelings or how much you spent on organic flour. The eggs aren't just there for protein — they're the structural backbone that will let us roll this cake without it breaking. We're using large eggs at exactly 70°F, which might seem obsessive until you realize that cold eggs don't whip properly and warm eggs can start cooking your batter before it hits the oven. The granulated sugar isn't just sweetener — it's creating thousands of tiny air pockets when we whip it with the eggs, and those pockets are what keep our cake light enough to roll without cracking.
Pumpkin puree is the star, but here's where most recipes go wrong — they treat all pumpkin puree the same. Libby's canned pumpkin has a different moisture content than fresh pumpkin, and if you're using fresh, you need to strain it through cheesecloth for at least two hours to get the right consistency. I've made this mistake so you don't have to. The difference between properly drained and straight-from-the-can pumpkin can mean the difference between a cake that rolls like a dream and one that cracks like the desert floor. And please, for the love of all things holy, don't use pumpkin pie filling — that's got spices and sweeteners already mixed in, and using it here is like trying to season a steak with a pre-made casserole.
The Texture Team
All-purpose flour might seem boring, but it's doing heavy lifting here. We need exactly one cup, sifted then spooned and leveled — not dipped directly from the bag, which can add up to two extra tablespoons and turn our flexible cake into something more suitable for building construction. The baking powder and salt work together like a comedy duo — the baking powder gives us lift, while the salt enhances all the other flavors and keeps things from tasting flat. Skip the salt and your pumpkin roll will taste like it was made by someone who doesn't understand how flavor works.
The ground cinnamon, nutmeg, ginger, and cloves aren't just there for tradition — each plays a specific role. Cinnamon provides the warm base note that makes everything taste like fall, nutmeg adds complexity with its subtle bitterness, ginger gives a bright spicy kick that keeps things interesting, and cloves provide that deep, almost medicinal note that makes the other spices taste more intense. But here's the thing — spices lose potency faster than you think. If your cinnamon has been sitting in your cabinet since last Thanksgiving, it's time for a new jar. Fresh spices can make the difference between a good pumpkin roll and one that makes people close their eyes and sigh.
The Unexpected Game-Changers
Lemon juice might seem out of place in a pumpkin roll, but it's essential for two reasons. First, it brightens the pumpkin flavor and keeps it from tasting like baby food. Second, it helps stabilize the egg foam we're creating, giving us a more reliable structure. Just a teaspoon does the job — any more and you'll start tasting lemon, which isn't what we're after here. The vanilla extract isn't negotiable either — it rounds out all the flavors and makes everything taste more expensive than it is. Buy the good stuff, not the artificial flavoring that tastes like sadness and regret.
The Cream Cheese Dream Team
Cream cheese is where most people mess up their filling without realizing it. It needs to be at room temperature, but not warm — exactly 68°F. Too cold and you'll get lumps that no amount of beating will smooth out. Too warm and your filling will be runny and slide right out of the roll. I set mine out two hours before I need it, and if I forget, I cut it into small cubes and let it sit for 30 minutes. The butter serves two purposes — it adds richness and helps create a smoother texture, but we're using less than most recipes because too much butter can make the filling greasy and heavy.
Powdered sugar might seem straightforward, but here's the insider tip — we're sifting it twice. Once when we measure it, and again when we add it to the cream cheese. This prevents those tiny lumps that can make your filling look like it has cottage cheese mixed in. The heavy cream is our secret weapon — just two tablespoons transform the texture from dense and heavy to light and spreadable. It's the difference between frosting that sits on top of your cake and filling that becomes one with it.
Everything's prepped? Good. Let's get into the real action, because this is where the magic happens and where most people either nail it or create something that looks like it was made by someone who's never seen a pumpkin roll before.
The Method — Step by Step
- Preheat and Prepare: Set your oven to 375°F and position the rack in the center. This isn't the time to rush — let it preheat for a full 20 minutes. While it's heating, line a 15x10-inch jelly roll pan with parchment paper, but here's the crucial part — spray the pan first, then line it, then spray the parchment again. This triple insurance policy ensures your cake will release like a dream. Most people skip the spray under the parchment and end up with half their cake stuck to the pan. Don't be most people.
- The Egg Foam Foundation: In the bowl of your stand mixer (or with a hand mixer if you're feeling ambitious), beat the eggs on high speed for exactly 3 minutes. They should become pale yellow and triple in volume — this is your cake's backbone. With the mixer running, slowly rain in the granulated sugar over the course of 2 minutes. You're creating a stable foam that will support the cake's structure. The mixture should be thick enough to form ribbons that sit on top for 3 seconds before sinking back in. If it's not there yet, keep beating — but don't go past 5 minutes total or you'll start breaking down the proteins.
- Pumpkin Integration: Reduce the mixer speed to low and stream in the pumpkin puree, lemon juice, and vanilla. Here's where you need to be gentle — we're trying to maintain as much of that precious air we just incorporated as possible. The mixture will deflate slightly, but it should still be light and fluffy. If it looks like soup, you've gone too far and need to start over. This is the moment of truth where most people panic, but trust the process.
- The Dry Team Assembly: In a separate bowl, whisk together the flour, baking powder, salt, and all your spices. This ensures even distribution — nobody wants a bite that's all cinnamon and another that's all nutmeg. Sprinkle this mixture over your pumpkin-egg foam in three additions, folding gently with a large rubber spatula. The technique here is crucial: cut down through the center, scrape along the bottom, and lift up the side, rotating the bowl as you go. Stop as soon as you see no more dry streaks — overmixing here is the enemy of a flexible cake.
- Spread and Smooth: Pour the batter into your prepared pan and smooth it into an even layer with an offset spatula. The batter will be thick but spreadable — if it pours like pancake batter, something went wrong. Gently tap the pan on the counter three times to release any large air bubbles. These bubbles can create weak spots that lead to cracks during rolling, so this isn't just for show.
- The Bake That Makes or Breaks: Slide the pan into the oven and bake for exactly 13-15 minutes. Set a timer — this is not the time to check Instagram. The cake is done when it springs back when lightly touched and has pulled slightly away from the sides of the pan. Overbaking is the number one cause of cracks, so err on the side of slightly underdone rather than over. The edges should be just starting to brown, not golden brown.
- The Towel Trick: While the cake bakes, lay out a clean kitchen towel and dust it liberally with powdered sugar — be generous here, this is your insurance policy. As soon as the cake comes out of the oven, run a knife around the edges to loosen it, then invert it onto the sugared towel. Peel off the parchment paper in one swift motion. Starting from a short end, roll the cake and towel together in a tight spiral. This feels wrong the first time — rolling a hot cake? But trust me, this is what prevents cracks. Let it cool completely, rolled up, for at least one hour.
- Cream Cheese Filling Creation: While the cake cools, beat the cream cheese and butter together until completely smooth — no lumps allowed. This takes longer than you think, about 3-4 minutes on medium-high speed. Add the powdered sugar in two additions, beating well after each. The mixture will look like it's separating at first — keep beating. Add the vanilla and heavy cream, then beat for another 2 minutes until light and fluffy. You should end up with a filling that holds peaks but isn't stiff — think spreadable but not runny.
- The Grand Unroll and Refill: Carefully unroll your cooled cake. It will try to spring back — this is good, it means your structure is intact. Spread the filling in an even layer, leaving a 1/2-inch border around all edges. This border prevents the filling from squishing out when you reroll. Use an offset spatula for even coverage, and don't press down — you're not trying to compress the cake.
- The Final Roll: Starting from the same short end you originally rolled, roll the cake back up, this time without the towel. Use the towel to help you roll by lifting it up and letting the cake fall into place naturally. Don't force it — if it's resisting, let it sit for 5 minutes to relax. Once rolled, wrap the whole thing tightly in plastic wrap and refrigerate for at least 2 hours. This sets the filling and makes slicing clean and easy.
That's it — you did it. But hold on, I've got a few more tricks that'll take this from great to absolutely legendary. These are the secrets that separate the home bakers from the dessert heroes.
Insider Tricks for Flawless Results
The Temperature Rule Nobody Follows
Here's the thing about temperature in baking — it's not just about your oven setting. Your eggs, pumpkin, and even your mixing bowl all need to play nice together. I keep my eggs in a bowl of warm water for exactly 10 minutes before using them. Not 5 minutes, not 15 — 10. This brings them to the perfect temperature where they'll whip to maximum volume without cooking from the warmth. Your pumpkin should be room temperature too, not straight from the pantry. Cold pumpkin will seize up the egg foam you've worked so hard to create, like pouring ice water into a bubble bath.
But here's the real secret — your bowl matters more than you think. A cold metal bowl will suck heat from your ingredients faster than you can mix them. I run hot water over my mixing bowl for 30 seconds, then dry it thoroughly before starting. This simple step can add 30% more volume to your egg foam, which translates to a cake that's lighter, more flexible, and less prone to cracking. A friend tried skipping this step once — let's just say her pumpkin roll looked like it had been through a war zone.
Why Your Nose Knows Best
Most recipes tell you to judge doneness by time or visual cues, but for this cake, your nose is your best friend. When it's perfectly baked, your kitchen will smell like autumn had a baby with a bakery — warm spices, toasted sugar, and something indefinably cozy. This happens about 90 seconds before the visual cues appear. If you wait for the edges to brown, you've already overbaked by 2-3 minutes, which might not sound like much but is the difference between a flexible cake and one that cracks like the Sahara desert.
The smell test works because the volatile compounds in spices release at specific temperatures. When you catch that first wave of intense aroma, it means the spices have reached their peak flavor development. Pull the cake then, not when your timer dings. Trust me on this — I've thrown away more overbaked test cakes than I care to count, all because I ignored my nose and trusted a timer.
The 5-Minute Rest That Changes Everything
After you roll your hot cake in the towel, walk away for exactly 5 minutes. Set a timer. This brief rest allows the steam trapped inside to soften the cake's outer layer, making it even more pliable. But here's the crucial part — don't let it go longer than 7 minutes. After that, the cake starts to set in its rolled shape, and if you try to unroll it too soon, it will crack. It's like the difference between stretching after a workout versus trying to do the splits cold.
During this rest, the residual heat continues cooking the cake gently, ensuring the center is fully set without overbaking the edges. It's also redistributing moisture throughout the roll, so you don't end up with dry edges and a soggy center. I use these 5 minutes to clean my mixing bowl and get ready for the filling — multi-tasking at its finest.
The Filling Consistency Secret
The perfect cream cheese filling should hold its shape when you dollop it, but spread smoothly without tearing the cake. Here's my test: scoop up some filling on your spatula and hold it sideways. It should slowly slide off over the course of 10-15 seconds, not plop off immediately (too soft) or refuse to move (too stiff). If it's too soft, beat in 2 more tablespoons of powdered sugar. Too stiff, add a teaspoon of heavy cream and beat for 30 seconds.
Temperature affects this dramatically — if your kitchen is warm, the filling will soften as you work. I keep mine in the fridge while the cake cools, then let it sit at room temperature for exactly 10 minutes before spreading. This gives you the perfect window of spreadability before it starts to warm up and get loose.
The Slicing Revelation
A warm knife is the difference between clean slices and a crumbly mess. Run your knife under hot water for 10 seconds, then wipe it dry before each cut. The heat melts through the cream cheese filling cleanly, while the dryness prevents it from sticking and pulling the cake apart. I keep a tall container of hot water next to my cutting board and dip/wipe between every single slice.
But here's the real pro move — cut from the center out, not from the end in. The center is the most stable part of the roll, and starting there gives you the cleanest first slice. Save the end pieces for yourself — they're usually not as pretty but taste just as good. And always cut with a gentle sawing motion, not straight down like you're chopping wood. Think of it as slicing through velvet, not carving a turkey.
Creative Twists and Variations
This recipe is a playground. Here are some of my favorite ways to switch things up:
The Maple Bourbon Edition
Replace the vanilla in both the cake and filling with maple extract, and add 2 tablespoons of good bourbon to the filling. The maple intensifies the autumn flavors while the bourbon adds a sophisticated note that makes this perfect for adult gatherings. I brought this version to a book club meeting once — the host hid the leftovers and claimed she needed to "quality test" them for the next three days.
The Chocolate Marble Marvel
Remove 1/4 cup of the pumpkin batter and mix it with 2 tablespoons of cocoa powder. Dollop this chocolate mixture over the main batter in the pan and swirl with a toothpick for a tiger-stripe effect. The chocolate adds depth to the pumpkin flavor without overwhelming it, and the visual impact is stunning when you slice into the spiral.
The Gingerbread Fusion
Replace half the cinnamon with ground ginger and add 1/4 teaspoon of black pepper to the spice mix. The pepper sounds weird but it makes all the other spices taste more intense, like turning up the volume on your favorite song. This version is particularly good if you're serving it to people who think traditional pumpkin desserts are too bland.
The Citrus Sunrise Version
Add the zest of one orange to the cake batter and replace the lemon juice with orange juice. For the filling, add 1 teaspoon of orange extract and fold in 2 tablespoons of orange marmalade. The bright citrus notes transform this from a heavy fall dessert into something you could serve at a spring brunch. My sister requests this version for her April birthday every year.
The Nutty Professor
Fold 1/2 cup of very finely chopped toasted pecans into the filling, and roll the finished cake in more chopped nuts for a decorative coating. Toasting the nuts first brings out their oils and prevents them from getting soggy. Use a food processor to get them almost powder-fine — you want texture, not crunchy bits that fight with the soft cake.
The Salted Caramel Dream
Drizzle 1/4 cup of cooled salted caramel over the filling before rolling, and save some for serving. The caramel adds pockets of gooey sweetness that contrast beautifully with the tangy cream cheese. Be careful not to add too much — more than 1/4 cup and it will start to slide out when you roll. I learned this the hard way and ended up with a caramel tsunami on my counter.
Storing and Bringing It Back to Life
Fridge Storage
Wrap your pumpkin roll tightly in plastic wrap, then in aluminum foil. It will keep in the refrigerator for up to 5 days, but here's the key — let it come to room temperature for 30 minutes before serving. Cold cream cheese filling firms up and the flavors become muted. If you've already sliced it, press plastic wrap directly against the cut surfaces before wrapping the whole thing. This prevents the cut edges from drying out and keeps the filling from forming that unpleasant skin.
For optimal freshness, I actually prefer to make this two days ahead. The flavors meld beautifully, and the moisture distributes evenly throughout the cake. Just be sure to hide it well — my record for a pumpkin roll disappearing from the fridge is 36 hours, and that was when my teenager had friends over.
Freezer Friendly
This pumpkin roll freezes beautifully for up to 3 months. Wrap it in plastic wrap, then in foil, and finally in a freezer bag with as much air removed as possible. Label it with the date — trust me, in three months you'll have no idea what that frozen cylinder is. To thaw, move it to the refrigerator overnight, then let it sit at room temperature for 1 hour before serving. Don't try to speed-thaw at room temperature or the filling can weep and make the cake soggy.
Here's a pro tip: freeze individual slices by placing them on a parchment-lined baking sheet until solid, then wrap each slice individually. This way you can pull out exactly what you need for unexpected guests or midnight cravings. I always keep a few slices hidden in the back of my freezer — they're like gold when you need a quick dessert or want to bribe someone for a favor.
Best Reheating Method
While this is best served at room temperature, if your fridge runs cold and the filling seems firm, you can warm individual slices in the microwave for exactly 8 seconds. Not 10 seconds — 8. Any longer and the cream cheese starts to melt and slide out. The goal is just to take the chill off, not warm it through. Alternatively, let slices sit at room temperature for 20-30 minutes before serving.
If you've frozen your pumpkin roll, never reheat it directly from frozen. The temperature shock can cause the filling to separate and the cake to become rubbery. Always thaw in the refrigerator first, then let it warm up naturally. And if you notice any condensation on the surface after thawing, gently blot it with a paper towel before serving. Your guests will never know it was frozen, and you can bask in their compliments about your "amazing" baking skills.