I swear I was on the brink of a full‑blown kitchen catastrophe when a friend dared me to make something “so scary it could actually haunt the living room.” I was halfway through a batch of plain brownies when the power flickered, the oven door slammed shut, and a sudden, mischievous craving for something truly Halloween‑worthy seized me. The air was thick with the sweet, buttery scent of chocolate, but my mind was buzzing with the idea of turning those ordinary squares into little monsters that would stare back at anyone daring enough to bite. I grabbed a handful of candy eyeballs, a splash of neon green food coloring, and the rest is a deliciously eerie story you’re about to hear.
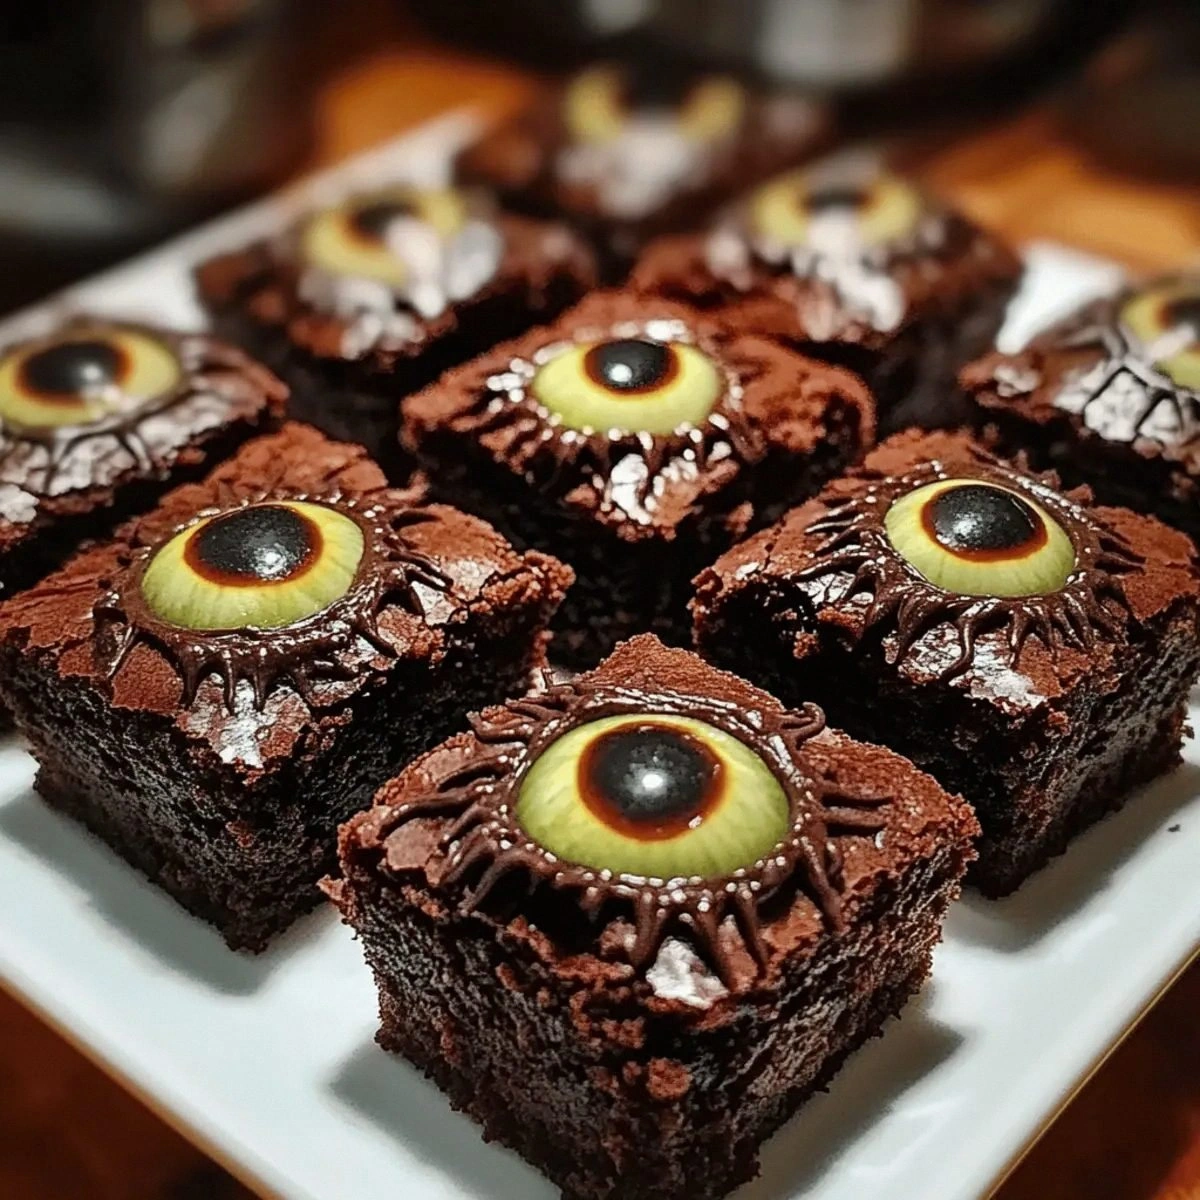
Picture this: a tray of fudgy brownie bites, each one topped with a glossy, emerald‑green glaze that looks like slime oozing from a swamp, and perched on top, a perfectly placed candy eye that glistens like a tiny, gelatinous orb. When you bite into one, the outer crust gives a faint crack, the interior is soft enough to melt on your tongue, and the sweet, buttery frosting spreads like a velvety fog across your palate. The moment the glaze hits your lips, you’ll hear that tiny “squish” that only a truly spooky treat can deliver. The scent? A heady mix of cocoa, butter, and a whisper of vanilla that makes the whole kitchen feel like a haunted bakery.
Most brownie bite recipes either skip the visual drama or overcomplicate the process with hard‑to‑find ingredients. This version, however, is hands down the best you’ll ever make at home because it balances simplicity with theatrical flair. The secret? A quick buttercream that you tint with food coloring, turning it into a glossy, eye‑catching glaze that sets in minutes, plus a clever technique for anchoring the candy eyeballs without them sliding off. I’ll be honest — I ate half the batch before anyone else got a chance to try it, and that’s a confession worth sharing.
Ready for the game‑changer? I dare you to taste this and not go back for seconds. I’m about to walk you through every single step — by the end, you’ll wonder how you ever made brownies any other way. Let’s dive in, because the kitchen is about to become the most thrilling part of your Halloween night.
What Makes This Version Stand Out
- Flavor Explosion: The brownie base is rich and chocolatey, while the buttercream glaze adds a buttery sweetness that amplifies the cocoa without overwhelming it.
- Texture Contrast: You get a crisp edge that pulls away from the pan, a fudgy interior that melts in your mouth, and a glossy glaze that feels like edible glass.
- Simplicity: All ingredients are pantry‑friendly, and the technique uses a single bowl for the glaze, keeping cleanup to a minimum.
- Visual Wow Factor: The green glaze and candy eyeballs turn ordinary brownies into conversation‑starting monsters that scream Halloween.
- Crowd Reaction: Guests can’t help but gasp when they see the “eyes” staring back, and the taste keeps them coming back for more.
- Ingredient Quality: Using real unsalted butter and powdered sugar creates a smooth, buttery glaze that cheap substitutes just can’t match.
- Cooking Method: Baking in a standard 9×13 pan ensures even cooking, while the glaze sets at room temperature, no extra oven time needed.
- Make‑Ahead Potential: The brownies store beautifully, and the glaze can be prepared a day ahead, allowing you to assemble the monsters right before serving.
Inside the Ingredient List
The Flavor Base
The 1 box Fudge Brownie Mix is the backbone of this recipe. It provides the deep cocoa flavor and the right amount of leavening to keep the bites tender. If you skip the mix and try to build a brownie from scratch, you risk a dry, crumbly texture that would ruin the whole spooky vibe. Look for a mix that promises a “chewy” result, and avoid those that claim “cake‑like” texture.
Next, the 2 large Eggs act as the binder, giving the brownies structure while keeping them moist. Fresh eggs are crucial; older eggs can cause a grainy crumb. If you’re vegan, a flax‑egg (1 tbsp ground flaxseed + 3 tbsp water) works, but the texture will be slightly denser.
0.25 cup Vegetable Oil adds richness and helps the brownies stay soft after cooling. Unlike butter, oil stays liquid at room temperature, ensuring the crumb stays tender. For a richer flavor, you could swap half the oil for melted butter, but keep an eye on the overall fat content.
The Texture Crew
0.67 cup Water is the liquid that hydrates the dry mix, creating a smooth batter. The precise 0.67 cup measurement (roughly 2/3 cup) is key; too much water makes the brownies cakey, too little leaves them dry. If you’re using a gluten‑free brownie mix, you might need a splash more water to achieve the same consistency.
1 cup Unsalted Butter is melted and folded into the batter, adding a buttery depth that oil alone can’t provide. The butter also contributes to the glossy top crust that forms during baking. Use high‑quality European butter for a richer mouthfeel; the extra fat will make the glaze set perfectly.
3 cups Powdered Sugar is the sweetening powerhouse for the glaze. Because it’s finely ground, it dissolves instantly, giving the glaze a silky texture without any gritty bits. If you’re aiming for a less sweet glaze, you can cut the sugar down to 2½ cups, but the glaze may lose some of its glossy sheen.
The Unexpected Star
1 teaspoon Vanilla Extract adds a subtle aromatic note that lifts the chocolate flavor, making the overall taste more complex. Real vanilla beans would be even more luxurious, but a good quality pure extract does the trick without breaking the bank.
2 tablespoons Heavy Cream or Milk enriches the glaze, giving it a satin finish that coats the brownie bites like a thin veil of fog. Heavy cream yields a richer glaze, while milk makes it a tad lighter. If you’re dairy‑free, coconut cream works beautifully and adds a faint tropical hint.
Green Gel Food Coloring is the visual hero. A few drops turn the buttercream into a slime‑green that screams Halloween. Gel colors are more concentrated than liquid, so you get vibrant hue without diluting the glaze. If you’re avoiding artificial dyes, matcha powder can provide a natural green, though the flavor will shift slightly.
The Final Flourish
Candy Eyeballs are the finishing touch that transforms a simple brownie bite into a monster eye. They’re essentially sugar spheres with a gummy center that holds their shape under the glaze. If you can’t find them, you can craft your own by dipping white chocolate circles in melted chocolate and adding a tiny dollop of red gel for the pupil.
Everything's prepped? Good. Let’s get into the real action…

The Method — Step by Step
Preheat your oven to 350°F (175°C) and line a 9×13‑inch baking pan with parchment paper, letting the excess hang over the sides for easy lift‑out later. The moment the oven clicks on, you’ll hear that comforting hum that signals chocolate magic is about to happen. While the oven warms, gather your brownie mix, eggs, oil, and water on the counter. Pro tip: whisk the wet ingredients together first; this prevents any flour pockets that could turn the batter lumpy.
Kitchen Hack: Use a rubber spatula to fold the melted butter into the batter in slow, gentle motions; this keeps the air out of the mix, ensuring a denser, fudgier crumb.In a large bowl, combine the brownie mix, eggs, vegetable oil, and water. Stir until just combined — you’ll see a thick, glossy batter that clings to the spoon. Stop mixing the moment you no longer see dry flour; over‑mixing creates gluten, which makes brownies cakey. The batter should look slightly glossy, like melted chocolate lava.
Melt the unsalted butter in a small saucepan over low heat, then let it cool for a minute before pouring it into the batter. This step adds a buttery sheen to the brownies and helps the glaze later set faster. As you pour, you’ll hear a faint sizzle that signals the butter is still warm enough to meld but not hot enough to cook the eggs.
Spread the batter evenly in the prepared pan, using an offset spatula to smooth the top. The surface should be level, with no high spots that could bake unevenly. Tap the pan lightly on the counter three times; this releases any trapped air bubbles, ensuring a uniform crumb. The aroma at this stage is already intoxicating — cocoa, butter, and a hint of vanilla start to mingle.
Bake for 25‑30 minutes, or until a toothpick inserted near the center comes out with a few moist crumbs but no wet batter. The edges will start pulling away from the pan, a visual cue that the brownies are done. Resist the urge to open the oven door early; the heat loss can cause the tops to sink.
Watch Out: Over‑baking will dry out the interior, making it impossible for the glaze to adhere properly. Keep a close eye after the 20‑minute mark.While the brownies cool in the pan, prepare the monster‑green glaze. In a medium bowl, whisk together 3 cups powdered sugar, 1 teaspoon vanilla, and 2 tablespoons heavy cream (or milk) until smooth. The mixture should be thick but pourable; if it’s too stiff, add a splash more cream, one teaspoon at a time.
Kitchen Hack: Add the green gel food coloring gradually, tasting as you go. Too much will make the glaze bitter; a few drops are enough for a vivid, eerie hue.Once the glaze reaches your desired shade, set it aside. The glaze will thicken slightly as it sits, which is perfect for coating the brownie bites without running off. If it becomes too thick, stir in a tiny drizzle of milk; if it’s too runny, whisk in an extra tablespoon of powdered sugar.
After the brownies have cooled completely (this is crucial — a warm brownie will melt the glaze), lift the slab out of the pan using the parchment overhang and place it on a cutting board. Slice the brownies into bite‑size squares, about 1‑inch each. The size is important: too big and the eye will look lost; too small and the bite will be overwhelming.
Using a small spoon or a pastry brush, drizzle the green glaze over each brownie bite, covering the top surface in a thin, glossy layer. The glaze should pool slightly before setting, creating a “slime” effect that looks like it’s alive. Let the glaze set for about 5 minutes at room temperature; you’ll see it firm up to a satin finish.
Now for the pièce de résistance: press a candy eyeball into the center of each glazed bite while the glaze is still tacky. The gummy center of the eye will adhere perfectly, and the glossy glaze will seal it in place. This step is the most fun — you’ll feel like a mad scientist creating edible monsters. Once all eyes are in place, let the brownies sit for another 10 minutes to let the glaze fully harden.
That’s it — you did it. But hold on, I’ve got a few more tricks that’ll take this to another level…
Insider Tricks for Flawless Results
The Temperature Rule Nobody Follows
Never bake brownies straight from the fridge. Let the batter sit at room temperature for 10‑15 minutes before it hits the oven. This small pause allows the butter and oil to emulsify properly, leading to a smoother crumb. I once tried skipping this step and ended up with a rubbery texture that no amount of frosting could fix.
Why Your Nose Knows Best
The moment the brownies start to smell toasty is your cue to start preparing the glaze. Your sense of smell is far more reliable than a timer when it comes to the perfect bake. If the aroma turns nutty or burnt, the brownies are overcooking and will be dry.
The 5‑Minute Rest That Changes Everything
After cutting the brownies, let them rest on a wire rack for five minutes before glazing. This short pause lets steam escape, preventing the glaze from becoming soggy. A friend once glazed hot brownies and ended up with a shiny puddle that never set — don’t let that be you.
Glaze Consistency is Key
If your glaze is too thick, it will clump and create uneven patches; too thin, and it will slide off. Adjust with a drop of cream or a sprinkle of powdered sugar, testing the flow with a spoonful on a plate. The ideal glaze should coat the back of a spoon and drip slowly.
Eye Placement Perfection
Press the candy eyeball in at a slight angle so the “pupil” faces outward. This tiny detail makes the monster eyes look more lifelike and less like flat stickers. If you’re feeling extra spooky, add a tiny dab of red gel on the pupil to mimic bloodshot horror.
Creative Twists and Variations
This recipe is a playground. Here are some of my favorite ways to switch things up:
Spooky Red‑Velvet Eyes
Swap the chocolate brownie mix for a red‑velvet mix, tint the glaze with a deep crimson, and use red candy eyes. The result is a blood‑dripping monster that’s perfect for a vampire‑themed party.
Nutty Frankenstein
Add ½ cup chopped walnuts to the batter for a crunchy bite, and use a pale green glaze with black licorice “scar” lines. The nuts give the “monster” a textured, scarred look.
Ghostly White Chocolate
Replace the brownie mix with white chocolate chips mixed into a vanilla cake base. Tint the glaze with a translucent teal and use white candy eyes with a black dot for a ghostly stare.
Caramel‑Swamp
Drizzle a thin layer of caramel sauce over the glaze before the eyeballs set. The caramel adds a gooey, swamp‑like texture that glistens under the green slime.
Vegan Vampires
Use a vegan brownie mix, replace butter with coconut oil, and swap heavy cream for oat cream. Choose plant‑based candy eyes (available in specialty stores) for a fully cruelty‑free monster.
Storing and Bringing It Back to Life
Fridge Storage
Place the brownies in an airtight container and keep them in the refrigerator for up to 5 days. The glaze will stay glossy, and the brownies remain moist. Let them sit at room temperature for 10 minutes before serving to soften the buttercream.
Freezer Friendly
Wrap the baked, unglazed brownies tightly in plastic wrap, then freeze in a zip‑top bag for up to 2 months. When you’re ready, thaw overnight in the fridge, then apply fresh glaze and eyeballs for a “just‑baked” look.
Best Reheating Method
To revive the brownies, microwave a single bite for 10‑12 seconds on medium power. Add a tiny splash (about a teaspoon) of water to the plate before microwaving; the steam will bring the crumb back to life without drying it out. The glaze will soften slightly but will set again as it cools.