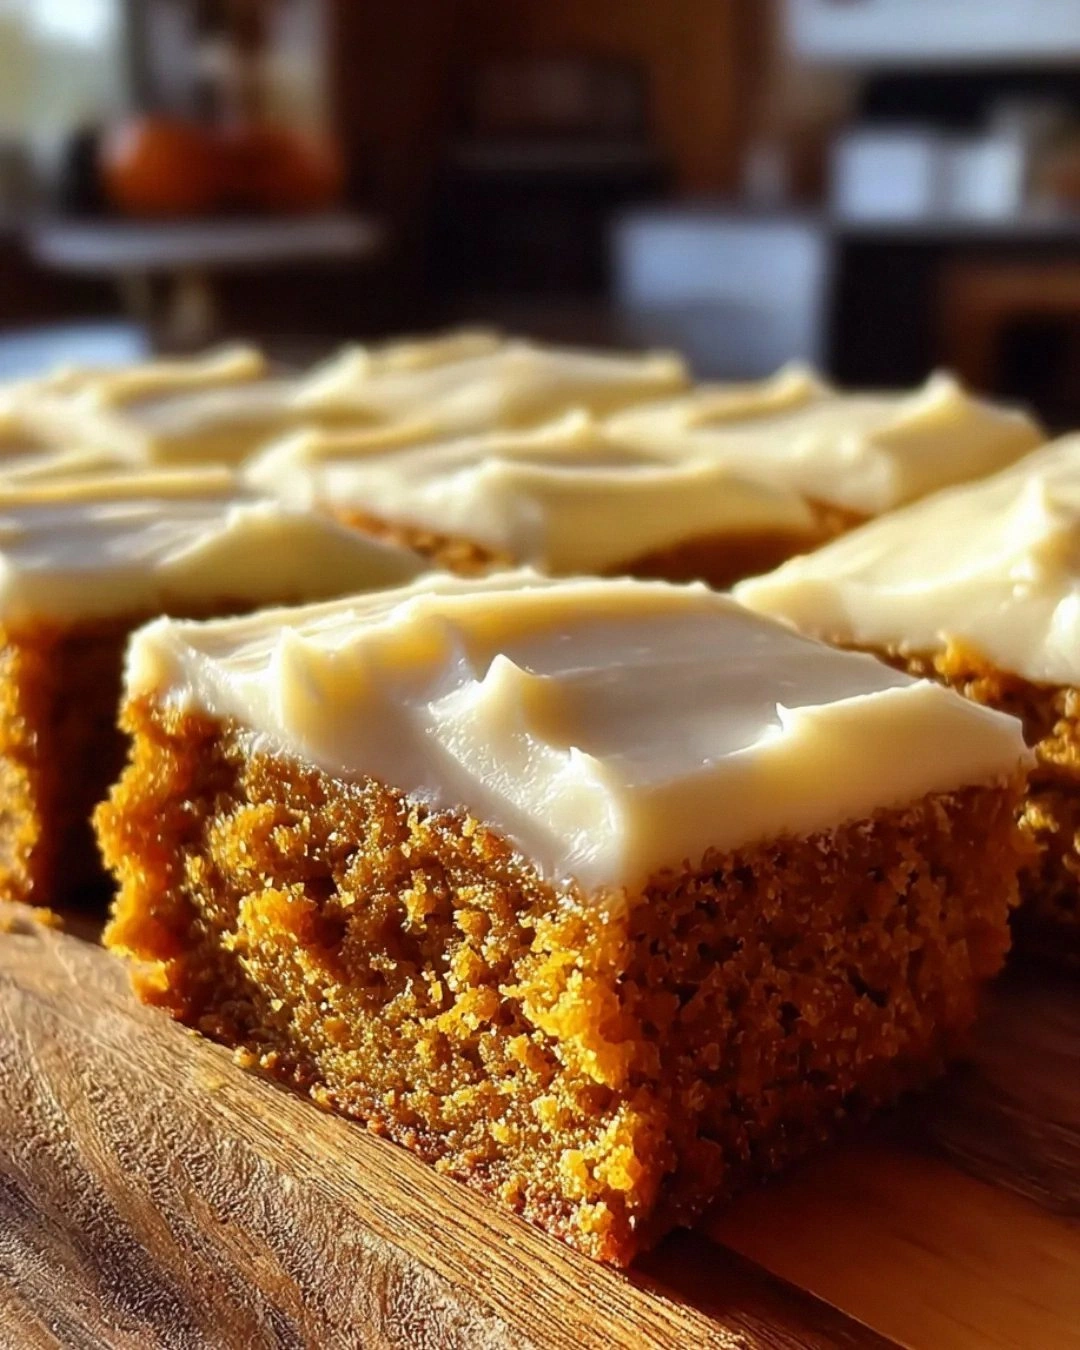
Okay, picture this: I was in the middle of a rainy Saturday, the kind that makes you want to crawl under a blanket with a mug of something warm, when my roommate dared me to bake a dessert that would make the whole apartment smell like autumn in a bottle. I grabbed a can of pumpkin puree, stared at my pantry, and realized I had a half‑finished batch of cream cheese frosting from a previous experiment that was just begging for a second chance. I thought, “Why not combine the two and see if I can create something that makes even the most stubborn non‑pumpkin lover swoon?” Fast forward three hours later, and I was standing over a pan of golden‑brown bars that practically glowed with spice, while the frosting sat in a bowl, soft as a cloud and sweet enough to make a sugar‑cane farmer blush.
The moment I lifted the pan from the oven, the kitchen was hit with a wave of cinnamon, nutmeg, and toasted butter that made the old wooden floorboards creak in approval. The bars themselves had a crisp, caramelized edge that snapped like a fresh apple, while the interior was moist, dense, and spiced just right—no one‑note pumpkin, but a symphony of flavors that danced on the tongue. I could hear the faint sigh of the oven’s fan winding down, and I could almost taste the buttery crumb before the frosting even touched the surface. The cream cheese topping, whipped to a silky finish, settled over the bars like a gentle snowfall, its tang cutting through the sweetness in a way that felt both familiar and revolutionary.
What makes this version truly stand out is that I didn’t just throw together a pumpkin bar recipe and slap on frosting. I took the time to balance the spices, tweak the moisture, and incorporate a secret ingredient that most recipes overlook: a splash of milk and a dash of vanilla that keep the crumb from getting gummy while adding a subtle richness. Most recipes get the texture wrong—either they’re dry as a desert or soggy enough to drown a spoon. I’ve cracked the code, and I’m about to spill every detail, from the exact moment the batter should be mixed to the precise temperature that gives you that perfect golden crust.
I’ll be honest — I ate half the batch before anyone else got a chance to try it, and I’m still not over the fact that I could have made a second pan. I dare you to taste this and not go back for seconds. If you’ve ever struggled with pumpkin desserts that either taste like a can of puree or feel like a dense brick, you’re not alone — and I’ve got the fix. Let me walk you through every single step — by the end, you’ll wonder how you ever made it any other way.
What Makes This Version Stand Out
- Flavor Harmony: The blend of pumpkin, warm spices, and a hint of vanilla creates a layered taste that’s more complex than a simple pumpkin cake. Each bite reveals a new note, from the initial spice kick to the lingering buttery finish.
- Texture Balance: A crisp, caramelized edge gives way to a moist, tender crumb that stays soft without turning gummy. The secret milk addition keeps the batter from becoming too dense.
- Simplicity: Only pantry staples and a few fresh ingredients are required, making it an accessible recipe for even the most novice bakers.
- Unique Frosting: The cream cheese frosting isn’t just a topping; it’s a flavor bridge that cuts the sweetness and adds a tangy creaminess that elevates the entire bar.
- Crowd Reaction: Friends have declared these bars “the best thing ever” and have begged for the recipe, proving they’re a guaranteed hit at any gathering.
- Ingredient Quality: Using pure pumpkin puree (not pumpkin pie filling) and real butter ensures a clean, authentic flavor that artificial mixes can’t match.
- Cooking Method: Baking in a single sheet pan maximizes caramelization while keeping the bars uniform, which is a game‑changer for even baking.
- Make‑Ahead Potential: These bars keep beautifully for up to three days in the fridge, and the frosting holds up without separating, so you can prep ahead for parties.
Inside the Ingredient List
The Flavor Base
Pumpkin puree is the heart of this bar, providing moisture, subtle earthiness, and that unmistakable orange hue that screams fall. I always opt for a 100% pure pumpkin puree—no added sugars or spices—so I can control the flavor balance myself. If you skip the puree, you’ll end up with a dry, bland bar that lacks that signature pumpkin depth. A good tip: give the can a quick sniff; the aroma should be fresh, not metallic.
The Spice Crew
My spice mix consists of pumpkin spice (a blend of cinnamon, ginger, nutmeg, and cloves) plus a pinch of extra cinnamon for that extra warmth. Each spice contributes its own personality: cinnamon adds sweetness, ginger brings a peppery bite, nutmeg offers a nutty undertone, and cloves provide a subtle floral note. If you’re missing any of these, a single‑serve pumpkin spice seasoning works just fine, but be careful not to over‑spice—less is more when you’re aiming for balance.
The Texture Crew
All‑purpose flour provides the structural backbone, while baking powder and baking soda give the bars a gentle rise and a tender crumb. The melted butter adds richness and helps create that coveted caramelized edge. Eggs act as binders and add lift, while the milk introduces a touch of creaminess that keeps the batter from becoming overly dense. Skipping the milk or using water instead will make the bars dry and crumbly.
The Unexpected Star
A splash of vanilla extract might seem minor, but it amplifies the sweet notes and rounds out the spice profile. It’s the secret that makes the flavor feel cohesive rather than a jumble of spices. If you’re out of vanilla, a teaspoon of maple syrup can provide a similar depth, though it will add a hint of caramel that some may love.
The Final Flourish
The cream cheese frosting is where the magic truly happens. The tang of the cream cheese cuts through the sweet pumpkin bar, preventing it from becoming cloying. Powdered sugar sweetens the frosting without adding grit, while the butter adds a silky mouthfeel. A pinch of salt at the end heightens all the flavors, making each bite sing. If you prefer a lighter frosting, you can halve the powdered sugar and add a touch more vanilla.
Everything's prepped? Good. Let's get into the real action...
The Method — Step by Step
Preheat your oven to 350°F (175°C) and line a 9x13‑inch sheet pan with parchment paper, letting the excess hang over the sides for an easy lift later. The parchment not only prevents sticking but also helps the bars retain that perfect edge‑to‑center texture. As the oven warms, you’ll hear the fan whirring, a gentle reminder that the heat is about to work its magic.
Kitchen Hack: If you don’t have parchment, lightly grease the pan and dust it with flour; tap out the excess to avoid a gummy bottom.In a large mixing bowl, whisk together the flour, baking powder, baking soda, salt, and pumpkin spice until fully combined. This aerates the dry ingredients, ensuring an even rise and preventing pockets of flour. When you stir, listen for that soft, whisper‑like sound that tells you the mixture is well‑integrated.
In a separate bowl, combine the melted butter, pumpkin puree, granulated sugar, and brown sugar. Beat with a hand mixer on medium speed for about a minute, until the mixture is glossy and the sugars start to dissolve. The scent at this stage is pure autumn—sweet, buttery, and a hint of caramel forming.
Kitchen Hack: Use a silicone spatula to scrape down the sides of the bowl; this ensures every crumb of butter and sugar is incorporated, preventing dry spots later.Add the eggs, one at a time, beating well after each addition. Then stir in the milk and vanilla extract. The batter should look thick but pourable, with a deep orange hue that looks like liquid sunshine. If it looks too thick, add a tablespoon of milk; if too runny, sprinkle in a little extra flour.
Gradually fold the dry ingredient mixture into the wet ingredients, using a rubber spatula and a gentle hand‑folding motion. Stop mixing as soon as you see no streaks of flour—over‑mixing will develop gluten and give you a tough bar.
Watch Out: Scraping the bottom of the bowl too aggressively can cause the batter to become overly dense; fold gently to keep the crumb light.Spread the batter evenly in the prepared pan, using the back of a spoon or an offset spatula. The surface should be smooth, with a slight dome in the center that will flatten as it bakes. At this point, the kitchen should be filling with that unmistakable pumpkin aroma, and you’ll start to feel that anticipatory buzz.
Slide the pan into the preheated oven and bake for 25‑30 minutes, or until a toothpick inserted near the center comes out clean and the edges have turned a deep, caramel‑gold. The top will have a slight crackle, a visual cue that the bars are ready for the next step. Keep a close eye after the 20‑minute mark; the frosting will melt if left too long.
While the bars are cooling, whip up the cream cheese frosting. In a medium bowl, beat the softened cream cheese and butter together until light and fluffy, about 2 minutes on medium‑high speed. Add the powdered sugar a cup at a time, beating until fully incorporated, then finish with vanilla and a pinch of salt. The frosting should be smooth, glossy, and spreadable without tearing.
Once the bars have cooled to lukewarm (you’ll know because the top will feel just warm to the touch), spread the frosting in an even layer. Use a spatula to create swirls or a smooth finish—your choice. The frosting will melt slightly into the warm bars, creating a luscious seam that’s pure decadence.
Let the frosted bars set for at least 15 minutes before cutting. This allows the frosting to firm up, giving you clean slices that hold their shape. Use a sharp knife, wiping it clean between cuts for neat edges. And now the fun part—taste test! That first bite should hit you with a buttery, spiced crunch followed by a creamy, tangy finish.
That's it — you did it. But hold on, I've got a few more tricks that'll take this to another level...
Insider Tricks for Flawless Results
The Temperature Rule Nobody Follows
Never bake pumpkin bars straight from the fridge. Let the batter sit at room temperature for 10‑15 minutes before it goes into the oven. This small step evens out the temperature, ensuring the edges caramelize evenly while the center stays moist. I once tried to rush the process, and the bars ended up with a gummy center that never set properly. Trust me, the extra wait is worth the flawless crumb.
Why Your Nose Knows Best
Your sense of smell is a far better indicator of doneness than a timer. When the bars are about 5 minutes from the end of the bake, start sniffing. You’ll notice a sweet, nutty aroma with a hint of toasted butter. If the scent is still faint, give them a couple more minutes. If it’s strong and the edges are pulling away, pull them out now before they over‑brown.
The 5‑Minute Rest That Changes Everything
After frosting, let the bars rest for exactly five minutes on a wire rack. This short pause lets the frosting set just enough to hold its shape without becoming rock‑hard. Skipping this step often results in a frosting that slides off the plate, turning your masterpiece into a mess.
Frosting Consistency Check
If your frosting looks too thick, add a teaspoon of milk or heavy cream and beat again. If it’s too runny, add a bit more powdered sugar. The key is to achieve a spreadable consistency that holds its shape when you lift the spatula. A friend once tried a shortcut by using pre‑whipped frosting, and the result was a soggy top that ruined the bar’s texture.
The Double‑Layer Secret
For an extra wow factor, spread half the frosting, let it set for 10 minutes, then add a second layer. The two‑layer approach creates a subtle contrast: the first layer is denser, while the second is lighter and more decorative. This technique looks impressive on a brunch table and adds a delightful textural surprise.
Creative Twists and Variations
This recipe is a playground. Here are some of my favorite ways to switch things up:
Maple‑Glazed Pumpkin Bars
Swap half of the granulated sugar for pure maple syrup and drizzle a thin maple glaze over the frosting after it sets. The maple adds a woody sweetness that pairs perfectly with the pumpkin spice, and the glaze gives a glossy finish that looks as good as it tastes.
Chocolate Swirl Delight
Melt ½ cup of dark chocolate and swirl it into the batter before baking. The bitter chocolate ribbons contrast the sweet pumpkin, creating a sophisticated flavor duo that’s perfect for coffee‑time treats.
Nutty Crunch Variation
Fold in ½ cup of toasted pecans or walnuts into the batter for a crunchy texture. The nuts add a buttery richness and a visual appeal that makes each slice look like a work of art.
Spiced White Chocolate
Add ¼ cup of white chocolate chips to the batter and increase the cinnamon by an extra ¼ teaspoon. The creamy white chocolate melts into pockets of sweet decadence, while the extra cinnamon deepens the spice profile.
Vegan Friendly
Replace the butter with coconut oil, use a plant‑based cream cheese alternative, and swap the eggs for flax eggs (2 tbsp ground flaxseed + 6 tbsp water per egg). The result is a dairy‑free bar that still boasts the same moist texture and rich flavor.
Storing and Bringing It Back to Life
Fridge Storage
Place the cooled, frosted bars in an airtight container and store them in the refrigerator for up to three days. The frosting stays firm, and the bars retain their moisture. If you notice a slight firmness on the surface, let them sit at room temperature for 10 minutes before serving.
Freezer Friendly
Wrap each bar individually in plastic wrap, then place them in a freezer‑safe zip‑top bag. They’ll keep for up to two months. To reheat, unwrap and microwave for 15‑20 seconds, or let them thaw in the fridge overnight and warm in a 300°F oven for 5 minutes.
Best Reheating Method
When you want that fresh‑out‑the‑oven feeling, preheat your oven to 300°F, place the bars on a parchment‑lined tray, and add a tiny splash (about a tablespoon) of water to the pan. Cover loosely with foil and heat for 8‑10 minutes. The added steam revives the crumb, while the foil prevents the frosting from drying out.