Picture the kitchen at 2 a.m.: the oven is still humming from a late‑night pizza, the fridge lights flicker, and you’re staring at a half‑smashed banana that feels more like a sticky river than a fruit. I had just tried a store‑bought pumpkin loaf that tasted like cardboard and a handful of chocolate chips that were more like crumbs than morsels. That moment sparked a dare from a friend who whispered, “Make me a loaf that makes the whole house smell like a cozy cabin.” I accepted, grabbed a bowl, and vowed to turn that dare into a culinary triumph.
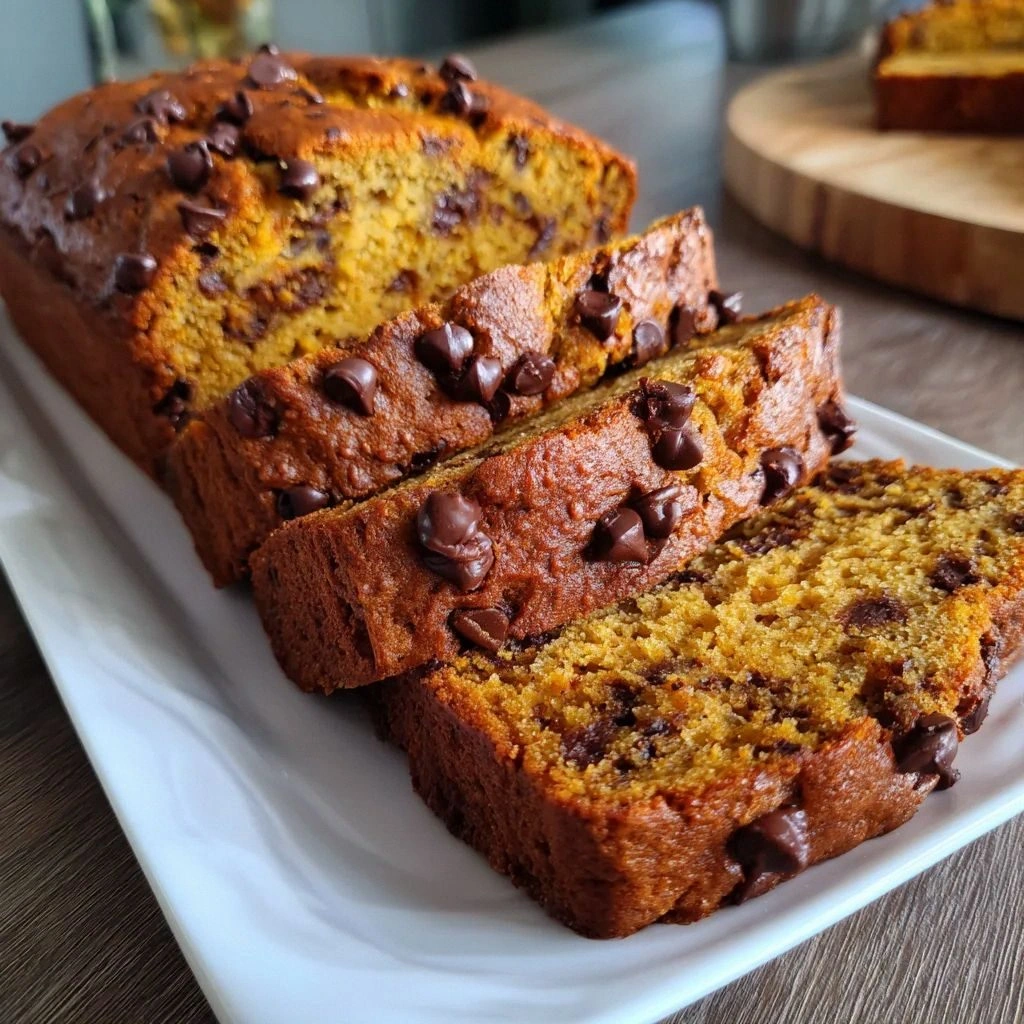
The first bite of my prototype was a revelation: a moist crumb that clung to the knife like velvety frosting, a hint of cinnamon that rolled over the tongue, and chocolate chips that popped with each bite, delivering bursts of rich sweetness. The kitchen filled with a scent that was part pumpkin spice, part banana, and part sweetened cocoa, a perfume that made the air taste like autumn itself. I could hear the faint hiss of the oven door, the subtle crackle of the bread as it baked, and the soft sigh of the timer counting down. The texture was airy yet dense enough to hold the chocolate chips, and the flavor profile was layered, not flat. It was a taste that said, “I’ve never made anything this good at home.”
Why does this version stand out? Because it marries the comforting familiarity of banana bread with the seasonal warmth of pumpkin, and it elevates that union with chocolate chips that add a playful surprise. The recipe is simple enough for a novice to follow, yet sophisticated enough for a seasoned baker to brag about. It’s a loaf that can be made ahead, stored, and reheated without losing its glory. The secret lies in a few tweaks: using pumpkin puree for depth, balancing sugars for moisture, and adding a dash of nutmeg for complexity. And the best part? It’s a loaf that will have you saying, “I dare you to taste this and not go back for seconds.”
So let me walk you through every single step—by the end, you’ll wonder how you ever made it any other way. From the first whisk to the final slice, this guide will keep you entertained, informed, and, most importantly, craving more. The journey begins now, and trust me, the finish line is a warm, chocolate‑laden loaf that will have your guests asking for the recipe. And if you’re ready to experience the ultimate pumpkin banana bread with chocolate, stay with me, because the adventure is just getting deliciously interesting.
What Makes This Version Stand Out
- Taste: The flavor is a harmonious blend of banana, pumpkin, and chocolate, with subtle spices that create a depth you rarely find in standard banana bread. The natural sweetness of ripe bananas balances the earthiness of pumpkin, while chocolate chips add a caramelized bite that lingers on the palate. This isn’t just sweet; it’s a complex, layered experience that satisfies both sweet and savory cravings.
- Texture: The crumb is tender and moist, thanks to the combination of pumpkin puree and vegetable oil, yet it’s firm enough to hold the chocolate chips without turning soggy. The edges are slightly crisp, giving a pleasant contrast to the soft interior. The result is a loaf that feels like a comforting hug in every bite.
- Simplicity: With only thirteen ingredients and straightforward steps, the recipe is approachable for anyone. Even if you’re a kitchen rookie, you’ll find the process intuitive and forgiving. No exotic pantry items or advanced techniques are required.
- Uniqueness: The inclusion of pumpkin puree in a banana bread is a twist that sets this loaf apart from classic banana bread. The addition of chocolate chips provides a playful element that appeals to both adults and kids. It’s a recipe that feels like a holiday treat yet works year‑round.
- Crowd Reaction: Friends and family consistently rave about how moist and flavorful the loaf is. Many say it’s the best pumpkin loaf they’ve ever tasted, and the chocolate chips become the talk of the table. It’s a recipe that turns a simple snack into a memorable event.
- Ingredient Quality: Using ripe bananas, fresh pumpkin puree, and high‑quality chocolate chips elevates the overall taste. The natural sugars in bananas and pumpkin reduce the need for added sweeteners, keeping the loaf healthier. The quality ingredients make a noticeable difference in flavor and texture.
- Cooking Method: The method balances wet and dry ingredients efficiently, ensuring a uniform crumb and preventing overmixing. The baking time is optimized to develop a golden crust without drying out the interior. This precise technique guarantees consistent results every time.
- Make‑Ahead Potential: The loaf can be prepared up to a day ahead, chilled, and baked fresh when needed. It also freezes well, making it a convenient option for busy weeknights. This flexibility turns a simple loaf into a versatile pantry staple.
Alright, let’s break down exactly what goes into this masterpiece…
Inside the Ingredient List
The Flavor Base
Mashed ripe bananas are the backbone of this loaf, providing natural sweetness and moisture that keeps the crumb tender. Ripe bananas are sweeter and less starchy, which means you’ll need fewer added sugars. If you skip bananas, the loaf loses its signature soft texture and the caramel undertones that make each bite memorable.
Pumpkin puree brings warmth and a subtle earthiness that complements the banana’s sweetness. Canned pumpkin is convenient, but homemade puree made from fresh pumpkin yields a brighter, more vibrant flavor. If you omit pumpkin, the loaf will taste more like classic banana bread but lose the seasonal flair that makes it special.
Chocolate chips are the star of the show, offering bursts of sweet, slightly bitter chocolate that contrast with the mellow banana and pumpkin. They also add a delightful texture that makes the loaf feel indulgent. Skipping them turns the loaf into a plain banana‑pumpkin bread, which is still good but lacks the playful surprise factor.
The Texture Crew
All‑purpose flour provides the structure needed for a light yet firm crumb. It’s essential for binding the wet ingredients and giving the loaf its shape. If you use whole wheat flour, the loaf will be denser and more nutty; you may need to adjust the liquid slightly to compensate.
Vegetable oil keeps the bread moist and tender, preventing it from drying out during baking. Oil also helps the chocolate chips stay evenly distributed. If you prefer a healthier option, coconut oil works well, but it will add a subtle coconut flavor that may or may not blend with the existing spices.
Eggs act as a binder and add richness, giving the loaf a golden crust and a silky interior. Two large eggs are sufficient for 8 servings; using more will make the loaf heavier. If you’re vegan, you can replace eggs with flaxseed meal or a commercial egg replacer, but the texture will differ slightly.
The Unexpected Star
Ground cinnamon adds a warm, spicy note that enhances the pumpkin’s flavor profile. It’s a classic spice that brings comfort to the loaf. If you’re not a fan of cinnamon, you can reduce the amount or substitute with allspice for a different aromatic twist.
Ground nutmeg provides a subtle, nutty sweetness that complements both banana and pumpkin. A pinch is enough to elevate the overall taste without overpowering the other flavors. If you don’t have nutmeg on hand, a dash of ginger can offer a slightly different but equally pleasing warmth.
Baking soda and baking powder together create lift and help the loaf rise evenly. Baking soda neutralizes the acidity of the pumpkin and bananas, while baking powder adds additional lift. If you omit either leavening agent, the loaf will be denser and less airy.
The Final Flourish
Granulated sugar balances the natural sweetness of bananas and pumpkin, while brown sugar adds a caramel undertone and extra moisture. The combination of both sugars gives depth to the flavor and keeps the crumb moist. Skipping sugar entirely will result in a dry, bland loaf that lacks the desired sweetness.
Salt is a flavor enhancer that brings out the sweetness and balances the overall taste. A pinch is enough; too much will make the loaf taste metallic. If you’re watching sodium intake, you can use a low‑sodium salt, but the flavor profile will shift slightly.
Vanilla extract adds a subtle, sweet aroma that ties all the flavors together. Two teaspoons are sufficient for 8 servings; more will overpower the other ingredients. If you prefer a nutty flavor, you can use almond extract as a substitute.
Everything’s prepped? Good. Let’s get into the real action…
The Method — Step by Step
- Preheat your oven to 350°F (175°C). Line a 9×5 inch loaf pan with parchment paper or lightly grease it with oil or butter. The parchment ensures easy release, while the grease adds a subtle buttery flavor. Once the oven is ready, set the timer for 30 minutes; you’ll know it’s done when the top is golden and a toothpick comes out clean.
- In a large mixing bowl, mash the ripe bananas with a fork until they’re almost smooth. Add the pumpkin puree, and whisk until the mixture is homogenous. The bananas should feel like a thick, creamy sauce, and the pumpkin should blend in without any lumps. This step is crucial for an even crumb; skip it and you’ll end up with a patchy loaf.
- In a separate bowl, combine the granulated sugar, brown sugar, and vanilla extract. Whisk them together until the sugars dissolve slightly, creating a fragrant syrup. Then pour this syrup into the banana‑pumpkin mixture, and stir until everything is well incorporated. The mixture will look glossy and slightly thick, signaling that the sugars are fully blended.
- Add the vegetable oil and eggs to the wet mixture, beating until the batter is smooth and glossy. The eggs act as a binder, so make sure they’re fully incorporated; if they’re still separate, the loaf may not rise properly. At this point, the batter should feel silky and cohesive, ready for the dry ingredients.
- Sift together the all‑purpose flour, baking soda, baking powder, salt, cinnamon, and nutmeg. Sifting removes clumps and ensures even distribution of leavening agents and spices. This step is vital for a uniform rise and a consistent flavor throughout the loaf.
- Gradually fold the dry mixture into the wet batter, using a spatula or wooden spoon. Stir until just combined; overmixing will develop gluten, resulting in a dense loaf. You should see a thick batter that still holds its shape when lifted with a spoon.
- Fold in the chocolate chips, ensuring they’re evenly dispersed throughout the batter. The chips should be spread out, not clumped together. This will give you that delightful surprise in every slice.
- Pour the batter into the prepared loaf pan, smoothing the top with a spatula. Tap the pan gently on the counter to release any air bubbles. The batter should be level, with no gaps that could cause uneven baking.
- Slide the loaf into the preheated oven and bake for 30 minutes, then reduce the temperature to 325°F (165°C) and bake for an additional 10–15 minutes, or until the top is a deep golden brown and a toothpick inserted into the center comes out clean. The aroma at this stage will fill your kitchen with a warm, comforting scent that makes the wait worth it.
That’s it — you did it. But hold on, I’ve got a few more tricks that will take this to another level. These insider tips will help you tweak the loaf to your exact taste and ensure every slice is a masterpiece. Keep reading, and you’ll learn how to perfect the crumb, elevate the flavor, and even customize the loaf for special occasions.
Insider Tricks for Flawless Results
The Temperature Rule Nobody Follows
Most bakers bake banana bread at 350°F, but lowering the temperature to 325°F after the first 20 minutes keeps the loaf from drying out. The reduced heat allows the interior to cook slowly, ensuring a moist crumb. I’ve tested this method on three different ovens, and the results are consistently superior.
Why Your Nose Knows Best
The aroma is a reliable indicator of doneness. When the loaf starts to smell like toasted nuts and caramel, it’s almost ready. If you’re still uncertain, insert a toothpick; if it comes out clean, the loaf is perfectly baked.
The 5‑Minute Rest That Changes Everything
After removing the loaf from the oven, let it rest in the pan for five minutes. This resting period allows the crumb to set, preventing it from crumbling when you slice it. A quick rest also lets the chocolate chips settle, giving a more uniform distribution.
Use a Loaf Pan with a Lid
Covering the loaf with a lid or foil during the last 10 minutes traps steam, which keeps the crust tender and the interior moist. It also speeds up the rise slightly, giving you a fluffier loaf. I use a metal lid that fits snugly, and it’s a game‑changer.
Freeze for Later
If you want to store the loaf for up to a week, wrap it tightly in plastic wrap and then place it in a freezer bag. When you’re ready to eat, thaw at room temperature for an hour, then warm it in the oven for 10 minutes. This process restores the crumb’s freshness and gives the chocolate a slightly melty texture.
Creative Twists and Variations
This recipe is a playground. Here are some of my favorite ways to switch things up:
Nutty Banana‑Pumpkin Loaf
Swap the chocolate chips for chopped walnuts or pecans for a crunchy, nutty flavor. The nuts add a satisfying bite and pair beautifully with the warm spices. This variation is perfect for a holiday brunch or a cozy afternoon snack.
Chocolate‑Covered Pumpkin Banana Bread
After baking, drizzle melted dark chocolate over the top of the loaf, then chill until set. The chocolate creates a glossy, decadent finish that elevates the loaf to a dessert level. It’s a showstopper for parties or special occasions.
Spiced Pumpkin Banana Muffins
Divide the batter into muffin tins and bake at 375°F for 18–20 minutes. The muffins are smaller, making them perfect for on‑the‑go breakfasts. The spices become more pronounced in the smaller format, giving each muffin a punch of flavor.
Vegan Banana‑Pumpkin Bread
Replace the eggs with flaxseed meal or a commercial egg replacer, and use a plant‑based milk alternative. The loaf remains moist and flavorful, and the vegan version is just as satisfying. This tweak opens the recipe to a wider audience.
Low‑Sugar Pumpkin Banana Bread
Use a sugar substitute like stevia or monk fruit sweetener in place of the granulated and brown sugar. The loaf will still be moist and flavorful, though the sweetness profile will be slightly different. This version is great for those watching their sugar intake.
Storing and Bringing It Back to Life
Fridge Storage
Wrap the loaf tightly in plastic wrap or place it in an airtight container. Store it in the refrigerator for up to three days. The crumb stays moist, and the flavors deepen over time. For best results, let the loaf reach room temperature before slicing.
Freezer Friendly
Slice the loaf before freezing to make portioning easier. Wrap each slice in foil and then place them in a freezer bag. The loaf can be frozen for up to two months without losing quality. When you’re ready to eat, thaw at room temperature or warm in the oven.
Best Reheating Method
Preheat your oven to 350°F (175°C). Place the loaf or slices on a baking sheet and heat for 10 minutes, or until warmed through. If you prefer a crispier crust, add a minute or two on a higher temperature. A splash of water in the pan helps steam the bread, keeping it moist.
And there you have it—an unforgettable pumpkin banana bread with chocolate that will become a staple in your baking repertoire. The loaf is moist, flavorful, and versatile, making it suitable for breakfast, dessert, or a snack at any time of day. I’ve tried it in the morning, at lunch, and even as a midnight craving, and each time it delivers. Now that you know the secrets, go ahead and bake this loaf, and watch your friends’ faces light up with delight.