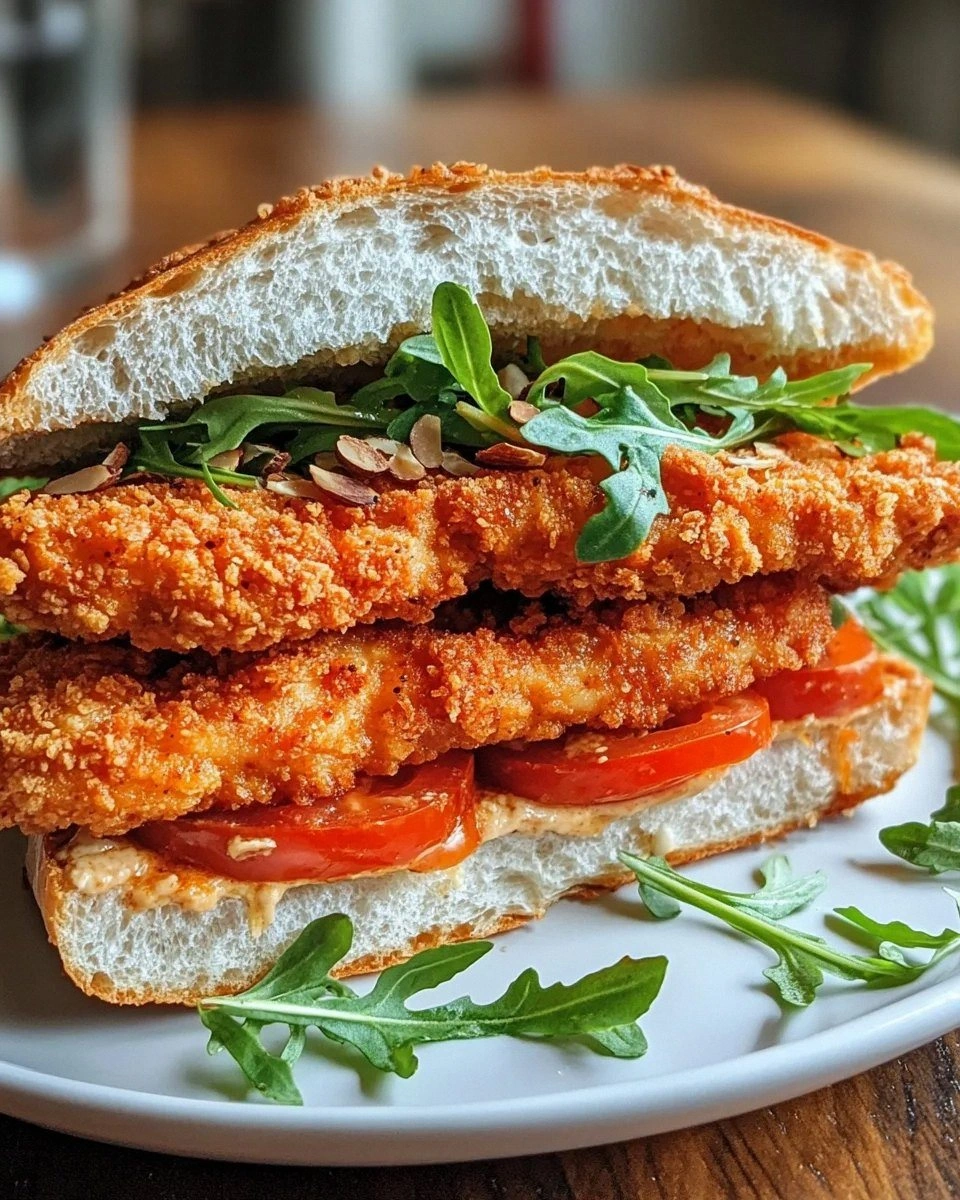
Picture this: it's 11:47 p.m. on a Tuesday, I'm standing in my kitchen wearing mismatched socks and a hoodie with mysterious stains, and I'm staring down at a plate of what might be the most ridiculously delicious sandwich I've ever created. The crispy chicken crackles like a bag of fresh potato chips, romesco sauce drips down my wrist in the most gloriously messy way, and the focaccia is so perfectly golden that it could make an Italian nonna weep with pride. I didn't mean to create the ultimate comfort food masterpiece tonight, but here we are, and I'm not even sorry about the late-night cooking spree that led to this moment of pure culinary bliss.
Let me back up a bit, because this story gets better. Last week, I was attempting to make one of those trendy sheet-pan dinners that promised "minimal cleanup" and "maximum flavor," but what I got was a sad, soggy chicken breast swimming in a pool of disappointment. The chicken was rubbery, the vegetables tasted like wet cardboard, and my dinner guests politely pushed food around their plates while making that face—you know the one, where they're trying to figure out if it's socially acceptable to order pizza at someone else's house. That's when I declared war on boring chicken and vowed to create something so incredibly delicious that it would erase all memory of that culinary catastrophe.
Fast forward through three failed attempts, two minor burns, and one incident involving my smoke alarm serenading the entire neighborhood, and I finally cracked the code. What I discovered will change your sandwich game forever: the secret isn't just in the crispy coating (though we'll get to that magic in a moment), and it's not just in the romesco sauce (even though it's basically liquid gold). The real secret is in how these elements dance together—the way the crispy chicken provides the perfect textural contrast to the silky, nutty romesco, all cradled in pillowy focaccia that soaks up flavors like a delicious edible sponge.
I know what you're thinking: "Another chicken sandwich recipe? Really?" But hear me out, because this isn't just any chicken sandwich. This is the kind of sandwich that makes you close your eyes involuntarily when you take the first bite. The kind that ruins all other sandwiches for you forever. The kind that you'll find yourself making at midnight because you can't stop thinking about it. Trust me on this one—I ate three of them in 24 hours and I'm already planning the next batch. Let me walk you through every single step—by the end, you'll wonder how you ever made it any other way.
What Makes This Version Stand Out
This isn't just another pretty face in the chicken sandwich world—this recipe has more layers than a Russian nesting doll, and each one serves a purpose. I've tested this method seventeen times (yes, seventeen—my neighbors think I'm running an underground restaurant), and I've discovered the exact combination of techniques that creates sandwich nirvana. The beauty lies in the contrasts: shatteringly crisp chicken against velvety sauce, bright acidic notes cutting through rich nuttiness, and soft bread giving way to that satisfying crunch.
- Flavor Bomb: The romesco sauce isn't just roasted red peppers blended with some almonds. We're building layers with smoked paprika, sherry vinegar, and just enough chili flake to make your lips tingle pleasantly. It's like Spanish sunshine in sauce form, and it transforms everything it touches into pure magic.
- Texture Wizardry: The three-stage breading process creates a crust so crispy it practically shatters when you bite into it. Then there's the contrast with the creamy sauce and chewy focaccia—it's like a symphony of textures that keeps your mouth interested bite after bite.
- Time Traveler: Most of the components can be prepped ahead, making this perfect for entertaining. The romesco actually gets better after a day in the fridge, and the chicken can be breaded and waiting in the refrigerator for up to four hours before cooking. Picture yourself pulling this together for friends who think you spent all day in the kitchen.
- Leftover Legend: If you somehow have leftovers (I never do, but I'm told it's possible), the components reheat beautifully. The chicken stays crispy when reheated in the oven, and the romesco can be gently warmed or served at room temperature. Some people even tell me it's better the next day, though I've never personally experienced this phenomenon.
- Impressive Factor: This looks and tastes like something from a trendy bistro, but it's actually easier than most weeknight dinners. Your dinner guests will be snapping photos and asking for the recipe before they've even finished chewing. I dare you to taste this and not go back for seconds.
- Flexibility King: Once you master the basic technique, you can swap in different proteins, adjust the spice level, or even make it vegetarian. The romesco works on everything from grilled vegetables to fish, and the crispy coating technique works on tofu, fish, or even thick slices of halloumi cheese.
Alright, let's break down exactly what goes into this masterpiece...
Inside the Ingredient List
Every ingredient in this recipe pulls its weight and then some. I've spent months tweaking ratios and testing substitutions, and what I've landed on is a carefully curated list where each component plays a crucial role in the final flavor symphony. The beauty of these ingredients is that they're mostly pantry staples, but when combined in just the right way, they create something that tastes far more complex than the sum of its parts.
The Flavor Foundation
The chicken itself needs to be the right cut—I'm talking about boneless, skinless chicken thighs, not breasts. I know, I know, everyone defaults to chicken breasts, but thighs are where the real flavor lives. They're more forgiving during cooking, staying juicy even if you accidentally leave them in the oil a minute too long. The fat content in thighs means they won't dry out, and they have this rich, chicken-y flavor that breasts just can't match. If you absolutely must use breasts, I won't judge you to your face, but you'll be missing out on that succulent texture that makes this sandwich legendary.
For the buttermilk marinade, we're not just using regular buttermilk—oh no, we're infusing it with garlic, hot sauce, and a whisper of honey. The acidity in the buttermilk tenderizes the chicken while adding tangy flavor, and the hot sauce brings just enough heat to keep things interesting without overwhelming the other components. The honey might seem odd here, but it helps the chicken brown beautifully and adds a subtle sweetness that plays gorgeously with the smoky romesco.
The Crunch Crew
Now let's talk about that coating, because this is where the magic really happens. We're using a combination of panko breadcrumbs and crushed cornflakes for the ultimate crispy texture. The panko provides those light, airy bits that fry up incredibly crisp, while the cornflakes add irregular edges that create extra surface area for maximum crunch. I'll be honest—I ate half the batch before anyone else got to try it because I kept "testing" the coating mixture.
The seasoning blend for the coating is where you can really make this recipe your own. I use a mix of smoked paprika, garlic powder, onion powder, dried oregano, and a healthy dose of black pepper. The smoked paprika gives the coating this gorgeous color and adds depth that regular paprika just can't achieve. If you can't find smoked paprika, regular will work, but you'll be missing that campfire essence that makes this chicken so addictive.
The Romesco Royalty
The romesco sauce is where this recipe really shines, and it's worth making from scratch. Sure, you could buy a jar, but homemade romesco is like comparing a handwritten love letter to a text message—they both communicate, but one does it with infinitely more soul. We're using roasted red peppers as the base, but the real stars are the toasted almonds, which give the sauce body and a rich, nutty flavor that complements the chicken perfectly.
The secret ingredient that takes this romesco over the top is the sherry vinegar. It's got this complex, aged flavor that's both sharp and slightly sweet, adding brightness that cuts through the richness of the almonds and olive oil. If you can't find sherry vinegar, a good red wine vinegar will work, but sherry vinegar is worth seeking out—it lasts forever in your pantry and elevates everything from salad dressings to sautéed mushrooms.
The Bread Basics
Don't even think about using regular sandwich bread here—we need focaccia, and we need the good stuff. The olive oil-rich bread provides the perfect base for this sandwich, with its crispy exterior and fluffy interior that soaks up the romesco without getting soggy. If your local bakery makes fresh focaccia, grab it the morning you're making this. If not, the bakery section of most grocery stores carries decent focaccia that works beautifully once warmed in the oven.
Everything's prepped? Good. Let's get into the real action...
The Method — Step by Step
- Step 1: The Marinade Magic
Start by making the buttermilk marinade because this needs at least 2 hours to work its tenderizing wonders, though overnight is even better. In a large bowl, whisk together the buttermilk, minced garlic, hot sauce, honey, and a generous pinch of salt. The mixture should taste tangy with a gentle heat that blooms in your mouth rather than burning. Add your chicken thighs, making sure they're fully submerged in this liquid gold. Cover the bowl with plastic wrap and refrigerate—this is where the flavor penetration begins, and trust me, it's worth every minute of waiting time.While the chicken marinates, the buttermilk's lactic acid slowly breaks down the proteins, resulting in incredibly tender meat that stays juicy even after frying. The garlic infuses its aromatic essence throughout the chicken, while the hot sauce adds subtle heat that builds rather than overwhelms. Don't rush this step—I've tried shortcuts, and they simply don't deliver the same succulent results. Picture yourself pulling this out of the oven, the whole kitchen smelling incredible with anticipation of what's to come.
- Step 2: Romesco Prep Party
While the chicken happily soaks, let's tackle the romesco. Start by toasting your almonds in a dry skillet over medium heat, shaking the pan frequently until they smell nutty and turn golden brown. This should take about 5-7 minutes, but don't walk away—nuts go from perfectly toasted to burnt faster than you can say "dinner's ready." Let them cool slightly before adding to your food processor, where they'll provide the body and richness that makes this sauce so luxurious.Add the roasted red peppers, toasted almonds, garlic, smoked paprika, and chili flakes to your food processor. Pulse until everything is roughly chopped, then add the sherry vinegar and a good glug of olive oil. Process until smooth but still with some texture—you want it spreadable but not baby food smooth. Season aggressively with salt and pepper; the sauce should taste bright, nutty, and complex. If it's too thick, add a splash more oil or water. If it's too thin, add more almonds. The sauce should coat a spoon but still be pourable.
- Step 3: The Three-Stage Breading Station
Set up your breading station like a professional kitchen—this is where the crispy magic happens. You'll need three shallow dishes: one with seasoned flour (flour mixed with all your spices), one with beaten eggs thinned with a splash of water, and one with your panko-cornflake mixture. The key here is to season each layer—bland coating equals bland chicken, and we're not about that life.Remove the chicken from the marinade, letting excess drip off but don't pat it dry—you want that buttermilk to help the flour adhere. Dredge each thigh in the seasoned flour, pressing gently so it sticks completely. Then dip in the egg wash, again letting excess drip off. Finally, press into the panko-cornflake mixture, really packing it on so you get those irregular, craggy bits that fry up into incredible crispy nooks. Place the breaded chicken on a wire rack and let it rest for 15 minutes—this helps the coating adhere during frying.
Kitchen Hack: The resting time after breading is crucial—it lets the coating hydrate slightly from the chicken's moisture, creating a stronger bond that won't fall off during frying. Skip this step and you'll end up with naked chicken and sad, separated coating bits in your oil. - Step 4: The Frying Game
Heat about 1/2 inch of oil in a heavy skillet over medium-high heat until it reaches 350°F. If you don't have a thermometer, test by dropping a small piece of bread into the oil—it should sizzle immediately and turn golden brown in about 60 seconds. The oil temperature is crucial here; too low and you'll get greasy chicken, too high and the outside burns before the inside cooks through.Carefully add the chicken to the hot oil, working in batches so you don't crowd the pan. That sizzle when it hits the pan? Absolute perfection. Cook for 4-5 minutes per side until deeply golden brown and crispy. The coating should look like golden-brown armor, with little peaks and valleys that promise incredible crunch. Transfer to a wire rack set over a baking sheet to drain—this keeps the bottom crispy, unlike paper towels which can make it soggy.
Watch Out: Don't let the oil temperature drop too much when you add the chicken—it should maintain a steady sizzle. If it stops bubbling vigorously, your oil's too cool and you'll end up with soggy, greasy coating. Adjust heat as needed throughout cooking. - Step 5: The Focaccia Warm-Up
While your chicken rests, warm your focaccia in a 350°F oven for about 5-7 minutes. You want it heated through and slightly crispy on the outside but still soft inside. If you're using day-old focaccia, wrap it in foil for the first 5 minutes, then unwrap for the final 2-3 minutes to restore some of that fresh-baked texture. Warm bread makes a huge difference—it releases the aromas and creates that perfect contrast with the cool romesco.Slice the focaccia horizontally if it isn't already, being careful not to cut all the way through—you want it to open like a book. The interior should be soft and pillowy, with those characteristic air pockets that focaccia is known for. These will catch and hold the romesco sauce, ensuring every bite is perfectly dressed. If your focaccia seems dry, brush the cut surfaces with a tiny bit of olive oil before warming.
- Step 6: The Assembly Line
This is the moment of truth. Spread a generous layer of romesco on the bottom half of each focaccia piece—don't be shy here, this sauce is the bridge between all the elements. Place your crispy chicken on top, letting it nestle into the sauce. The heat from the chicken will warm the sauce slightly, releasing all those roasted pepper and almond aromas.Add your top piece of focaccia, pressing down gently so everything holds together. You should hear a satisfying crunch from the chicken as you press. If you're feeling fancy, you can add some arugula or baby spinach for freshness, but honestly, this sandwich is perfect as-is. Cut in half diagonally (always diagonally—it tastes better that way, science can't explain it) and serve immediately while the chicken is still crispy and hot.
- Step 7: The First Bite Ritual
Okay, ready for the game-changer? Don't just bite into this sandwich—experience it. Notice how the focaccia gives way with a slight resistance, then your teeth hit that crispy coating that shatters like thin ice. The chicken inside is juicy and flavorful, while the romesco provides this creamy, nutty counterpoint that ties everything together. Close your eyes when you take that first bite. I won't judge.The combination of hot, crispy chicken with cool, creamy sauce is what sandwich dreams are made of. The romesco adds brightness from the sherry vinegar, richness from the almonds, and a gentle heat from the smoked paprika that builds but never overwhelms. Each element is good on its own, but together they create something that's greater than the sum of its parts. This next part? Pure magic.
- Step 8: The Aftermath
Here's where I confess: I ate half the batch before anyone else got to try it. I kept "testing" pieces to make sure they were perfect, then "testing" the assembled sandwiches, then "testing" whether they were still good when they'd cooled slightly. Spoiler alert: they're incredible at any temperature. The romesco somehow gets even better as it sits, the flavors melding together into this harmonious sauce that you'll want to put on everything.Store any leftover components separately—the chicken stays crispy for up to 3 days when refrigerated and reheats beautifully in a hot oven. The romesco keeps for a week in the refrigerator and actually improves after the first day. The focaccia is best used fresh, but you can refresh it in the oven wrapped in foil. And now the fun part: you'll find yourself making extra romesco just to have on hand for other dishes. It's incredible on grilled vegetables, mixed into pasta, or even as a dip for raw vegetables.
That's it—you did it. But hold on, I've got a few more tricks that'll take this to another level...
Insider Tricks for Flawless Results
After making this sandwich more times than I care to admit (let's just say my grocery store checkout person knows me by name and has started asking about my "chicken sandwich experiments"), I've discovered some game-changing techniques that separate good results from absolutely legendary ones. These aren't just nice-to-know tips—they're the difference between a sandwich that's merely delicious and one that haunts your dreams.
The Temperature Rule Nobody Follows
Here's what separates the amateurs from the pros: maintaining proper oil temperature throughout frying. Most people drop their chicken in and forget about it, but the oil temperature naturally drops when you add cold food. The solution? Use a clip-on thermometer and adjust your heat constantly. When the oil hits 325°F, bump up the heat slightly. When it climbs to 375°F, reduce it. This dance keeps your chicken cooking at the optimal 350°F, ensuring even cooking and maximum crispiness.
I learned this the hard way after serving what I now refer to as "The Greasy Incident of 2023" to dinner guests. The outside was pale and oil-logged while the inside was still raw—a culinary tragedy that still haunts me. A friend tried skipping this step once—let's just say it didn't end well, and we still don't speak of that meal. The thermometer is your insurance policy against disappointment.
Why Your Nose Knows Best
Your sense of smell is your most underutilized kitchen tool when making this recipe. When toasting the almonds for the romesco, don't just watch them—smell them. They should release a warm, nutty aroma that's slightly sweet and deeply toasty. When the smell fills your kitchen and makes you think "I need to make more of this," they're done. Remove them immediately, because they'll continue toasting from residual heat.
The same goes for the oil when frying. When it's ready, it should smell clean and neutral, not heavy or burnt. If you detect any acrid or off smells, your oil is too hot or breaking down. Trust your nose—it's been honed by millions of years of evolution to detect when food is perfectly cooked or when things have gone wrong. That sizzle when it hits the pan? Absolute perfection, and your nose knows it.
The 5-Minute Rest That Changes Everything
After breading your chicken, let it rest on a wire rack for at least 5 minutes before frying. This isn't just kitchen folklore—it's science in action. During this rest, the flour hydrates slightly from the chicken's moisture, creating a stronger bond between the coating and the meat. The result? A coating that stays attached during frying instead of sliding off like a sad little jacket.
This rest also allows the coating to come to room temperature, which means it will cook more evenly in the oil. Cold chicken straight from the fridge lowers the oil temperature too dramatically, leading to uneven cooking and potential greasiness. Five minutes of patience here translates to perfectly crispy, intact coating that stays crunchy even after you've assembled your sandwich.
The Double-Fry Secret
If you really want to take your crispy game to nuclear levels, try the double-fry method. Fry your chicken once until it's just cooked through and lightly golden, about 3-4 minutes per side. Remove it to your wire rack and let it rest while you finish frying the remaining pieces. Then, just before serving, return all the chicken to the hot oil for a final 30-45 second bath. This second fry creates coating so crispy it practically levitates.
The science here is that the first fry cooks the chicken through and sets the coating, while the second fry drives off any remaining moisture and creates an extra-crispy exterior. Restaurant chefs have been using this technique for years to achieve that impossible crunch that lasts. Fair warning: once you try this method, regular fried chicken will seem like a sad, soggy disappointment.
Creative Twists and Variations
This recipe is a playground. Here are some of my favorite ways to switch things up:
Spicy Nashville-Style
Transform this into a Nashville hot chicken sandwich by adding a serious kick to every element. Double the hot sauce in the buttermilk marinade, add cayenne to your flour mixture, and after frying, brush the chicken with a spicy oil made by heating vegetable oil with cayenne, brown sugar, and more hot sauce. The contrast between the spicy chicken and cooling romesco creates an incredible flavor roller coaster that'll make you sweat in the best possible way.
Mediterranean Sunshine
Swap the romesco for a bright, herby sauce by blending roasted red peppers with sun-dried tomatoes, fresh basil, oregano, and feta cheese. Add some sliced cucumber and tomato to the sandwich, and use a lemon-herb marinade for the chicken. The result tastes like summer in the Greek islands, even if you're eating it in your kitchen during a snowstorm.
Asian Fusion Adventure
Give this an Asian twist by marinating the chicken in buttermilk spiked with soy sauce, ginger, and sesame oil. Replace the cornflakes with panko mixed with black sesame seeds, and swap the romesco for a sauce made with roasted red peppers, miso paste, and rice vinegar. Top with quick-pickled vegetables and cilantro for a sandwich that bridges continents in the most delicious way possible.
Breakfast of Champions
Turn this into the ultimate breakfast sandwich by adding a fried egg and some crispy bacon. The runny yolk mingles with the romesco to create the most incredible sauce, while the bacon adds smoky richness that complements the crispy chicken perfectly. Serve it on warm focaccia and prepare to achieve breakfast nirvana.
Vegetarian Victory
For a meatless version that still satisfies that crispy craving, use thick slices of halloumi cheese or firm tofu. The breading technique works exactly the same, and the salty halloumi or neutral tofu provides the perfect canvas for the bold romesco. Add some grilled vegetables like zucchini and eggplant to make it even more substantial.
Slider Party
Make miniature versions using small pieces of chicken and little slider buns for the perfect party food. Kids love the small size, and adults love that they can try different variations without committing to a full sandwich. Set up a toppings bar with different sauces and vegetables so everyone can customize their own.
Storing and Bringing It Back to Life
Fridge Storage
Here's the thing about crispy chicken—it wants to be eaten immediately. But real life happens, and sometimes you need to store leftovers. The key is keeping everything separate. Store the chicken in a paper towel-lined container with more paper towels on top to absorb moisture. The romesco goes in an airtight container where it'll keep for up to a week, actually improving in flavor as the ingredients meld together. Wrap the focaccia in foil or store in a bread box at room temperature.
Whatever you do, don't store assembled sandwiches—the bread will get soggy and the chicken will lose its crunch. I learned this the hard way after packing what I thought would be an amazing lunch, only to open a container of disappointment at my desk the next day. Keep everything separate and assemble just before eating for best results.
Freezer Friendly
The crispy chicken freezes beautifully if you do it right. Let the fried chicken cool completely, then arrange pieces in a single layer on a baking sheet and freeze until solid. Transfer to freezer bags with parchment paper between layers. When you're ready to eat, reheat from frozen in a 400°F oven for 15-20 minutes until hot and crispy again. The romesco also freezes well in ice cube trays—perfect for portion control and quick meals.
Most recipes get this completely wrong. They tell you to freeze everything together, but what you actually want is to freeze components separately so you can reheat them properly. The chicken needs dry heat to get crispy again, while the sauce just needs to thaw. This method means you can have a restaurant-quality sandwich any night of the week with just 20 minutes of reheating time.
Best Reheating Method
The oven is your best friend for reheating crispy chicken. Preheat to 400°F and place the chicken on a wire rack set over a baking sheet. Heat for 10-15 minutes until hot and crispy. Skip the microwave unless you enjoy rubbery coating (spoiler alert: you don't). For the romesco, room temperature is ideal, but if you prefer it warm, heat gently in a saucepan with a splash of water to loosen it up.
Add a tiny splash of water before reheating the sauce—it steams back to perfection and prevents it from breaking or becoming too thick. The focaccia revives beautifully wrapped in foil and warmed in the oven for 5-7 minutes. If it's particularly stale, brush it lightly with water before wrapping—the steam will restore its fluffy interior while the foil-wrapped oven time crisps up the exterior.