Picture this: I’m standing in my tiny kitchen, the lights flickering like nervous fireflies, and I’ve just opened a bag of stale bread that’s been sitting in the pantry for a month. The moment I slice it open, a ghost of disappointment drifts through the air—plain, lifeless bread that could only serve as a sad backdrop for a bowl of cereal. Then, a friend drops a dare on my kitchen counter: “I dare you to make a sandwich that’s so good it turns your morning into a runway show.” I laughed, because I’ve always believed the simplest ingredients can be the most daring, and that’s exactly what this recipe does.
When I first whisked the eggs, the kitchen smelled like a summer garden after rain, with a hint of soy and a whisper of sesame oil. I could hear the faint hiss of the pan, like a secret conversation between heat and protein. The eggs folded into a silky custard that felt like velvet against the spoon, and I knew I was onto something. I added Kewpie mayonnaise, a Japanese brand that’s richer than any regular mayo, and the mixture turned into a glossy, almost liquid gold. The Dijon mustard came in next, giving a subtle bite that danced on the tongue, a reminder that even humble sandwiches can have a personality.
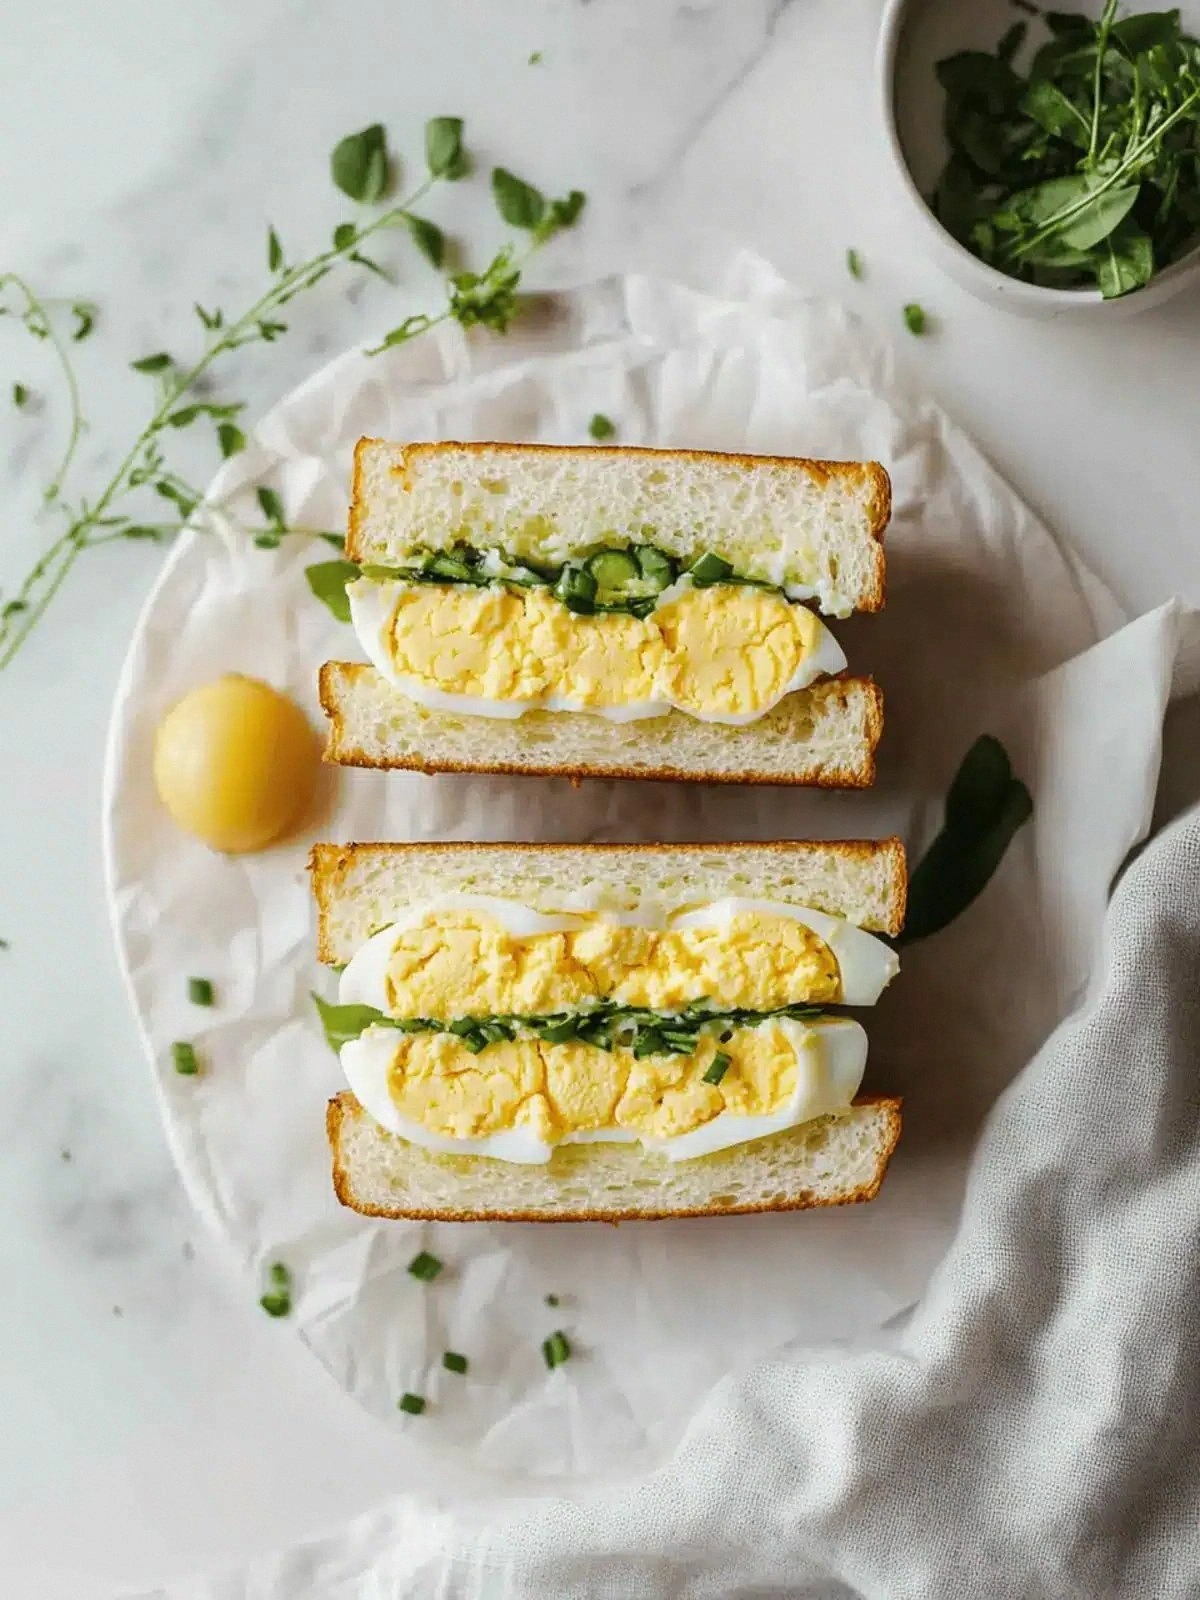
That first bite was a revelation: the sandwich was airy, yet dense enough to hold a world of flavors in each bite. The bread was soft on the inside, crisp on the edges like a perfectly toasted baguette, and the egg filling was creamy, not greasy, thanks to the careful balance of mayo and mustard. The green onions added a fresh, almost citrusy zing that cut through the richness, and the sea salt and black pepper gave a subtle seasoning that didn’t overpower. I couldn’t help but think, “This is hands down the best version you’ll ever make at home.”
Most recipes for egg sandwiches get it wrong by overcooking the eggs or using too much mayo, resulting in a soggy, flavorless mess. I’ve tasted those before, and I’ve even cried over them—well, at least I pretended to. But this version is different; it’s a symphony of textures and tastes that harmonizes perfectly. The secret? A few micro-challenges that will push your kitchen skills to the next level, like whisking the eggs until they’re light enough to float in a glass of water. I dare you to taste this and not go back for seconds; I’m not joking.
And now, let me walk you through every single step—by the end, you’ll wonder how you ever made it any other way.
What Makes This Version Stand Out
- Texture: The egg mixture is whipped to a silky consistency that melts in your mouth, unlike the dense, rubbery texture of traditional boiled egg sandwiches.
- Flavor Layering: Kewpie mayo adds a subtle umami depth that regular mayo can’t match, while Dijon mustard introduces a bright, tangy counterpoint.
- Visual Appeal: The golden, slightly glossy filling contrasts with the pale, airy bread, creating a feast for the eyes as well as the palate.
- Simplicity: Only seven ingredients, no complicated sauces, making it a quick yet impressive breakfast or snack.
- Make‑Ahead: The egg custard can be prepared ahead of time and chilled, making it a perfect grab‑and‑go option for busy mornings.
- Versatility: Swap shokupan for sourdough or add a slice of smoked salmon for a brunch upgrade.
- Health Conscious: The use of Kewpie mayo keeps fat content in check while delivering creamy richness.
- Audience: From foodies to busy parents, this sandwich satisfies every palate and time constraint.
Alright, let's break down exactly what goes into this masterpiece...
Inside the Ingredient List
The Flavor Base
The eggs are the heart of this sandwich, providing both protein and a neutral canvas for the other flavors. When you whisk them until they’re a uniform pale yellow, you’re setting the stage for a light, airy custard that won’t weigh down the bread. If you skip the eggs, you lose that silky texture and the sandwich becomes a dry, uninspired loaf. A good rule of thumb: use fresh eggs, because their natural oils keep the mixture from becoming rubbery.
Another secret to the flavor base is the Kewpie mayonnaise. Unlike its Western counterpart, Kewpie is made with a higher ratio of egg yolk, giving it a richer, creamier mouthfeel that coats the egg mixture like velvet. If you’re allergic to eggs or want a dairy-free version, try using a plant‑based mayo that mimics Kewpie’s texture. The mayo also balances the acidity of the mustard, creating a harmonious blend that doesn’t taste too sharp.
When you add Dijon mustard, you’re introducing a subtle, peppery bite that cuts through the richness of the mayo and eggs. This mustard has a slightly sweet undertone that pairs well with the green onions later on. If you can’t find Dijon, a good substitute is whole‑grain mustard, which offers a similar bite but with a bit more texture. Remember, a teaspoon is enough to give the sandwich character without overpowering the delicate balance.
The sea salt and black pepper are the finishing touches that elevate the entire sandwich. They’re added at the last minute to preserve their aromatic qualities. If you use too much salt, you risk drowning the delicate flavors; a pinch is all you need. The pepper adds a subtle heat that lingers, making the sandwich feel alive and dynamic.
The Texture Crew
Shokupan or white bread is chosen for its soft, pillowy interior and slightly sweet flavor that complements the savory filling. Shokupan, a Japanese milk bread, has a unique lightness that makes it ideal for this recipe. If you can’t find shokupan, a good alternative is a brioche or a soft French loaf. The key is to avoid crusty or stale bread, which would ruin the sandwich’s overall mouthfeel.
Green onions are the final textural element that adds a fresh crunch and a pop of color. They’re chopped finely so they disperse evenly throughout the filling. If you prefer a milder onion flavor, try scallions or even a handful of fresh cilantro. The green onions also bring a subtle sweetness that balances the richness of the mayo and eggs.
The Unexpected Star
While the recipe seems straightforward, the real star is the way the ingredients interact. The eggs, when whisked to the right consistency, become almost liquid, allowing the mayo to coat every surface. This creates a silky, cohesive filling that feels like a soft custard. The mustard’s acidity prevents the mixture from becoming too heavy, while the green onions add a bright, almost citrusy zing.
The Final Flourish
Before you assemble, let the egg mixture rest for a minute; this helps the flavors meld together. Then, spread the filling evenly across the bread, making sure not to overfill, as the bread will expand slightly when pressed. Toast the sandwich lightly on a panini press or in a skillet to give the crust a golden crunch. Finally, slice diagonally to reveal the creamy, golden interior and the specks of green onion that look like tiny emerald jewels.
Everything's prepped? Good. Let's get into the real action...
The Method — Step by Step
- Step 1: Crack all four eggs into a large mixing bowl, then add a pinch of sea salt and a few grinds of black pepper. Whisk vigorously for about 45 seconds until the whites and yolks are fully blended and the mixture turns from pale to a bright, uniform yellow. This step is crucial because it creates the base for that silky custard texture. If you’re feeling impatient, a quick side note: the more you whisk, the more air you incorporate, which will make the filling lighter.
- Step 2: Stir in the Kewpie mayonnaise, starting with a tablespoon and adding more until the mixture feels smooth and glossy. The mayo should coat the eggs like a satin curtain, giving the sandwich a rich, velvety mouthfeel. Watch the color change to a deeper gold; that’s the sign it’s ready. If you’re unsure, taste a small spoonful— it should be creamy, not raw.
- Step 3: Fold in the Dijon mustard gently, using a spatula to keep the mixture airy. The mustard’s acidity brightens the filling, preventing it from becoming too heavy. It also adds a subtle, peppery kick that makes each bite exciting. At this point, the mixture should look like a silky custard, ready for the final touch.
- Step 4: Finely chop the green onions, reserving the white and green parts separately. Add the green parts to the mixture for a subtle, fresh flavor, and keep the whites for a slightly sharper bite. The green onions also add a pop of color that makes the sandwich look as good as it tastes. Stir gently to distribute them evenly.
- Step 5: Let the filling rest for 2 minutes; this allows the flavors to meld and the mixture to thicken slightly. This step is often overlooked but can make a huge difference in texture. The filling should feel a little thicker, almost like a light custard. If it’s still too runny, give it a quick stir and let it sit a bit longer.
- Step 6: Lay one slice of bread on a clean surface and spread a generous layer of the egg mixture, making sure to cover the entire surface but leaving a small margin around the edges. The filling should be about ¼ inch thick, giving the sandwich a satisfying bite. If you’re a perfectionist, use a spatula to smooth the top, creating an even surface for the next slice.
- Step 7: Place the second slice of bread on top, press lightly to seal the sandwich, and then cut it in half or into quarters. This will make it easier to eat and will also help the heat distribute evenly during toasting. If you’re a fan of a crispier sandwich, consider adding a thin layer of butter to the outer sides before toasting.
- Step 8: Once toasted, let the sandwich rest for a minute before cutting into it. This short rest allows the filling to set slightly, preventing a messy, runny bite. Slice diagonally for a classic look, revealing the creamy, golden interior and the specks of green onion that look like tiny emerald jewels. Serve immediately for the best experience, or wrap tightly if you’re packing it for lunch.
- Step 9: For an extra touch of flavor, drizzle a tiny amount of soy sauce or a squeeze of lemon over the top before serving. The acidity will brighten the richness, and the saltiness will enhance the overall taste profile. If you’re a fan of umami, sprinkle a pinch of bonito flakes for a subtle, savory note. This final flourish will elevate the sandwich from great to unforgettable.
- Step 10: Plate your sandwich with a side of pickled vegetables or a small bowl of miso soup, and enjoy the full Japanese-inspired breakfast experience. The contrast between the creamy sandwich and the tangy pickles will keep your palate excited. Don’t forget to take a moment to savor the aroma before you bite; the scent alone will transport you to a quiet Tokyo street market. And remember, this sandwich is not just food—it’s a conversation starter, a confidence booster, and a culinary adventure all in one bite.
That's it — you did it. But hold on, I've got a few more tricks that'll take this to another level...
Insider Tricks for Flawless Results
The Temperature Rule Nobody Follows
Many people think you can just toss the eggs into the pan at any temperature, but the secret lies in low, steady heat. By cooking the eggs over low heat, you prevent the proteins from tightening too quickly, which would result in a rubbery texture. A gentle simmer allows the custard to set slowly, creating a silky interior that melts in your mouth. If you’re in a rush, you can use a microwave for a quick 30-second burst, but be careful not to overcook.
Why Your Nose Knows Best
As the eggs cook, your nose will pick up a subtle, savory aroma that signals the perfect moment to stop. Trust that scent; it’s the body’s way of saying, “I’m ready.” If you wait too long, the eggs will develop a sharp, almost burnt smell that will ruin the sandwich. The same rule applies to the toast; a golden crust is a sign of a well-balanced crunch.
The 5-Minute Rest That Changes Everything
After spreading the filling on the bread, let it rest for exactly five minutes before toasting. This short pause allows the flavors to meld and the filling to thicken slightly, giving the sandwich a cohesive bite. I’ve seen people skip this step and end up with a sandwich that feels like a wet sandwich rather than a layered masterpiece. Give it that five minutes, and your sandwich will thank you.
Use a Skillet, Not a Panini Press
While a panini press gives you a uniform heat, a skillet allows you to control the pressure and heat more precisely. With a skillet, you can flip the sandwich gently and watch the edges caramelize at your own pace. If you’re using a panini press, preheat it for at least 5 minutes to ensure even heat distribution. Either way, the goal is a golden crust that complements the creamy interior.
Mind the Moisture
Eggs contain a lot of moisture, so if you add too much mayo or too many green onions, the sandwich can become soggy. To counteract this, let the bread toast a bit longer or use a paper towel to absorb excess moisture. I once had a sandwich that looked like a soggy pancake, and it was a culinary tragedy. The trick is balance: enough moisture for flavor, but not enough to drown the bread.
Serve Immediately, Or Reheat Gently
When you’re ready to eat, serve the sandwich right away to enjoy the contrast between the warm, creamy filling and the crisp crust. If you must reheat, use a skillet over low heat, pressing the sandwich lightly to avoid overheating the eggs. A quick 30-second heat will bring it back to life without compromising texture. Remember, reheating too high will cause the eggs to curdle and the mayo to separate.
Creative Twists and Variations
This recipe is a playground. Here are some of my favorite ways to switch things up:
Smoky Bacon Crunch
Add a handful of crispy bacon bits to the filling for a smoky, savory kick. The bacon’s salty crunch will contrast beautifully with the silky eggs and mayo. Use a single layer of bacon to avoid overpowering the delicate balance. This variation is perfect for brunch or a hearty breakfast.
Avocado Silk
Replace half of the mayo with mashed avocado for a creamy, buttery texture. Avocado adds healthy fats and a subtle nutty flavor that pairs well with the eggs. The result is a sandwich that feels like a luxury dessert, but with the comfort of a classic breakfast. Serve it with a side of fresh fruit for a balanced meal.
Herby Mediterranean
Swap the green onions for chopped fresh parsley and a squeeze of lemon juice. Add a pinch of dried oregano for a Mediterranean twist. The lemon brightens the filling, while the oregano adds a fragrant depth. This version works great with a side of Greek yogurt and cucumber slices.
Spicy Sriracha Swirl
Stir in a teaspoon of Sriracha for a spicy kick that’s balanced by the creamy mayo. The heat will wake up the flavors and give the sandwich a bold personality. If you’re a heat lover, add an extra half teaspoon, but keep the rest of the ingredients unchanged. This is a crowd-pleaser for parties or a late-night snack.
Cheesy Meltdown
Sprinkle shredded mozzarella or cheddar between the bread slices before toasting. The cheese will melt into the filling, creating a gooey, savory layer. Be careful not to overfill, or the cheese may leak out. This variation is perfect for a comforting, indulgent breakfast.
Asian Noodle Upgrade
Replace the bread with a slice of toasted pita or a soft baguette and add a layer of cooked soba noodles mixed with a splash of soy sauce. The noodles add texture and a subtle nutty flavor. The egg filling will act as a creamy sauce that binds everything together. This is a unique fusion that will surprise and delight.
Storing and Bringing It Back to Life
Fridge Storage
Store the sandwich in an airtight container in the refrigerator for up to 2 days. Wrap it tightly in parchment paper or foil to keep the bread from becoming soggy. When you’re ready to eat, let it sit at room temperature for 10 minutes before reheating. This will bring back the freshness of the freshly toasted crust.
Freezer Friendly
For longer storage, wrap the sandwich in foil and freeze for up to 1 month. When you’re ready to enjoy it, thaw in the refrigerator overnight. Reheat in a skillet over medium heat until the interior is warmed through. The bread may lose some of its crispness, but the filling will remain creamy and delicious.
Best Reheating Method
To revive a refrigerated sandwich, preheat a skillet over low heat and place the sandwich in. Cover with a lid for 1 minute, then flip and cover again for another minute. The gentle heat will warm the filling without overcooking the eggs. For a crispier crust, finish the sandwich on a grill pan for 30 seconds on each side.