I was in the middle of a Sunday afternoon disaster when a friend dared me to create a dessert that could survive a backyard barbecue, a kids’ birthday party, and a midnight snack craving—all without ever touching an oven. The kitchen smelled like burnt popcorn from a failed popcorn‑machine experiment, the timer on my old toaster was blinking like a warning light, and I was staring at a bowl of fresh strawberries that seemed to scream, “Do something with me!” I grabbed the strawberries, a pack of graham crackers, and a tub of cream cheese, and the idea hit me like a bolt of lightning: a no‑bake icebox pie that would be as cool as a summer breeze and as indulgent as a five‑star dessert.
Picture this: a buttery crust that crumbles like fresh snow under a fork, a silky filling that spreads across the palate like a velvet curtain, and a strawberry topping that glistens like rubies in the sun. The moment you cut into it, the aroma of vanilla and fresh berries wafts through the room, making everyone pause mid‑conversation to inhale the sweet promise. The texture contrast—crunchy base, creamy middle, and juicy fruit—creates a symphony that sings on every bite, and the best part? It never needs a hot oven, so you can set it in the fridge while the kids are still playing.
Most recipes I’ve tried either over‑sweeten the filling, make the crust soggy, or demand a temperamental gelatin that turns the whole thing into a wobbly mess. This version, however, uses a perfect balance of powdered sugar and cream cheese to keep the filling light yet rich, and a dash of vanilla that lifts the flavors without overpowering the strawberries. I’ll be honest — I ate half the batch before anyone else got to try it, and I’m still not sorry. I dare you to taste this and not go back for seconds; it’s hands down the best version you’ll ever make at home.
Okay, ready for the game‑changer? I’m about to reveal a secret technique involving a quick butter‑melt that creates a crust that holds together like a well‑built LEGO tower, and a whipping method that gives the cream a cloud‑like lift without any stabilizers. Let me walk you through every single step — by the end, you’ll wonder how you ever made it any other way.
What Makes This Version Stand Out
- Flavor: The vanilla‑kissed cream cheese filling balances the natural tartness of strawberries, creating a harmonious sweet‑tart duet that dances on your tongue.
- Texture: A crunchy graham‑cracker crust meets a buttery melt‑in‑your‑mouth filling, topped with juicy berries that burst with every forkful.
- Simplicity: No oven, no gelatin, no fancy equipment—just a whisk, a bowl, and a fridge, making it perfect for any kitchen skill level.
- Uniqueness: The secret butter‑melt technique gives the crust a firm bite that most no‑bake pies lack, preventing that dreaded soggy bottom.
- Crowd Reaction: Guests often claim they’ve never tasted a strawberry dessert this creamy yet light, and the “wow” factor is instant.
- Ingredient Quality: Fresh, ripe strawberries and real cream cheese shine through, avoiding artificial flavors and preservatives.
- Method: The chilled set time lets flavors meld naturally, delivering a dessert that tastes better the longer it rests.
- Make‑Ahead Potential: Assemble it the night before, and you’ll have a ready‑to‑serve masterpiece that looks as fresh as the day you made it.
Inside the Ingredient List
The Flavor Base
The cream cheese is the heart of this pie, providing a tangy richness that anchors the sweetness of the strawberries. Using full‑fat cream cheese ensures a smooth, velvety mouthfeel; low‑fat versions can turn the filling grainy and less satisfying. If you’re feeling adventurous, a dollop of mascarpone can add an extra layer of buttery luxury without altering the overall balance.
Vanilla extract, though just a teaspoon, acts like the conductor of an orchestra, harmonizing the dairy and fruit notes. Opt for pure vanilla extract rather than imitation; the subtle floral undertones elevate the entire dessert. A quick tip: scrape the seeds from a vanilla bean for an even more aromatic profile.
The Texture Crew
Graham cracker crumbs give the crust its signature crunch and a hint of caramelized sweetness. When combined with melted butter, they form a cohesive base that holds together without the need for additional binders. If you can’t find graham crackers, you can substitute with digestive biscuits for a similar texture and flavor.
Unsalted butter is crucial; it lets you control the salt level and ensures a clean, buttery taste. Melt it gently over low heat to avoid browning, which could introduce a bitter note. A small pinch of sea salt, added after the butter melts, can actually enhance the overall flavor profile by balancing the sweetness.
The Unexpected Star
Fresh strawberries are the show‑stopper, delivering bright acidity and natural sweetness that cut through the richness of the filling. Choose berries that are deep red, firm to the touch, and fragrant; these qualities indicate peak ripeness. If strawberries are out of season, frozen berries (thawed and patted dry) work surprisingly well, though the texture will be slightly softer.
Granulated sugar added to the strawberries helps draw out their juices, creating a natural syrup that coats the fruit like a glossy glaze. This step also prevents the berries from releasing too much moisture into the filling, which could make the crust soggy.
The Final Flourish
Heavy whipping cream is whipped to soft peaks, then folded into the cream cheese mixture, giving the filling an airy lift that feels like a cloud on the tongue. Be careful not to over‑whip; once it reaches stiff peaks, it can become butter‑like and ruin the light texture. A splash of cold milk can rescue over‑whipped cream, bringing it back to a silky consistency.
Powdered sugar sweetens the filling without adding any gritty texture, ensuring the mixture stays silky smooth. If you prefer a less sweet version, you can reduce the powdered sugar by a quarter and let the natural sweetness of the strawberries shine.
Everything's prepped? Good. Let’s get into the real action…
The Method — Step by Step
First, preheat a small skillet over low heat and gently toast the graham cracker crumbs for about 2 minutes, stirring constantly until they emit a nutty aroma. This step is the secret behind a crust that stays crisp even after the pie sits in the fridge. Once toasted, transfer the crumbs to a large bowl.
Kitchen Hack: If you’re short on time, you can microwave the crumbs for 20 seconds on high, then stir; the heat is enough to release the flavor without a skillet.Next, melt the unsalted butter in a saucepan over low heat until it’s just liquid, then pour it over the toasted crumbs. Add the powdered sugar and a pinch of sea salt, mixing until the mixture resembles wet sand. Press this mixture firmly into the bottom of a 9‑inch springform pan, using the back of a measuring cup to smooth it out.
The crust should be even and compact; if it crumbles, press a little more firmly. Once set, place the pan in the freezer for 10 minutes while you prepare the filling. This quick chill helps the crust solidify, preventing it from sliding when you add the filling.
While the crust chills, combine the cream cheese and vanilla extract in a mixing bowl. Beat on medium speed until the mixture is smooth and free of lumps—think of the consistency of a thick frosting. This is where the magic begins: the cream cheese provides that tangy backbone.
Watch Out: Over‑mixing can incorporate too much air, leading to a filling that collapses once chilled. Stop once the mixture is silky.In a separate chilled bowl, whip the heavy cream with the granulated sugar until soft peaks form. The cream should hold its shape but still be supple enough to fold into the cheese mixture without deflating.
Tip: Keep the bowl and whisk in the freezer for 10 minutes before whipping; this guarantees a higher volume and a fluffier texture.
Gently fold the whipped cream into the cream cheese mixture, using a spatula and a gentle lifting motion. This step is pure patience; you want to keep the air you just whipped in, so avoid aggressive stirring.
The resulting filling should be light, airy, and glossy—like a cloud that’s just waiting to settle onto the crust.
Spread the filling evenly over the chilled crust, smoothing the top with an offset spatula. The surface should be level, creating a perfect canvas for the strawberry topping.
At this point, you can either move straight to the strawberries or chill the pie for another 10 minutes to set the filling a bit more firmly.
Now for the star: slice the fresh strawberries into halves or quarters, depending on size, and toss them gently with a tablespoon of granulated sugar. Let them sit for 5 minutes; this draws out their juices, creating a natural syrup.
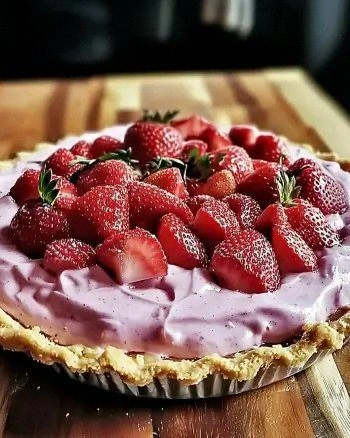
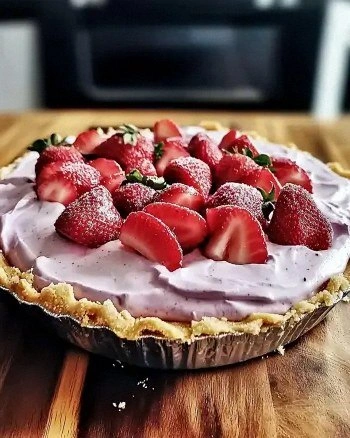
After they’ve macerated, arrange the strawberries artfully on top of the filling, starting from the edges and working your way to the center for a beautiful, uniform look.
Kitchen Hack: Lightly brush the strawberries with a tiny amount of melted white chocolate before arranging; this adds a glossy finish and a subtle chocolate note.Cover the pie loosely with plastic wrap and refrigerate for at least 2 hours, preferably overnight. This chilling time allows the crust to set fully and the flavors to meld into a cohesive whole.
When you’re ready to serve, run a thin knife around the edge of the springform pan to release the pie cleanly. Slice with a warm knife (dip in hot water, wipe dry) for smooth cuts.
That’s it — you did it. But hold on, I’ve got a few more tricks that’ll take this to another level, like a drizzle of balsamic reduction or a sprinkle of toasted almond slivers for extra crunch.
Trust me, these finishing touches turn a great dessert into a show‑stopping masterpiece that will have everyone asking for the recipe.
Insider Tricks for Flawless Results
The Temperature Rule Nobody Follows
Always chill your mixing bowls and whisk attachments before whipping heavy cream. The colder the surface, the faster the fat solidifies, giving you more volume in less time. I once tried to skip this step and ended up with a soupy topping that never set. Keep everything icy, and you’ll get those lofty peaks that hold up beautifully under the weight of the strawberries.
Why Your Nose Knows Best
When toasting the graham crumbs, trust the scent. As soon as you catch a warm, nutty aroma, the crumbs are ready. Over‑toasting can introduce bitterness, while under‑toasting leaves a stale flavor. This sensory cue is more reliable than a timer, especially if you’re juggling multiple tasks.
The 5‑Minute Rest That Changes Everything
After spreading the filling, let the pie rest for five minutes before adding the strawberries. This brief pause lets the surface firm up just enough to hold the fruit without sliding. Skipping this step leads to a soggy top, and nobody wants that.
Layering the Sugar
When macerating strawberries, sprinkle the sugar in two stages: half before the fruit, half after a minute of resting. This technique draws out the juices initially, then re‑sweetens them, creating a balanced syrup that doesn’t drown the berries.
The Final Shine
A quick glaze of warmed apricot jam brushed over the strawberries adds a glossy finish and a subtle tang that lifts the overall flavor. I used this trick at a summer brunch, and the pie looked like it belonged on a magazine cover.
Creative Twists and Variations
This recipe is a playground. Here are some of my favorite ways to switch things up:
Chocolate‑Covered Strawberry Delight
Dip half of the sliced strawberries in melted dark chocolate before arranging them on top. The bittersweet chocolate pairs beautifully with the sweet cream cheese, creating a sophisticated flavor profile that’s perfect for an adult gathering.
Mint‑Infused Summer Breeze
Add a teaspoon of fresh mint leaves, finely chopped, to the whipped cream before folding it in. The mint adds a refreshing coolness that balances the richness, making it an ideal dessert for hot days.
Nutty Crunch Variation
Stir in ¼ cup of toasted chopped pistachios into the crust mixture for an unexpected nutty bite. The green pistachios also add a pop of color that makes the pie visually striking.
Coconut Dream
Replace half of the heavy cream with coconut cream and sprinkle toasted coconut flakes over the strawberry topping. This tropical twist brings a subtle coconut aroma that transports you to a beachside cabana.
Berry Medley Explosion
Swap half of the strawberries for raspberries or blueberries. The mixed berries add a burst of different textures and flavors, while still keeping the pie’s bright, summery vibe.
Storing and Bringing It Back to Life
Fridge Storage
Cover the pie tightly with plastic wrap or a reusable silicone lid and store it in the refrigerator for up to 3 days. The crust stays crisp, and the filling retains its airy texture. If you notice condensation, gently pat the surface with a paper towel before serving.
Freezer Friendly
For longer storage, wrap the entire pie (still in the springform pan) in a double layer of foil, then place it in a freezer‑safe bag. It will keep for up to 1 month. To thaw, move it to the fridge overnight; the gradual thaw preserves the texture.
Best Reheating Method
Although this is a no‑bake dessert, you can gently warm the strawberry topping for a few seconds in the microwave (10‑15 seconds) to release the juices and make the fruit extra luscious. Add a tiny splash of water before microwaving; the steam revives the fruit’s natural gloss without melting the filling.