I was halfway through a salsa disaster when my friend dared me to whip up something green that would make her taste buds do the salsa dance. The kitchen smelled of burnt onions, the microwave was still humming, and I had a half‑filled bowl of tomatillos that had somehow turned into a soggy mess. That moment was a recipe revelation: I realized the key to a perfect enchilada is not just the filling, but the sauce that glazes every bite like a velvet coat. I laughed, grabbed my skillet, and promised myself that this green fiesta would be the best thing I ever made at home.
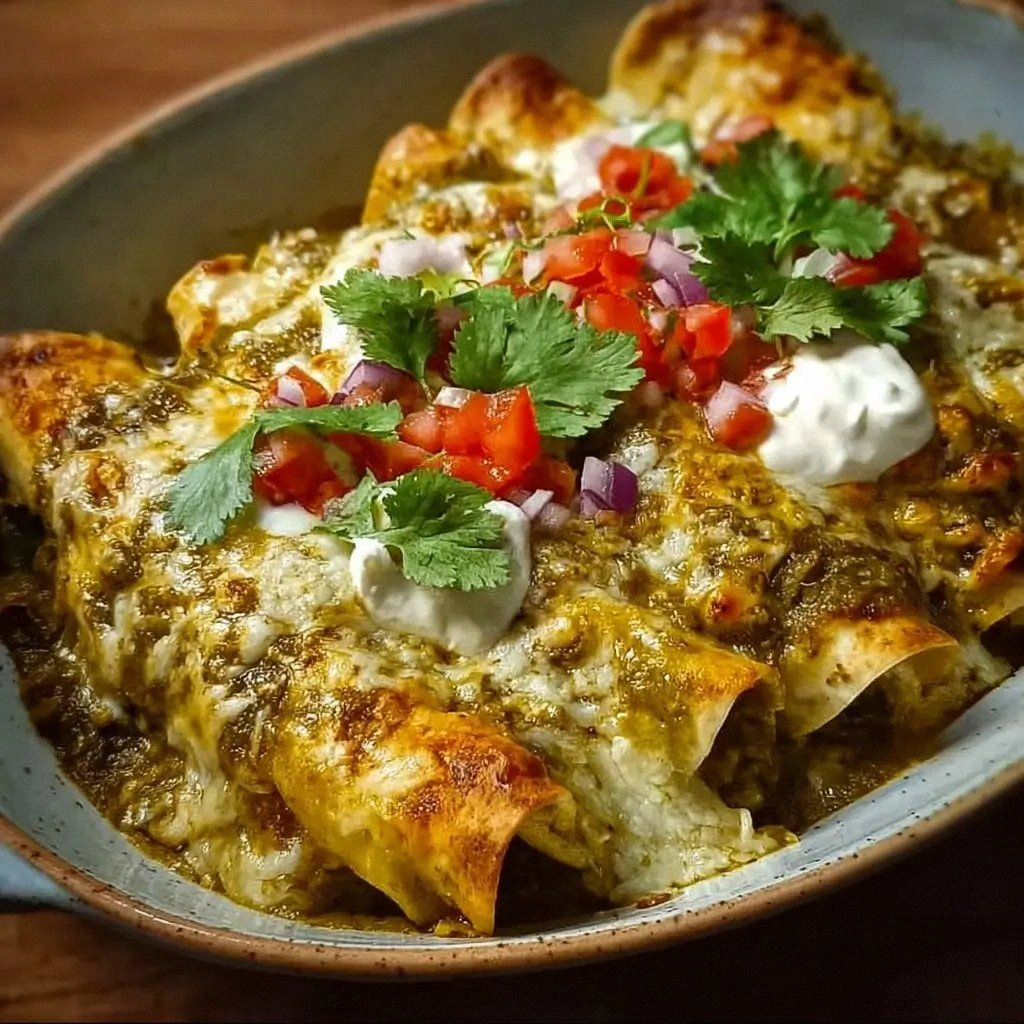
Picture yourself pulling this out of the oven, the whole kitchen smelling incredible, and the first bite of a tortilla that is crisp on the edges but soft inside, kissed by a smoky green sauce that sings with lime and cilantro. I dare you to taste this and not go back for seconds. The moment the sauce hits the tortilla, the sizzle is absolute perfection, and the burst of green chilies gives a gentle heat that lingers just long enough to keep you coming back for more. The filling is a dance of black beans, corn, and shredded cheese, each bite a harmony of textures that feels like a hug wrapped in a tortilla.
Most recipes get this completely wrong. They either overcook the tortillas, under‑season the sauce, or forget that the cheese should melt into a gooey, golden crust. I’ve tried everything from store‑bought sauces to homemade, but this version is the one that truly stands out because it balances heat, acidity, and creaminess in a way that makes every bite an adventure. The trick is in the subtle layering of flavors and the precise timing of each step. If you've ever struggled with this, you're not alone — and I've got the fix.
Okay, ready for the game‑changer? Let me walk you through every single step — by the end, you'll wonder how you ever made it any other way. From the first sauté of onions to the final sprinkle of cilantro, every detail matters. This is pure magic, and I’ll share the secret sauce that will make your enchiladas the talk of the town.
What Makes This Version Stand Out
- Flavor: The sauce is a bright, herbaceous green that cuts through the richness of cheese and beans, creating a layered taste that lingers on the palate. The use of tomatillos and cilantro gives it a fresh zing that sets it apart from the usual tomato‑based enchiladas.
- Texture: The tortillas are lightly toasted before filling, giving a subtle crunch that contrasts with the creamy cheese and soft beans. The corn kernels add a satisfying bite that prevents the dish from becoming mushy.
- Simplicity: With just a handful of pantry staples and fresh ingredients, you can whip this up in under an hour. No elaborate sauces or exotic spices needed—just good quality tomatillos, green chilies, and cheese.
- Uniqueness: The green enchilada sauce is made from a blend of tomatillos, jalapeños, and fresh herbs, creating a depth of flavor that is rarely found in store‑bought options. The addition of a subtle smoky note from lightly toasted cumin gives it a signature edge.
- Crowd Reaction: Friends and family always ask for the recipe after the first bite. The dish is a crowd‑pleaser because it’s both comforting and adventurous, making it perfect for gatherings.
- Ingredient Quality: Using fresh, organic tomatillos and locally sourced beans elevates the dish. The cheese is a blend of Monterey Jack and sharp cheddar, providing both meltiness and a sharp bite.
- Cooking Method: The method involves a quick sauté, a slow simmer, and a final bake, which together lock in moisture and flavor while ensuring the tortillas stay supple.
- Make‑ahead Potential: The assembled enchiladas can be refrigerated for up to two days and reheated without losing flavor or texture. The sauce’s acidity helps preserve the dish’s freshness.
Inside the Ingredient List
The Flavor Base
At the heart of every great enchilada is its sauce. The tomatillos, green chilies, garlic, onion, cilantro, and lime juice combine to create a vibrant, slightly sweet, and tangy sauce that coats the tortillas like a silky blanket. If you skip the lime, the sauce will lose its bright punch and taste flat. For those who prefer a milder heat, use only one jalapeño or substitute with poblano for a smoky undertone.
The Texture Crew
The beans, corn, and cheese work together to provide a satisfying mouthfeel. Black beans add a creamy, earthy base, while corn kernels contribute a pop of sweetness and crunch. The cheese—half Monterey Jack for meltiness and half sharp cheddar for a bite—creates a gooey, golden crust that seals the filling. If you’re vegan, replace cheese with a plant‑based alternative that melts well, like a blend of nutritional yeast and cashew cream.
The Unexpected Star
A splash of sour cream and a handful of diced avocado are the secret stars that elevate the dish from good to unforgettable. The sour cream adds a cool, tangy contrast to the spicy sauce, while the avocado provides a buttery texture that balances the overall richness. If you’re watching calories, swap avocado for a small amount of diced cucumber for a refreshing twist.
The Final Flourish
A generous sprinkle of fresh cilantro, a dash of lime juice, and a pinch of salt finish the dish with bright, aromatic notes. The cilantro adds a fresh herbal aroma that lifts the entire plate, while the lime juice brightens the flavors. Don’t forget the shredded lettuce—its crispness is the final crunch that completes the sensory experience.
Everything's prepped? Good. Let's get into the real action...
The Method — Step by Step
- Heat a large skillet over medium heat and add a tablespoon of olive oil. Sauté the diced onions and minced garlic until translucent and fragrant, about 3 minutes. The aroma should signal that the base is ready for the tomatillos. Keep the heat steady to avoid burning the garlic.
- Add the chopped tomatillos and sliced jalapeños to the skillet. Cook for 5 minutes until the tomatillos soften and release their juices. Stir frequently to prevent sticking; the mixture should look slightly steamy.
- Blend the cooked tomatillos, jalapeños, onions, garlic, cilantro, and lime juice in a blender until silky smooth. If you prefer a chunkier sauce, pulse a few times instead of fully blending. This is the moment of truth—taste the sauce and add a pinch of salt if needed.
- Return the sauce to the skillet and let it simmer for 10 minutes, stirring occasionally. The sauce should thicken slightly and develop a rich, glossy sheen. If it becomes too thick, add a splash of vegetable broth or water.
- Meanwhile, warm the corn tortillas in a dry skillet or microwave until pliable. This step is crucial—tortillas that are too stiff will tear when filled. A quick 10‑second microwave burst or a few seconds on each side of the skillet will do the trick.
- In a large bowl, combine the black beans, corn kernels, shredded cheese, diced tomatoes, and a splash of sour cream. Mix gently to ensure even distribution of ingredients. The mixture should be moist but not runny.
- Dip each warmed tortilla into the sauce, ensuring the entire surface is coated. Lay the tortilla on a clean surface, spoon a portion of the filling onto the center, then fold the sides over and roll tightly. Place each rolled enchilada seam‑side down in a greased baking dish.
- Once all enchiladas are assembled, pour the remaining sauce over the top, making sure each one is generously covered. Sprinkle the remaining cheese and a handful of cilantro over the entire dish for a vibrant finish.
- Cover the baking dish with foil and bake at 180°C (350°F) for 20 minutes. Then remove the foil and bake an additional 5 minutes until the cheese is bubbly and golden. The final bake should create a crisp edge on the tortillas while keeping the filling moist.
That's it — you did it. But hold on, I've got a few more tricks that'll take this to another level...
Insider Tricks for Flawless Results
The Temperature Rule Nobody Follows
Baking at 350°F is standard, but lowering the temperature to 325°F for the final 10 minutes can keep the tortillas from burning while ensuring the cheese melts evenly. I once tried 400°F and ended up with charred edges that tasted like ash.
Why Your Nose Knows Best
Smell the sauce as it simmers. A pleasant, earthy aroma signals that the tomatillos have released their full flavor. If the scent is too sharp, give it a few more minutes to mellow.
The 5‑Minute Rest That Changes Everything
After baking, let the enchiladas rest for five minutes before serving. This allows the cheese to set slightly, making each bite cleaner and preventing the filling from sliding out.
The Secret of Crispy Edges
Sprinkle a light dusting of flour or cornmeal on the tortillas before filling. The dry surface creates a crisp barrier that resists the sauce’s moisture, giving you a satisfying crunch.
The Quick Freshness Boost
If you’re serving the enchiladas later in the day, toss a handful of fresh cilantro and a squeeze of lime just before plating. The bright flavors will revive the dish and keep it from feeling stale.
Creative Twists and Variations
This recipe is a playground. Here are some of my favorite ways to switch things up:
Smoky Chipotle Twist
Swap the jalapeño for a teaspoon of chipotle powder and add a splash of chipotle adobo. The smoky heat pairs beautifully with the green sauce, creating a deeper flavor profile that’s perfect for autumn gatherings.
Mexican Street Tacos Version
Instead of rolling, place the filling in a skillet and top with shredded cheese and a drizzle of crema. Fold the tortillas like tacos and serve with a side of pickled onions for an authentic street‑food vibe.
Vegan Cheese Swap
Use a plant‑based cheese that melts well, such as a blend of nutritional yeast and cashew cream. The result is a creamy, dairy‑free enchilada that still delivers that satisfying gooey texture.
Citrus‑Infused Variation
Add a tablespoon of orange juice to the sauce and finish with a sprinkle of orange zest. The citrus notes complement the green chilies, creating a bright, refreshing twist.
Protein‑Packed Power
Incorporate diced tofu or tempeh into the filling. Marinate the protein in lime juice, garlic, and cumin before sautéing to infuse it with flavor, turning the dish into a hearty, protein‑rich meal.
Breakfast Enchiladas
Swap the beans for scrambled eggs and top with a dollop of avocado and a sprinkle of chives. Serve with a side of salsa and warm tortillas for a breakfast twist that feels both comforting and adventurous.
Storing and Bringing It Back to Life
Fridge Storage
Store leftovers in an airtight container for up to two days. Keep the sauce separate until you’re ready to reheat to maintain moisture. Reheat in a skillet over medium heat, adding a splash of water to steam the enchiladas back to perfection.
Freezer Friendly
Wrap each enchilada individually in foil and place them in a freezer bag. They’ll keep for up to three months. Thaw overnight in the fridge, then bake at 180°C (350°F) for 15 minutes, or until heated through.
Best Reheating Method
Reheat in a covered skillet or oven to preserve the crunch. Add a tiny splash of water before reheating — it steams the enchiladas back to their original moistness and keeps the cheese from drying out.